Introduction
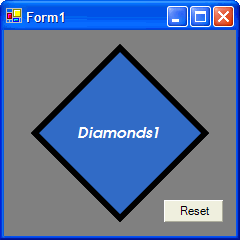
This article will describe some of the considerations and pitfalls to watch out for when designing a custom user control. The DiamondControl sports a custom UIEditor to show the shapes of the controls available when using the Visual Studio designer. It also supports transparency and uses double buffering to provide smooth transitions for the MouseOver color changes. A help file (DiamondControl.chm, generated with VBCommenter and NDoc) is also included in the download.
Background
I designed this control a while back, but I was never satisfied with the results. The border never seemed to be quite right for differing sizes and shapes of the control. Also, the clipping seemed to be off, resulting in the right and bottom edges of the control having an odd look. Since then I've completely rewritten the OnPaint method with a new technique used to define the clipping region of the control, and correct math applied to draw the border properly no matter how the control is sized.
Using the code
Build the solution in the download above, then copy the .dll from the bin folder to your project folder when you need to include this control in a project. Add a reference to the control's .dll in your project, then add one or more instances of the control to your form. You may also want to add the control to the Toolbox in Visual Studio to make it easier to include in your forms. If I'm using this approach, I usually like to copy the control's .dll to the PublicAssemblies folder (located at C:\Program Files\Microsoft Visual Studio .NET 2003\Common7\IDE\PublicAssemblies on my computer) and add the Toolbox reference to that copy.
Points of Interest
To enable transparency and double buffered drawing of the control, I've added the following code to the control's Sub New(), after the call to InitializeComponent():
Dim cs As ControlStyles = _
 ControlStyles.DoubleBuffer Or _
 ControlStyles.AllPaintingInWmPaint Or _
 ControlStyles.ResizeRedraw Or _
 ControlStyles.UserPaint Or _
 ControlStyles.SupportsTransparentBackColor
Me.SetStyle(cs, True)
Me.UpdateStyles()
MyBase.BackColor = Color.Transparent
I originally used the technique of creating a PointF array for the points defining the shape of the control and adding that to a GraphicsPath, then setting the control's region to that GraphicsPath and using FillPath to fill the control. After that step, I was calculating another GraphicsPath using another PointF array which basically divided the control's BorderWidth property by two and used the resulting computed points to call DrawPath to draw the border. This proved unsatisfactory because the border wasn't always uniform and the control region seemed to clip the right and bottom edge of the region area.
My new technique is similar to the original, however, now I'm subtracting one from the ClientSize.Width and ClientSize.Height to account for the control's right and bottom edges not being drawn (I read somewhere that this is a problem encountered when using double buffering to paint a control). I've also decided a better way to fill the control's region would be to avoid DrawPath and simply use FillPath to draw both the center and border of the control.
The way this works is if the control has no border, i.e., the BorderWidth property is set to zero, I simply use the initial GraphicsPath to call FillPath with the color of the button's interior (ButtonColor property).
When the border is used, I first call FillPath with the initially computed GraphicsPath and the border color (qproperty). I then make another call to the Sub which computes the PointF array, the GetFillArray Sub, this time setting the optional isBorder parameter to True. This causes the Sub to calculate an array of points reduced in size by the width of the border, which is then used to call FillPath a second time to fill the interior of the control with the ButtonColor. So the entire control is first filled with the border color, then the interior is repainted with the button color. This doesn't sound as efficient as drawing the border around the control with DrawPath, but I've not noticed any real difference in performance compared with the original code.
Oh, those Borders!
As I mentioned, the original code didn't always create uniform borders on the control. After whipping out some graph paper and drawing several buttons of varying sizes, I decided to go back to school, so to speak, and get serious about the math involved in calculating the correct points to use when drawing the interior of the control. This turned out to be a very non-trivial experience! I finally arrived at what appears to be the perfect mathematical solution for locating these points, using some Geometry and Trigonometry.

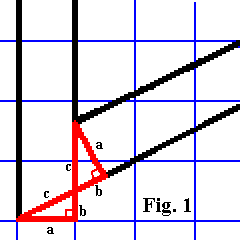
Figure 1 above shows a corner of the control when using the right arrow shape of the control. The two triangles outlined in red turn out to be congruent triangles, that is, they are exactly the same except for their location. It can be seen that the location of the interior corner of the border can be found by adding the lengths of side b of the bottom triangle and side c of the upper one. Further study reveals that the length of side b of the bottom triangle is equal to the tangent of the lower left angle of the bottom triangle, which of course is nothing more than the slope of side c, the hypotenuse. Now this reveals itself to be simply half of the height of the control, divided by the width of the control (slope is defined as change in height divided by change in width, (y2-y1)/(x2-x1) ).
Furthermore, since the two triangles are congruent, or equal, the hypotenuse (side c) of the upper triangle is the same as that of the lower one, which we may easily compute using the Pythagorean theorem, i.e., c2 = a2 + b2. The math is simplified by the fact that side a of the bottom triangle is simply the border width. So for the calculation, we consider side a to be 1, and use the formula:
(Math.Sqrt(m ^ two + one) + m) * mb
where m is the slope, mb is the border width, and one and two are constants defined to be 1.0F and 2.0F respectively. The expression within the inner set of parentheses is the sum of the squares of sides a and b (remember that side b is the tangent, or slope, and side a is taken as 1, representing one 'unit width' of the border). So then, we simply take the square root of that (so we now have the length of side c, the hypotenuse), add to that the slope m (side b), and multiply the whole thing by mb, the border width. Simple, eh?

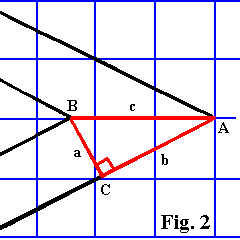
In Figure 2 above, we see another corner of the control, this time the 'point' of the arrow. Fortunately, the math for this one is somewhat simpler than the first! Examining the diagram shows that the length we are interested in is just side c of the triangle highlighted in red. We know angle A, that is, we arrive at its value from the slope of the line, side b. We also know that side a is again the 'unit width' of the border, which we take as 1. So to make a long story short(er), we can use the following formula to arrive at the length of side c:
mb / Math.Sin(Math.Atan(m))
So the inner expression finds the angle whose tangent is m, the slope (Atan(m)), and we use another trig identity to finish, that is:
c = a / sin A
Since a in the expression above is our 'unit width' border, taken as 1, there is no need to write:
mb * (1 / Math.Sin(Math.Atan(m)))
We simply combine terms, multiplying mb * 1 to get mb (what else!) and this simplifies the expression.
Conclusion
I encourage you to read through the source code accompanying this article to see how the values above are used in the GetFillArray Sub, and also how the slopes are calculated. It turns out that to get all four sides/angles for the diamond shape, two slope values are required, one being simply the inverse of the other, i.e., 1 / m. The first is used for the left and right 'points' and the second for the top and bottom 'points' of the diamond.
I wanted to discuss the workings of the custom UIEditor as well, but this article is growing long so I'll leave it up to the reader to download the source code and examine the workings of the UIEditor code.
Update
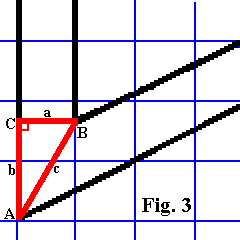
My son had asked me to explain to him about how I arrived at the math used in the calculations for the points described in the article above. After looking at my graph paper drawings, he asked why I didn't just use a similar method for the first point as for the second, instead of relying on the two congruent triangles method. On hearing this, I had to ask myself the same question. Would it really be easier to simply split the angle formed, and use the right triangle based on the half angle to arrive at the necessary length? In order to find out, I made a new drawing as follows:

Here we can see that the length we are interested in is side b of the triangle outlined in red. Side a is our border width, which we will again take as 1. From trigonometry, we know that the tangent of an angle is equal to the opposite side divided by the adjacent side, so here it's: tan A = a / b. From this, it follows that b = a / tan A.
But what about this angle A? We find it to be half of the complimentary angle to the angle formed by the lower sloping line of the control. What luck! We are already calculating the slope of that line, we need it to calculate the length in Figure 2 above. So our angle A is equal to (90 - the lower angle) / 2. Given our slope m from the previous calculations above, this is (90 - atan(m)) / 2 degrees. But realizing that the trig functions in .NET's Math class use radians instead of degrees, we must write:
(Math.PI / 2 - Math.Atan(m)) / 2
So with the border width as variable mb, our simple expression a / tan A becomes:
mb / Math.Tan((Math.PI / 2 - Math.Atan(m)) / 2)
After seeing the complexity of this expression, I decided that:
(Math.Sqrt(m ^ 2 + 1) + m) * mb
might be better after all, even if it's a little harder conceptually to see how it's arrived at!
If you are interested in learning more about trigonometry, check out Dave's Short Trig Course. This site by David E. Joyce of the Department of Mathematics and Computer Science, Clark University Worcester, MA is a treasure trove of trig info. I especially like the intriguing exercises he presents, complete with hints and solutions. Great work, Dave!
History
- 03/06/2005 - Initial release.
- 03/18/2005 - Added update with alternate method to calculate length from Figure 1.
This member has not yet provided a Biography. Assume it's interesting and varied, and probably something to do with programming.
 General
  News
News  Suggestion
  Question
  Bug
Bug  Answer
  Joke
Joke  Praise
  Rant
Rant  Admin
Admin 


