Introduction
This tip details out the steps to build MVC application quickly using the best & quick practices that are provided by ASP.NET MVC. In the application, I am building a School Management website with some simple actions of add/view/edit/delete the Student information.
I have used Visual Studio 2013 along with Update 4, SQL Server 2012 to build this application.
Using the Code
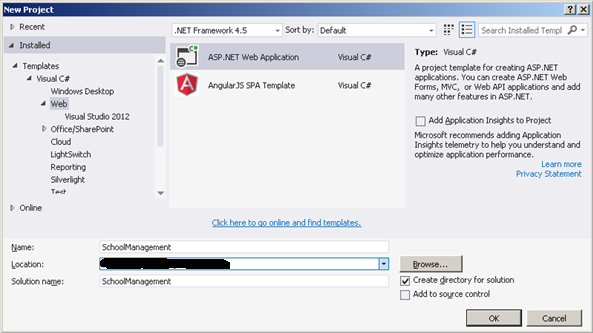
- Start with a New Project - Select ‘ASP.NET Web Application’, name it as
SchoolManagement, as given below:
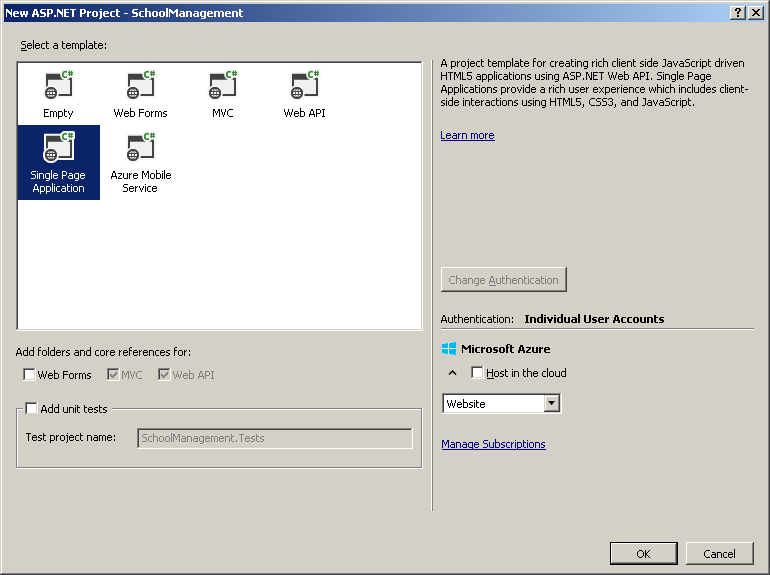
- Select ‘Single Page Application’, as given below:
- Open SQL Server Management Studio and create a new database – ‘
SchoolManagement’. Use the following script for creating a Student table:
USE [SchoolManagement]
GO
SET ANSI_NULLS ON
GO
SET QUOTED_IDENTIFIER ON
GO
SET ANSI_PADDING OFF
GO
CREATE TABLE [dbo].[Student](
[StudentID] [int] IDENTITY(1,1) NOT NULL,
[Name] [varchar](50) NULL,
[Email] [varchar](500) NULL,
[Class] [varchar](50) NULL,
[EnrollYear] [varchar](50) NULL,
[City] [varchar](50) NULL,
[Country] [varchar](50) NULL,
CONSTRAINT [PK_Student] PRIMARY KEY CLUSTERED ( [StudentID] ASC )WITH (PAD_INDEX = OFF, _
STATISTICS_NORECOMPUTE = OFF, IGNORE_DUP_KEY = OFF, ALLOW_ROW_LOCKS = ON, _
ALLOW_PAGE_LOCKS = ON) ON [PRIMARY] ) ON [PRIMARY]
GO
SET ANSI_PADDING OFF
GO
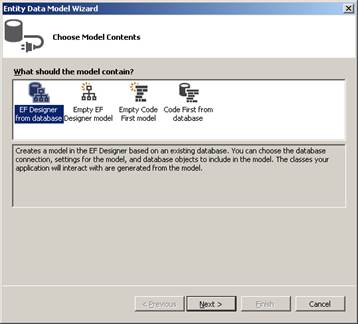
- Right click on the solution, and add a new folder – ‘Entities’.
- Right click on Entities folder, select Add -> ADO.NET Entity Data Model.

- Give the name as ‘
SchoolManagementDB’ and click OK.

- Select ‘EF Designer from database’ and click Next.
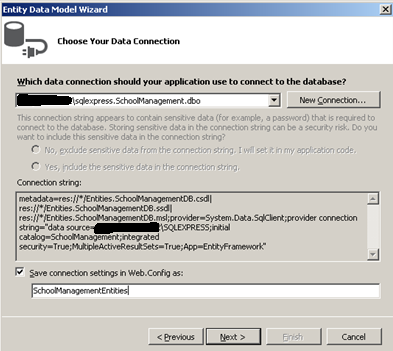
- Click on New Connection. Select the Server Name and Database Name on respective comboboxes.
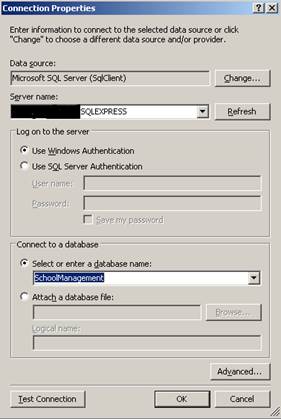
- Click OK.
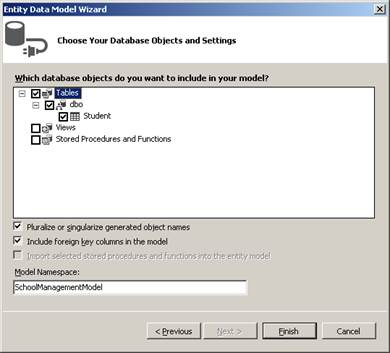
- Click Next and select the table –
Student. Click Finish.
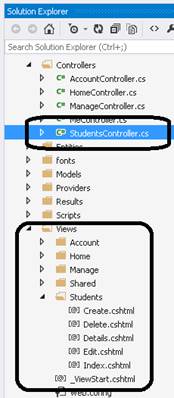
- This would create a file - SchoolManagementDB.edmx, in Entities folder. Rebuild the solution.
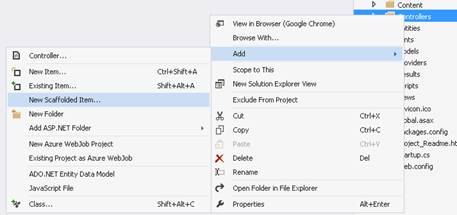
- Right click on Controllers folder, select Add -> New Scaffolded Item.
- Select ‘MVC 5 Controller with views, using Entity Framework’. Click on Add.
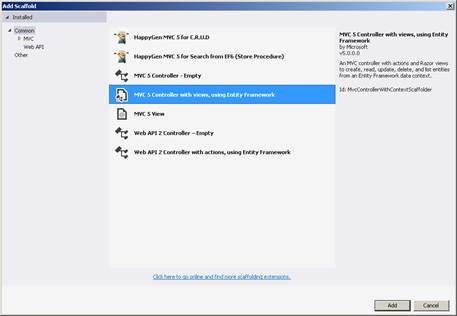
- Select ‘Model Class’ and ‘Data Context Class’ on the ‘Add Controller’ screen. Click on Add.
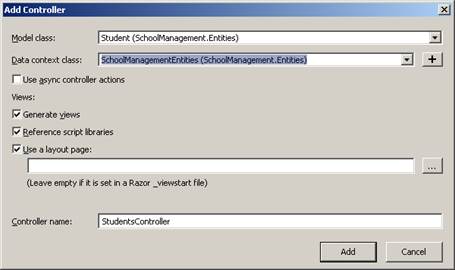
- This would add a ‘
StudentsController’ and related views to Create/Delete/Details/Edit/Index for Student model.
- Now build and run the solution. Enter the URL in your web-browser – ‘http://localhost:XXXX/Students’, after replacing the XXXXX with the actual port numbers that you have received. This should open a screen like the following:
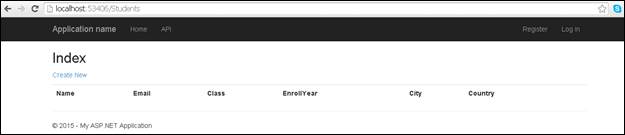
- Here, you can try creating new student information using the link – ‘Create New’. This would subsequently display the other links of Edit/Details/Delete on the same page.
- Now, we can link the
Student views with the main application. Open the ‘_Layout.cshtml’ page, given under Views -> Shared folder. Search for the following link:
<li>@Html.ActionLink("API", "Index", "Help", new { area = "HelpPage" }, null)</li> - Add the following line after the above link:
<li>@Html.ActionLink("Student Info", "Index", "Students", new { area = "" }, null)</li>
"Student Info" specifies Link title.
"Index" specifies the Page name that should be displayed.
"Students" specifies that Controller Name.
- Run the application, and now you can view ‘
Student Info’ link at the top of your application:
- Here, you can click on the link – ‘
Student Info’ and play around.
Authorization
- As a next step, we would put some authorization and validation in our application.
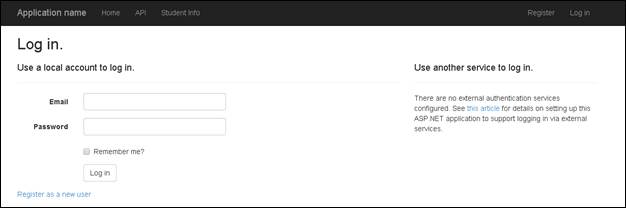
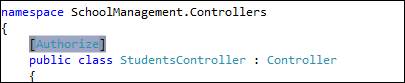
- Open the
StudentsController class and add the attribute – [Authorize], above the class name:
- Rebuild the solution and run it. Now if you click on ‘
Student Info’ link, it would ask you to first login and then let you go to the required page.
Validation
- As of now, if you try to create any new
Student, it doesn’t ask you for any validation. Next, we would follow to provide certain validations like:
- Name, Email, Enroll year should be mandatory
- Email should be in proper email format.
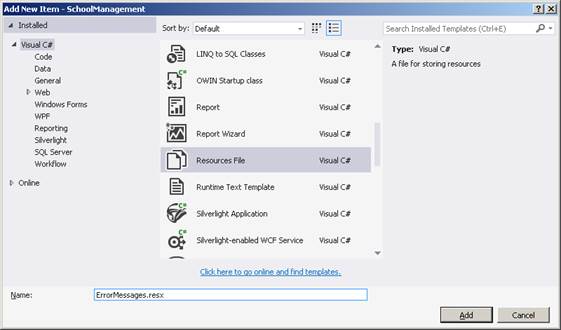
- Right click on the solution and add a new folder, name it as “Resources”.
- Right click on new folder – “Resources” and click on “Add New Item”. Select file type – “Resources File”. Name it as “ErrorMessages.resx”. Click on Add button.
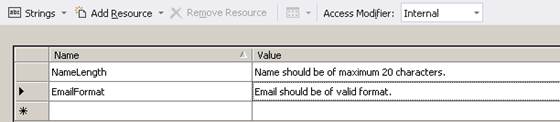
- Add some error messages in resource file, like the following:
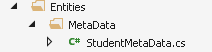
- Add a new folder inside Entities folder, name it as MetaData. Add a new class file inside MetaData folder, name it as StudentMetaData.cs.
- Replace the contents of the above class with the following:
using SchoolManagement.Resources;
using System;
using System.Collections.Generic;
using System.ComponentModel.DataAnnotations;
using System.Linq;
using System.Web;

namespace SchoolManagement.Entities.MetaData
{
 public class StudentMetaData
 {

 [Required]
 [StringLength(20, ErrorMessageResourceType=typeof(ErrorMessages),
 	ErrorMessageResourceName="NameLength" )]
 public string Name { get; set; }


 [Required]
 [EmailAddress(ErrorMessageResourceType = typeof(ErrorMessages),
 	ErrorMessageResourceName = "EmailFormat", ErrorMessage=null)]
 public string Email { get; set; }

 public string Class { get; set; }

 [Required]
 [Display(Name="Enroll Year")]
 public string EnrollYear { get; set; }

 public string City { get; set; }

 public string Country { get; set; }
 }
}
- Add a new class inside Entities folder, name it as PartialClasses.cs. Add the following contents inside this new class:
using SchoolManagement.Entities.MetaData;
using System;
using System.Collections.Generic;
using System.ComponentModel.DataAnnotations;
using System.Linq;
using System.Web;

namespace SchoolManagement.Entities
{
    [MetadataType(typeof(StudentMetaData))]
    public partial class Student
    { }
}
In the above three steps, we have defined a metadata class that would hold all our validations, and then linked this MetaData class to the main Entities class using the partial classes.
We could have added all our validations inside main Entities class (Student.cs), but if needed to refresh Entities from DB, then it would remove all the validations.
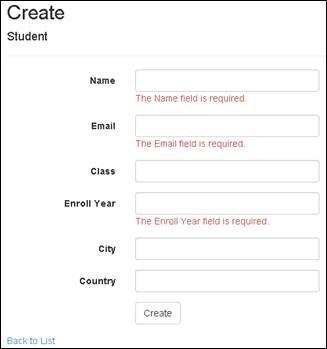
- You can now build and run the application. While you try to add new Student without valid information, it would show the validation messages:
History
- 21st April, 2015: Initial version
This member has not yet provided a Biography. Assume it's interesting and varied, and probably something to do with programming.


 General
  News
News  Suggestion
  Question
  Bug
Bug  Answer
  Joke
Joke  Praise
  Rant
Rant  Admin
Admin 


