Introduction
When we use Visual Studio IDE to create a Windows Form application, Visual Studio makes a project file and a solution file. When you click build button, your project is compiled and then you can run your application by pressing F5 button. This tip will show you how to make your project file from scratch and you will get more insight for the build process.
Good understanding of project build process will help you set up your own build server and CI(i.e. continuous integration) system.
To read this tip, you may need to know basics of MSBuild. Please look at my reference section to help.
This is my second post in codeproject.com. My next post will be on multi-targeting build process.
Background
I want to set up my automatic build process. so I picked up MSBuild technique to test some simple project to get more experience. I guess there is a need there to benefit more people.
This tip will also help in this scenario: if you have Windows SDK 7 installed, but do not have Visual Studio, you still can do .NET programming. If you download a demo project, but you don't have VS IDE, you still can compile this project to see how your demo works. Here is the example to show you how.
Demo Project
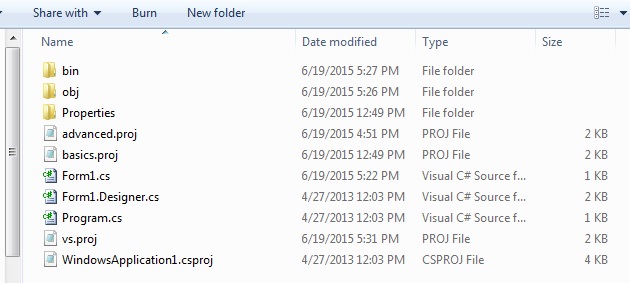
Here I used Visual Studio 2013 and created a Windows Forms application. There is only one form here. It is very simple. I purposely removed WindowApplication1.csproj file to show how to write your own MSBuild project file to build this project manually by submitting MSBuild commands.
The file structure is explained by the following two screenshots:
Project files and folders are listed here:
The files under Properties folder are listed here:

Create MSBuild Project File basics.proj
You can use any text editor to write the following MSBuild project file in XML format. I use NotePad++. As you can see, I just use basic property and item in MSBuild.
<Project xmlns="http://schemas.microsoft.com/developer/msbuild/2003"
DefaultTargets="Build" ToolsVersion="12">

 <ItemGroup>
  <FilesToCompile Include="Form1.cs" />
  <FilesToCompile Include="Form1.Designer.cs" />
  <FilesToCompile Include="Program.cs" />
  <FilesToCompile Include="Properties\AssemblyInfo.cs" />
  <FilesToCompile Include="Properties\Resources.Designer.cs" />
  <FilesToCompile Include="Properties\Settings.Designer.cs" />
 </ItemGroup>

 <ItemGroup>
  <ResourceFiles Include="Properties\Resources.resx" />
 </ItemGroup>

 <PropertyGroup>
  <OutputDir>bin\debug</OutputDir>
  <OutputAssembly>$(OutputDir)\aForm.exe</OutputAssembly>
  <Optimize>false</Optimize>
 </PropertyGroup>
 <Target Name="Build">
  <Message Text="build MSbuild project file from scratch" />
  <MakeDir Directories="$(OutputDir)"/>
  <GenerateResource Sources="@(ResourceFiles)">
   <Output TaskParameter="OutputResources" ItemName="CompiledResources"/>
  </GenerateResource>
  <Csc Sources="@(FilesToCompile)" OutputAssembly="$(OutputAssembly)"
   Optimize="$(Optimize)" TargetType="exe"
   Resources="@(CompiledResources)"/>
 </Target>

</Project>
Instructions to Run the basics.proj
Firstly let's discuss the case that you do not have Visual Studio IDE installed on your computer. On build server, it is always the case. First, you need to find out where your MSBuild installled. Find out the path where msbuild.exe resides. For my case, MSBuild version 12 is installed in C:\Program Files (x86)\MSBuild\12.0\Bin. So under your project file folder, in the same level as basics.proj, created a DOS batch file set.bat using your text editor. Inside this set.bat, write this statement: set path=C:\Program Files (x86)\MSBuild\12.0\Bin; Then save this file. Before you run any msbuild command, please run set.bat first. It will set your current path to this bin folder. If you don't have MSBuild version 12 installed, at least you will have MSBuild version 4. The path shall be C:\Windows\Microsoft.NET\Framework64\v4.0.30319. So set your PATH to this value.
Secondly, if you have Visual Studio IDE installed, you may save more typing keyboard. You need to run Visual Studio command prompt so that you have the right MSBuild path. You can see my screen shot below:
Please use DOS command to go to the project folder where you put downloaded file and submit the following command:
Now go to your bin folder and you will see the executable is there.
Create MSBuild Project File advanced.proj
Now we add more control to our build process. We define a property Config to see if it is debug mode or release mode, and then decide if we can create optimized or not optimized executable file.
<Project xmlns="http://schemas.microsoft.com/developer/msbuild/2003"
DefaultTargets="Build" ToolsVersion="12">
<ItemGroup>
<FilesToCompile Include="Form1.cs" />
<FilesToCompile Include="Form1.Designer.cs" />
<FilesToCompile Include="Program.cs" />
<FilesToCompile Include="Properties\AssemblyInfo.cs" />
<FilesToCompile Include="Properties\Resources.Designer.cs" />
<FilesToCompile Include="Properties\Settings.Designer.cs" />
</ItemGroup>
<ItemGroup>
<ResourceFiles Include="Properties\Resources.resx" />
</ItemGroup>
<PropertyGroup>
<Config Condition="'$(Config)' == '' Or '$(Config)' != 'Debug' Or
'$(Config)' != 'Release'">Debug</Config>
</PropertyGroup>
<PropertyGroup Condition="'$(Config)'=='Debug'">
<OutputDir>bin\debug</OutputDir>
<Optimize>false</Optimize>
</PropertyGroup>
<PropertyGroup Condition="'$(Config)'=='Release'">
<OutputDir>bin\release</OutputDir>
<Optimize>true</Optimize>
</PropertyGroup>
<PropertyGroup>
<OutputAssembly> $(OutputDir)\myapp.exe</OutputAssembly>
</PropertyGroup>
<Target Name="Build">
<Message Text="build MSbuild project file from scratch" />
<Message Text="the property config is: $(Config)" />
<Message Text="final output directory: $(OutputDir)" />
<MakeDir Directories="$(OutputDir)"/>
<GenerateResource Sources="@(ResourceFiles)">
<Output TaskParameter="OutputResources" ItemName="CompiledResources"/>
</GenerateResource>
<Csc Sources="@(FilesToCompile)" OutputAssembly="$(OutputAssembly)"
Optimize="$(Optimize)" TargetType="exe"
Resources="@(CompiledResources)"/>
</Target>
</Project>
Instructions to Run advanced.proj
It is the same steps as above. You need to start Visual Studio command prompt to run MSBuild command there to get the right path set up. Here is the screenshot for the details:
Create MSBuild Project File vs.proj to Integrate with Visual Studio IDE
We can import Microsoft.CSharp.Targets file into our project and remove Csc task. So we can follow the standard process defined in Microsoft.CSharp.Targets to compile our project. So we need to use Compile as item name to include C# source file. We use EmbeddedResources item name to include resource file. AssemblyName and OutputType properties need to be defined here by Microsoft.CSharp.Targets specifications.
As observed, you need to add Reference items into this project file too. Otherwise, you will get errors.
We also demo how to use BeforeBuild target and AfterBuild target. So you can see you can customize the build processes.
<Project xmlns="http://schemas.microsoft.com/developer/msbuild/2003"
DefaultTargets="Build" ToolsVersion="12">
<ItemGroup>
<Compile Include="Form1.cs" />
<Compile Include="Form1.Designer.cs" />
<Compile Include="Program.cs" />
<Compile Include="Properties\AssemblyInfo.cs" />
<Compile Include="Properties\Resources.Designer.cs" />
<Compile Include="Properties\Settings.Designer.cs" />
</ItemGroup>
<ItemGroup>
<EmbeddedResource Include="Properties\Resources.resx" />
</ItemGroup>
<ItemGroup>
<Reference Include="System" />
<Reference Include="System.Data" />
<Reference Include="System.Deployment" />
<Reference Include="System.Drawing" />
<Reference Include="System.Windows.Forms" />
<Reference Include="System.Xml" />
</ItemGroup>
<PropertyGroup>
<AssemblyName>vsapp</AssemblyName>
<OutputType>Exe</OutputType>
</PropertyGroup>
<PropertyGroup>
<Configuration Condition="'$(Configuration)' == ''">Debug</Configuration>
</PropertyGroup>
<PropertyGroup Condition="'$(Configuration)'=='Debug'">
<OutputPath>bin\Debug\</OutputPath>
<Optimize>false</Optimize>
</PropertyGroup>
<PropertyGroup Condition="'$(Configuration)'=='Release'">
<OutputPath>bin\Release\</OutputPath>
<Optimize>true</Optimize>
</PropertyGroup>
<Import Project="$(MSBuildBinPath)\Microsoft.CSharp.targets" />
<Target Name="BeforeBuild">
<Message Text="build MSbuild project file from scratch" />
<Message Text="the property Configuration is: $(Configuration)" />
<Message Text="final output directory: $(OutputPath)" />
<Message Text="MSBuild installation path: $(MSBuildBinPath) " />
</Target>
<Target Name="AfterBuild">
<Message Text="AfterBuild step" />
</Target>
</Project>
Instructions to Run vs.proj
Please follow the same step as above by using Visual Studio command prompt. You will get the following result:
If you do not have Visual Studio IDE installed, you need to run set.bat first under command line under the same folder as project file. Because we define property Configuration in our vs.proj file, we can build this demo project in both ways:
- MSBuild vs.proj /p:Configuration=Debug
- MSBuild vs.proj /p:Configuration=Release
If you want to see more details of the two building processes, you can set another property as below:
- MSBuild vs.proj /p:Configuration=Debug /clp:v=d
- MSBuild vs.proj /p:Configuration=Release /clp:v=d
If you open the project file vs.proj inside Visual Studio 2013, you will see Visual Studio can understand it. If you run Build by pressing F5 button, you will get the project compiled smoothly.
Points of Interest
If you follow these steps to build the project files, you will see how Visual Studio IDE builds the project. Among the project file, DefaultTargets="Build". This is the same process as you click button Build from Visual Studio IDE Build menu item. The Build matches to Build target in the project file vs.proj.
If you do not have Visual Studio 2013, you may need to change project ToolsVersion="12" to "4", or remove it.
This is my first post on CodeProject. I hope you like it. Feedback is appreciated. My next article will be multi-targeting build process. Stay tuned.
References
- Introduction to MSBuild
http://www.codeproject.com/Articles/12985/Practical-NET-and-C-An-introduction-to-MSBuild - Customising your build process with MSBuild
http://www.developerfusion.com/article/84411/customising-your-build-process-with-msbuild/ - Inside MSBuild Engine
http://andreaspacific.com/Files/Inside_the_Microsoft_Build_Engine_Second_Edition.pdf
History
- 06-04-2015 Initialized this tip
- 06-20-2015 Finished this tip
turns good thoughts into actions...


 General
  News
News  Suggestion
  Question
  Bug
Bug  Answer
  Joke
Joke  Praise
  Rant
Rant  Admin
Admin 


