Remote object on IIS
Problem: Some times we need the same unchanged set of data from database such as user, cities, countries, etc. How to avoid accessing the database repeatedly, to enhance the server performance?
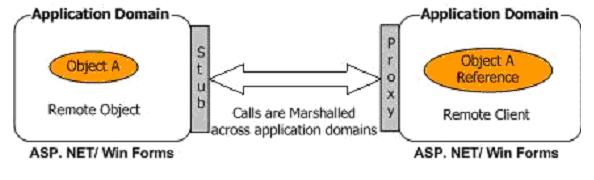
Solution: Use the .NET remoting Singleton object hosted by IIS. So the object will be shared for all applications. One program can populate the data from the database to be run as service. Other applications can access this object from IIS (see the following figure).
Let us take the following example (for Users).
Remote Object Lifetime
InitializeLifetimeService inherited from MarshByREfObejct (see code below).
public override Object InitializeLifetimeService ()
{
return null;
}
IIS configuration
In the Web.Config file:
<configuration>
  <system.runtime.remoting>
    <application>
      <service>
        <wellknown mode="Singleton"
type="UsersNamespace.UserClass, Users" objectUri="Users.rem" />
      </service>
    </application>
  </system.runtime.remoting>
</configuration>
Mode=Singleton means a single instance of object services all clients
type="UsersNamespace.UserClass - The format is namespace.class.assembly
objectUri="Users.rem" - Must be .rem or .soap
Note: The other mode is Singlecall which means it will be a new instance of object on every client use.
How to call the remote object from the client
Add reference to remote object.
UserClass obj =
  (UserClass)Activator.GetObject(typeof(UserClass),
  "http://localHost/Users/Users.rem");

return  obj.GetUsers(User);
typeof(UserClass) - The object type
http://localHost/Users/Users.rem - The remote object
IIS setup
Create new directory in C:\interup\wwwroot. Let us call it "Users".

This directory contains: the bin directory (which contains the User.dll Object) & web.config file.
Complete the wizard as default values. Then your object is hosted on IIS.
Develop a Windows service
Problem: Schedule a task. Time bound base. To populate the user from databases to above mentioned remote object.
Solution: Develop a Windows service.
To make benefit of Event Log:
public MyNewService()
{
InitializeComponent()
if(!System.Diagnostics.EventLog.SourceExists("DoDyLogSourse"))
System.Diagnostics.EventLog.CreateEventSource("DoDyLogSourse",
"DoDyLog");
eventLog1.Source = "DoDyLogSourse";
eventLog1.Log = "DoDyLog";
}
Use the System.Timers.Timer component.
Warring: Use Component Timer not Form timer.
- Add timer start on
Onstart event
protected override void OnStart(string[] args)
{
    this.timer1.Start();
}
- Add timer stop on
Onstop event
protected override void OnStop()
{
   this.timer1.Stop();
}
- Add timer start on
OnContinue event
protected override void OnContinue()
{
    this.timer1.Start();
}
- Add the required code of populate user under
timer1_Elapsed event.
To build your service project
- In Solution Explorer, right-click your project and select Properties from the shortcut menu. The project's Property Pages dialog box appears.
- In the left pane, select the General tab in the Common Properties folder.
- From the Startup Object list, choose MyNewService. Click OK.
- Press Ctrl+Shift+B to build the project.
Now that the project is built, it can be deployed. A setup project will install the compiled project files and run the installers needed to run the Windows service. To create a complete setup project, you will need to add the project output, MyNewService.exe, to the setup project and then add a custom action to have MyNewService.exe installed.
To create a setup project for your service
- On the File menu, point to Add Project, and then choose New Project.
- In the Project Types pane, select the Setup and Deployment Projects folder.
- In the Templates pane, select Setup Project. Name the project MyServiceSetup.
A setup project is added to the solution. Next you will add the output from the Windows service project, MyNewService.exe, to the setup.
To add MyNewService.exe to the setup project
- In Solution Explorer, right-click MyServiceSetup, point to Add, then choose Project Output. The Add Project Output Group dialog box appears.
- MyNewService is selected in the Project box.
- From the list box, select Primary Output, and click OK.
A project item for the primary output of MyNewService is added to the setup project. Now add a custom action to install the MyNewService.exe file.
To add a custom action to the setup project
- In Solution Explorer, right-click the setup project, point to View, then choose Custom Actions. The Custom Actions editor appears.
- In the Custom Actions editor, right-click the Custom Actions node and choose Add Custom Action. The Select Item in Project dialog box appears.
- Double-click the application folder in the list box to open it, select primary output from MyNewService (Active), and click OK. The primary output is added to all four nodes of the custom actions — Install, Commit, Rollback, and Uninstall.
- Build the setup project.
To install the Windows service
Browse to the directory where the setup project was saved, and run the .msi file to install MyNewService.exe.
To start and stop your service
- Open the Services Control Manager by doing one of the following:
- In Windows 2000 Professional, right-click My Computer on the desktop, then click Manage. In the Computer Management Console, expand the Services and Applications node.
- Or -
- In Windows 2000 Server, click Start, point to Programs, click Administrative Tools, and then click Services.
Note: In Windows NT version 4.0, you can open this dialog box from Control Panel.
- You should now see MyNewService listed in the Services section of the window.
- Select your service in the list, right-click it, and then click Start.
Right-click the service, and then click Stop.
To verify the event log output of your service
Open Server Explorer and access the Event Logs node. For more information, see Working with Event Logs in Server Explorer.
Note: The Servers node of Server Explorer is not available in the Standard Edition of Visual Basic and Visual C# .NET.
To uninstall your service
- On the Start menu, open Control Panel and click Add/Remove Programs, and then locate your service and click Uninstall.
- You can also uninstall the program by right-clicking the program icon for the .msi file and selecting Uninstall
This member has not yet provided a Biography. Assume it's interesting and varied, and probably something to do with programming.


 General
  News
News  Suggestion
  Question
  Bug
Bug  Answer
  Joke
Joke  Praise
  Rant
Rant  Admin
Admin 


