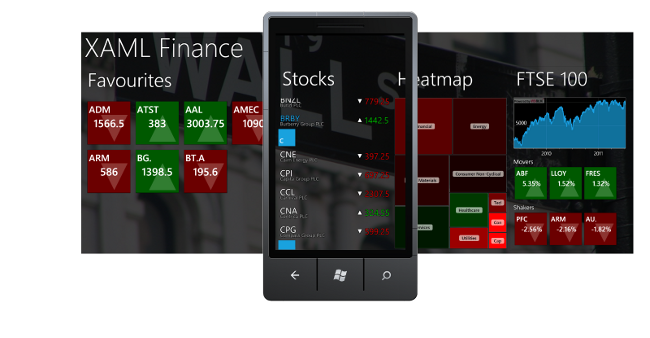
The Windows Phone 7 Panorama control is widely used in applications and to many has come to symbolize the Metro Design Language. Search for panorama images and you will find numerous promo-shots of Windows Phone 7 applications which display the panoramic contents of the application hub, with an image of a phone above it illustrating how the panorama slides through your viewport.
The image below shows a promo-shot for XAMLFinance, an application I have been working on:

Creating images like the one above takes a bit of work, fortunately, you can turn off the parallax scrolling effect of the control (as described in this blog post), allowing for easier image stitching, however the process is still quite manual.
For a bit of fun, I thought it would be nice to template the Panorama control itself in order to display the full panorama contents on the emulator within a single screen, so that I can create my promo-shot with a single screengrab.
Unfortunately, the Panorama control is a little too tightly coupled to its template to allow this kind of radical re-design, so the next best options is to create a new page that hosts my PanoramaItems within an ItemsControl and style that.
So, we’ll start with a page which hosts our items within an ItemsControl:
<ItemsControl Style="{StaticResource ItemsControlStyle}">
<ItemsControl.Background>
<ImageBrush ImageSource="PanoramaBackground.jpg" Opacity="0.5"/>
</ItemsControl.Background>
<controls:PanoramaItem Header="item1" Style="{StaticResource PanoramaItemStyle}">
<Grid>
...
</Grid>
</controls:PanoramaItem>
<controls:PanoramaItem Header="item2" Style="{StaticResource PanoramaItemStyle}">
<Grid>
...
</Grid>
</controls:PanoramaItem>
<controls:PanoramaItem Header="item3" Style="{StaticResource PanoramaItemStyle}">
<Grid>
...
</Grid>
</controls:PanoramaItem>
</ItemsControl>
We need to shrink each of those PanoramaItem instances so that they all fit on a single screen. We can easily shrink them with a ScaleTransform, however Silverlight only supports render transforms, what we really need here is a transform that affects layout also (for a brief overview of the difference see this blog post). Fortunately, the Silverlight Toolkit has a LayoutTransformer class which emulates this behaviour, and whilst it is not available in the WP7 release, copying the code across, I found it to be entirely compatible with the Silverlight WP7 version.
We can shrink our PanoramaItems as follows:
<system:Double x:Key="Scale">0.5</system:Double>
<Style x:Key="PanoramaItemStyle" TargetType="controls:PanoramaItem">
<Setter Property="Width" Value="260"/>
<Setter Property="Height" Value="290"/>
<Setter Property="Template">
<Setter.Value>
<ControlTemplate TargetType="controls:PanoramaItem">
<local:LayoutTransformer>
<local:LayoutTransformer.LayoutTransform>
<ScaleTransform ScaleX="{StaticResource Scale}"
ScaleY="{StaticResource Scale}"/>
</local:LayoutTransformer.LayoutTransform>
<Grid Background="{TemplateBinding Background}" Margin="12,0,0,0">
<Grid.RowDefinitions>
<RowDefinition Height="auto"/>
<RowDefinition Height="*"/>
</Grid.RowDefinitions>
<ContentControl x:Name="header"
ContentTemplate="{TemplateBinding HeaderTemplate}"
Content="{TemplateBinding Header}"
FontSize="{StaticResource PhoneFontSizeExtraExtraLarge}"
FontFamily="{StaticResource PhoneFontFamilySemiLight}"
HorizontalAlignment="Left" Margin="10,-2,0,26">
<ContentControl.RenderTransform>
<TranslateTransform x:Name="headerTransform"/>
</ContentControl.RenderTransform>
</ContentControl>
<ContentPresenter Content="{TemplateBinding Content}"
HorizontalAlignment="{TemplateBinding HorizontalContentAlignment}"
Margin="{TemplateBinding Padding}" Grid.Row="1"
VerticalAlignment="{TemplateBinding VerticalContentAlignment}"/>
</Grid>
</local:LayoutTransformer>
</ControlTemplate>
</Setter.Value>
</Setter>
</Style>
Now we need to styles and template the ItemsControl so that it looks like a Panorama. This is done as follows:
<Style TargetType="ItemsControl" x:Key="ItemsControlStyle">
<Setter Property="VerticalAlignment" Value="Center"/>
<Setter Property="HorizontalAlignment" Value="Center"/>
<Setter Property="ItemsPanel">
<Setter.Value>
<ItemsPanelTemplate>
<tk:WrapPanel Orientation="Horizontal"/>
</ItemsPanelTemplate>
</Setter.Value>
</Setter>
<Setter Property="Template">
<Setter.Value>
<ControlTemplate>
<Grid Background="{TemplateBinding Background}">
<Grid.RowDefinitions>
<RowDefinition Height="auto"/>
<RowDefinition Height="*"/>
</Grid.RowDefinitions>
<local:LayoutTransformer>
<local:LayoutTransformer.LayoutTransform>
<ScaleTransform ScaleX="{StaticResource Scale}"
ScaleY="{StaticResource Scale}"/>
</local:LayoutTransformer.LayoutTransform>
<TextBlock Text="{TemplateBinding Tag}"
FontSize="180"
FontFamily="{StaticResource PhoneFontFamilySemiLight}"
HorizontalAlignment="Left" Margin="10,-2,0,26"/>
</local:LayoutTransformer>
<ItemsPresenter Grid.Row="1"/>
</Grid>
</ControlTemplate>
</Setter.Value>
</Setter>
</Style>
The end result is that we can see the entire panorama contents in a screen-shot ready state:

The big advantage of this approach is that any changes to the application can be reflected in the promo-shot very swiftly. It is also quite good fun having a fully functioning version of your panoramic hub in miniature!
Regards,
Colin E.


