Table of Contents
It is a couple of months I started to write an installer for a web application. I decided to learn how to write it in WIX because I’ve heard positive reviews about it. It wasn’t so easy at the very beginning but the time I’ve spent in that platform is very valuable for me. Since then I realized that having an installer is important part of software delivery process. After writing an installer for a few projects, this activity become easy and fast. In this article I introduce a code for creating an installer for a web application in WIX and I show you how to compile it using commands from command line. I also introduce msbuild script for creating an installer for a web application starts from publishing a web application through harvesting the application content finished by compiling the installer. You will understand the process and thus you will be able to extend it according to the demands of your web application.
In my professional career I’ve been mostly developing ASP.NET web applications. Not all of them but most of them. The software delivery process was always pushed to be secondary activity and therefore underestimated by almost all of the team members. Not only in the early days but also today I meet good programmers with the vision that building installer is not necessary. Xcopy (robocopy) will always work well and raised issues will be solved ad-hoc in the production environment. But that’s not professional, isn’t it? Well, if you are creating a blog page for you or friend of yours which should be deployed to a hosting service then you probably don’t need to create an installer for it. You will probably have no option to execute the installer on the hosting service because of lacking privileges. The only thing you will have available is FTP access. So, why is needed to write an installer for a web application anyway? I would consider to write an installer for a web application which should be installed more than once and by someone else than the author of the web application. I would also consider to write an installer for a web application if there is the continuous integration or continuous delivery process as the part of the development. To be clear about that have a look at two following Figures.

Figure B01
Figure B01 is showing an example which should be familiar for those who are working in a large company. Developers are creating software and administrators are taking care of servers. They don’t know each other and in the company is high fluctuation. In this case administrators are getting an installer from developers and installing software with no coordination with developers. If the installer is written really well then minimum documentation for administrator is required. If the server crash occurs after a year, the administrator will be able to easily install application again and don’t have to contact the developer who is probably working somewhere else because he/she got a better offer.
Another example where the installer is great option is in case of doing continuous integration. In that case you usually want to redeploy your application during night side by side with nightly build. This situation is caught by Figure B02.
Figure B02
A little theory at the beginning of the article has been fulfilled, so let’s see some code.
The installer needs something on its input. For that reason we need to create a simple web application. Of course, I created one. You can find it in the MyWeb directory in the source code. It’s very simple, contains just a single web page. Despite of simplicity I placed the web application into a solution file of Visual Studio in order to be easily extended by custom libraries. The codes for creating an installer are therefore expecting a solution with web application as an input.
In this chapter I will introduce a code for creating installer in WIX. Used version of WIX is 3.0. I found this code being most universal during several projects I’ve been developing web applications. I mean this is the template I always start with. As in many things, nothing’s perfect, so I modify this template from project to project to be better and better. I do not say that the current version is the best but works well for me. I’m expecting to alter the code in this article in the future if I discover some part to be written better. The installer for web application is like any other applications and could not be written universally for all of the web applications. Though, take it as an example which should be extended according to the demands of your web application. I don’t want to repeat another well written articles, thus, I will not go into very details of the WIX code. I’m expecting from reader to know basics about writing installer using WIX. Very nice resource about WIX itself is the official tutorial [1]. The source code contains also comments for better orientation.
The template, I’m going to introduce now is divided into five files as you can see on Figure C01.
Figure C01 – Block scheme of the source files for an installer.
| File Name | Description |
| ConfigurationInitialize | Declaration of variables used in installer. |
| Product | Main file. Defining target directory structure, main UI, features and so on. |
| IISConfiguration | Doing demanded changes in IIS. |
| UIDialogs | Definition of custom UI screens. |
| MyWebUI | Definition of the order of the UI screens. |
| WebSiteContent | Generated code. Definition of the files from web application output. |
Before describing the code, I should say what the installer exactly does. The visual representation could be seen on Figure C02.
Figure C02 – Steps done by installer
As you can see from the Figure C02 the installer is doing steps which are needed almost for each web application. It is obvious you need to copy your application to some directory on the target computer. You of course need to set up the IIS in order to make the web application available for clients. The step about registering web site to run under ASP.NET 2 is requested especially when you are deploying on IIS 6 and finally changing configuration string is feature that I have always needed in every web application I have ever written. Described actions need input information gathered from the person who processes the installation. Therefore as part of the installer is also the set of UI screens which have to be filled before the installer begins with processing installation.
Note: As you may noticed the installer is creating an application pool. For that action is installer asking for an account under which the pool will be executed. Regarding that account please read [6] for understanding what the account needs. It took me some minutes to figure out why the application pool created by installer is failing to start on particular servers.
This file is an include file, thus, the structure is quite a bit different from the others.
="1.0"="utf-8"
<Include>
<Property Id="VIRTUAL_DIR_VAL" Value="MyWeb" />
<Property Id="WEB_APP_NAME" Value="MyWeb" />
<Property Id="WEB_APP_POOL_IDENTITY_DOMAIN" Value="POOL_DOMAIN" />
<Property Id="WEB_APP_POOL_IDENTITY_NAME" Value="account-name" />
<Property Id="WEB_APP_POOL_IDENTITY_PWD" Hidden="yes" />
<Property Id="CONNECTION_STRING" Value="Data Source=|SERVER|;Initial Catalog=|Database name|;User Id=|LOGIN|;Password=|PASSWORD|;Persist Security Info=True" />
</Include>
Listing C01 – ConfigurationInitialize.wxi
As you can see on the previous listing the file contains just ID/VALUE collection of variables with default values. These values could be customized directly from command line when you are launching the installation. The main reason for having those is for mapping to UI dialogs and using them for parameterization of installation. For example the connection string will be prompted to be specified by user during the installation and finally written into the configuration file.
This code is the main code of the installer. It could be seen in Listing C02.
="1.0"="UTF-8"
<Wix xmlns="http://schemas.microsoft.com/wix/2006/wi"
xmlns:iis="http://schemas.microsoft.com/wix/IIsExtension"
xmlns:util="http://schemas.microsoft.com/wix/UtilExtension"
xmlns:netfx="http://schemas.microsoft.com/wix/NetFxExtension">
<Product Id="{FA1B9338-B6F6-413e-B67F-86CA8BCED6E8}"
Name="MyWeb.Setup"
Language="1033"
Version="1.0.0.0"
Manufacturer="MyWeb.Setup"
UpgradeCode="{E5C9F391-5787-4fd1-81E6-D1A4A91D226D}">
<Package InstallerVersion="200" Compressed="yes" />
<Media Id="1" Cabinet="MyWeb.cab" EmbedCab="yes" />
<PropertyRef Id="NETFRAMEWORK30_SP_LEVEL" />
<Property Id="WIXUI_INSTALLDIR" Value="INSTALLLOCATION" />
<Directory Id="TARGETDIR" Name="SourceDir">
<Directory Id="ProgramFilesFolder">
<Directory Id="INSTALLLOCATION" Name="MyWeb">
<Directory Id="MYWEBWEBSITE" Name="Website">
</Directory>
</Directory>
</Directory>
</Directory>
<Feature Id="Complete"
Title="MyWeb - My awesome web"
Level="1"
Display="expand"
ConfigurableDirectory="INSTALLLOCATION">
<Feature Id="MainContent"
Title="MyWeb Website"
Description="The website content"
Level="1">
<ComponentGroupRef Id="MyWebIssConfiguration" />
<ComponentGroupRef Id="MyWebWebComponents" />
<ComponentRef Id="WebConfigCmp" />
</Feature>
</Feature>
<DirectoryRef Id="MYWEBWEBSITE">
<Component Id="WebConfigCmp" Guid="">
<File Id="WebConfigFile" KeyPath="yes" Source="$(var.publishDir)\Web.config" Vital="yes" />
<util:XmlFile Id="ModifyConnectionString"
                		 Action="setValue"
                		 Permanent="yes"
                		 ElementPath="/configuration/connectionStrings/add[\[]@name='MyConnectionString'[\]]"
                		 Name="connectionString"
                		 File="[#WebConfigFile]"
                		 Value="[CONNECTION_STRING]"
                		 SelectionLanguage="XSLPattern"
                		 Sequence="1" />
</Component>
</DirectoryRef>
<Property Id="FRAMEWORKBASEPATH">
<RegistrySearch Id="FindFrameworkDir" Root="HKLM" Key="SOFTWARE\Microsoft\.NETFramework" Name="InstallRoot" Type="raw"/>
</Property>
<Property Id="ASPNETREGIIS" >
<DirectorySearch Path="[FRAMEWORKBASEPATH]" Depth="4" Id="FindAspNetRegIis">
<FileSearch Name="aspnet_regiis.exe" MinVersion="2.0.5"/>
</DirectorySearch>
</Property>
<CustomAction Id="MakeWepApp20" Directory="MYWEBWEBSITE" ExeCommand="[ASPNETREGIIS] -norestart -s W3SVC/1/ROOT/[WEB_APP_NAME]" Return="check"/>
<InstallExecuteSequence>
<Custom Action="MakeWepApp20" After="InstallFinalize">ASPNETREGIIS AND NOT Installed</Custom>
</InstallExecuteSequence>
<WixVariable Id="WixUILicenseRtf" Value="$(var.MyWebResourceDir)\License.rtf" />
<UIRef Id="MyWebUI" />
</Product>
</Wix>
Listing C02 – Product.wxs
For better understanding the Listing C02 contains comments and the code is not so difficult to understand. What is quite a bit tricky is changing connection string after the configuration file is copied to the desire location. This could be also seen in Listing C03.
<util:XmlFile Id="ModifyConnectionString"
Action="setValue"
Permanent="yes"
ElementPath="/configuration/connectionStrings/add[\[]@name='MyConnectionString'[\]]"
Name="connectionString"
File="[#WebConfigFile]"
Value="[CONNECTION_STRING]"
SelectionLanguage="XSLPattern"
Sequence="1" />
Listing C03 – Customizing connection string.
Because this doesn’t have to be taken as basic knowledge, I point you out the excellent article [2] explaining this code.
According to the name of the file you can guess that this code will take care of IIS configuration. It means creating virtual directory and web application pool. The code could be seen in Listing C04.
="1.0"="UTF-8"
<Wix xmlns="http://schemas.microsoft.com/wix/2006/wi"
xmlns:iis="http://schemas.microsoft.com/wix/IIsExtension"
xmlns:util="http://schemas.microsoft.com/wix/UtilExtension">
<Fragment>
<iis:WebSite Id="DefaultWebSite" Description='Default Web Site'>
<iis:WebAddress Id="AllUnassigned" Port="80" />
</iis:WebSite>
<DirectoryRef Id="MYWEBWEBSITE">
<Component Id="MyWebAppPoolCmp" Guid="" KeyPath="yes">
<util:User Id="MyWebAppPoolUser"
CreateUser="no"
Name="[WEB_APP_POOL_IDENTITY_NAME]"
Password="[WEB_APP_POOL_IDENTITY_PWD]"
Domain="[WEB_APP_POOL_IDENTITY_DOMAIN]" />
<iis:WebAppPool Id="MyWebAppPool"
Name="[WEB_APP_NAME]"
Identity="other"
User="MyWebAppPoolUser" />
</Component>
<Component Id="MyWebVirtualDirCmp" Guid="{751DEB01-ECC1-48ff-869A-65BCEE9E0528}" KeyPath="yes" >
<iis:WebVirtualDir Id="MyWebVirtualDir" Alias="[VIRTUAL_DIR_VAL]" Directory="MYWEBWEBSITE" WebSite="DefaultWebSite">
<iis:WebDirProperties Id="MyWebVirtDirProperties" AnonymousAccess="no" BasicAuthentication="no" WindowsAuthentication="yes" />
<iis:WebApplication Id="MyWebWebApplication" Name="[VIRTUAL_DIR_VAL]" />
</iis:WebVirtualDir>
</Component>
</DirectoryRef>
<ComponentGroup Id="MyWebIssConfiguration">
<ComponentRef Id="MyWebVirtualDirCmp" />
<ComponentRef Id="MyWebAppPoolCmp" />
</ComponentGroup>
</Fragment>
</Wix>
Listing C04 – IIS configuration.
As you noticed the template is using WIX 3.0 IIS extensions to set up the IIS. This is fully compatible with IIS 5 and IIS 6. Fortunately it works with IIS 7 as well but you have to have installed IIS Compatibility Management Pack on the target machine. However, there could be another issue when you try to use some IIS 7 features which are not available on IIS 6. As an example could be considered an application pool running in Integrated mode. In case like this you will have to run custom action to call AppCmd.exe in order to change it because the default mode for application pool is Classic. See [7] for further information.
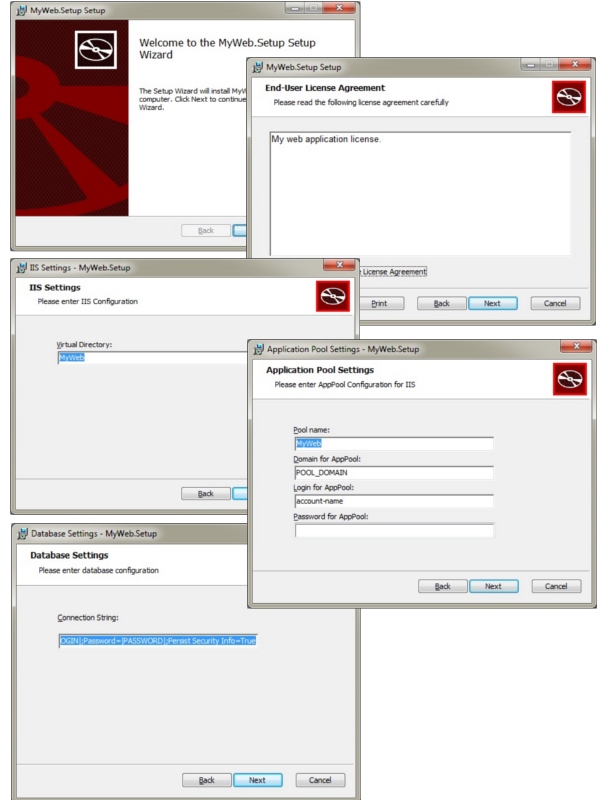
As I mentioned earlier, the installer is collecting information from the user. For that reason is needed to add some custom screens with text boxes which have to fill out. The code is quite a bite verbose as you can see in Listing C05.
="1.0"="UTF-8"
<Wix xmlns="http://schemas.microsoft.com/wix/2006/wi">
<Fragment>
<UI>
<Dialog Id="IisSetupDlg" Width="370" Height="270" Title="IIS Settings - [ProductName]" NoMinimize="yes">
<Control Id="VirtualDirLabel" Type="Text" X="45" Y="73" Width="100" Height="15" TabSkip="no" Text="&Virtual Directory:" />
<Control Id="VirtualDirEdit" Type="Edit" X="45" Y="85" Width="220" Height="18" Property="VIRTUAL_DIR_VAL" Text="{80}" />
<Control Id="Back" Type="PushButton" X="180" Y="243" Width="56" Height="17" Text="&Back">
<Publish Event="NewDialog" Value="LicenseAgreementDlg">1</Publish>
</Control>
<Control Id="Next" Type="PushButton" X="236" Y="243" Width="56" Height="17" Default="yes" Text="&Next">
<Publish Event="NewDialog" Value="PoolSettingsDlg">
<![CDATA[
</Publish>
</Control>
<Control Id="Cancel" Type="PushButton" X="304" Y="243" Width="56" Height="17" Cancel="yes" Text="Cancel">
<Publish Event="SpawnDialog" Value="CancelDlg">1</Publish>
</Control>
<Control Id="BannerBitmap" Type="Bitmap" X="0" Y="0" Width="370" Height="44" TabSkip="no" Text="WixUI_Bmp_Banner" />
<Control Id="Description" Type="Text" X="25" Y="23" Width="280" Height="15" Transparent="yes" NoPrefix="yes">
<Text>Please enter IIS Configuration</Text>
</Control>
<Control Id="BottomLine" Type="Line" X="0" Y="234" Width="370" Height="0" />
<Control Id="Title" Type="Text" X="15" Y="6" Width="200" Height="15" Transparent="yes" NoPrefix="yes">
<Text>{\WixUI_Font_Title}IIS Settings</Text>
</Control>
<Control Id="BannerLine" Type="Line" X="0" Y="44" Width="370" Height="0" />
</Dialog>
<Dialog Id="PoolSettingsDlg" Width="370" Height="270" Title="Application Pool Settings - [ProductName]" NoMinimize="yes">
<Control Id="PoolNameLabel" Type="Text" X="45" Y="73" Width="100" Height="15" TabSkip="no" Text="&Pool name:" />
<Control Id="PoolNameEdit" Type="Edit" X="45" Y="85" Width="220" Height="18" Property="WEB_APP_NAME" Text="{80}" />
<Control Id="DomainPoolLabel" Type="Text" X="45" Y="105" Width="100" Height="15" TabSkip="no" Text="&Domain for AppPool:" />
<Control Id="DomainPoolEdit" Type="Edit" X="45" Y="117" Width="220" Height="18" Property="WEB_APP_POOL_IDENTITY_DOMAIN" Text="{80}" />
<Control Id="LoginPoolLabel" Type="Text" X="45" Y="137" Width="100" Height="15" TabSkip="no" Text="&Login for AppPool:" />
<Control Id="LoginPoolEdit" Type="Edit" X="45" Y="149" Width="220" Height="18" Property="WEB_APP_POOL_IDENTITY_NAME" Text="{80}" />
<Control Id="PasswordPoolLabel" Type="Text" X="45" Y="169" Width="100" Height="15" TabSkip="no" Text="&Password for AppPool:" />
<Control Id="PasswordPoolEdit" Type="Edit" X="45" Y="181" Width="220" Height="18" Property="WEB_APP_POOL_IDENTITY_PWD" Text="{80}" Password="yes" />
<Control Id="Back" Type="PushButton" X="180" Y="243" Width="56" Height="17" Text="&Back">
<Publish Event="NewDialog" Value="IisSetupDlg">1</Publish>
</Control>
<Control Id="Next" Type="PushButton" X="236" Y="243" Width="56" Height="17" Default="yes" Text="&Next">
<Publish Event="NewDialog" Value="ConnectionStringDlg">
<![CDATA[
</Publish>
</Control>
<Control Id="Cancel" Type="PushButton" X="304" Y="243" Width="56" Height="17" Cancel="yes" Text="Cancel">
<Publish Event="SpawnDialog" Value="CancelDlg">1</Publish>
</Control>
<Control Id="BannerBitmap" Type="Bitmap" X="0" Y="0" Width="370" Height="44" TabSkip="no" Text="WixUI_Bmp_Banner" />
<Control Id="Description" Type="Text" X="25" Y="23" Width="280" Height="15" Transparent="yes" NoPrefix="yes">
<Text>Please enter AppPool Configuration for IIS</Text>
</Control>
<Control Id="BottomLine" Type="Line" X="0" Y="234" Width="370" Height="0" />
<Control Id="Title" Type="Text" X="15" Y="6" Width="200" Height="15" Transparent="yes" NoPrefix="yes">
<Text>{\WixUI_Font_Title}Application Pool Settings</Text>
</Control>
<Control Id="BannerLine" Type="Line" X="0" Y="44" Width="370" Height="0" />
</Dialog>
<Dialog Id="ConnectionStringDlg" Width="370" Height="270" Title="Database Settings - [ProductName]" NoMinimize="yes">
<Control Id="ConnectionStringLabel" Type="Text" X="45" Y="73" Width="100" Height="15" TabSkip="no" Text="&Connection String:" />
<Control Id="ConnectionStringEdit" Type="Edit" X="45" Y="95" Width="220" Height="18" Property="CONNECTION_STRING" Text="{200}" />
<Control Id="Back" Type="PushButton" X="180" Y="243" Width="56" Height="17" Text="&Back">
<Publish Event="NewDialog" Value="PoolSettingsDlg">1</Publish>
</Control>
<Control Id="Next" Type="PushButton" X="236" Y="243" Width="56" Height="17" Default="yes" Text="&Next">
<Publish Event="NewDialog" Value="CustomizeDlg">
<![CDATA[
</Publish>
</Control>
<Control Id="Cancel" Type="PushButton" X="304" Y="243" Width="56" Height="17" Cancel="yes" Text="Cancel">
<Publish Event="SpawnDialog" Value="CancelDlg">1</Publish>
</Control>
<Control Id="BannerBitmap" Type="Bitmap" X="0" Y="0" Width="370" Height="44" TabSkip="no" Text="WixUI_Bmp_Banner" />
<Control Id="Description" Type="Text" X="25" Y="23" Width="280" Height="15" Transparent="yes" NoPrefix="yes">
<Text>Please enter database configuration</Text>
</Control>
<Control Id="BottomLine" Type="Line" X="0" Y="234" Width="370" Height="0" />
<Control Id="Title" Type="Text" X="15" Y="6" Width="200" Height="15" Transparent="yes" NoPrefix="yes">
<Text>{\WixUI_Font_Title}Database Settings</Text>
</Control>
<Control Id="BannerLine" Type="Line" X="0" Y="44" Width="370" Height="0" />
</Dialog>
</UI>
</Fragment>
</Wix>
Listing C05 – Custom UI screens.
Basically three screens with definition of labels, text boxes, buttons and their location.
In this file is specified the flow of screens. The code could be seen in Listing C06.
="1.0"="UTF-8"
<Wix xmlns="http://schemas.microsoft.com/wix/2006/wi">
<Fragment>
<UI Id="MyWebUI">
<UIRef Id="WixUI_FeatureTree" />
<UIRef Id="WixUI_ErrorProgressText" />
<DialogRef Id="IisSetupDlg" />
<Publish Dialog="LicenseAgreementDlg" Control="Next" Event="NewDialog" Value="IisSetupDlg" Order="3">LicenseAccepted = "1"</Publish>
<Publish Dialog="CustomizeDlg" Control="Back" Event="NewDialog" Value="ConnectionStringDlg">1</Publish>
</UI>
</Fragment>
</Wix>
Listing C06 – UI flow specification.
Finally we get the last file which is generated content of the web application. In this file will be specified what pages (aspx), css files, javascript codes, dlls and so on will be included in the installer and therefore copied to the desire location during the installation. The way the file is generated is described in the next chapter in very detail.
In the previous chapter we discussed some code to write an install package and now it’s time to compile it. In this chapter I will introduce commands for building msi package. I got used to compile msi packages using commands from command line even though there is a plug-in for Visual Studio. Of course when I started to work with WIX I was using this Visual Studio plug-in but when time passed I was facing some issues with this plug-in. By solving the problems like why the plug-in is not working in different environments I depth into details of what the plug-in actually does and realized that it does almost nothing. So I decided to use command line directly and never came back to that plug-in again. It has also other benefits. For example if you decide to work with different technology in the future like Java or C++ then you will be able to write an install package for it because you know how to do it and you are simply not tied to Visual Studio.
The visual interpretation of the process of creating msi package is described on Figure D1. Basically there are four main steps which should be achieved to create msi package.
Figure D1 – Creating msi package
First step is building solution in release mode in order to be sure that all dll are up to date. This step is followed by publishing web application. It is the publish that everyone knows from Visual Studio (right click on project -> publish). Next is the very important step which is harvesting the web application. Basically say harvesting of the output from the previous step. At last come up the compilation of the WIX code we’ve created in second chapter.
In WIX, harvesting files is recommended to be done once at the beginning. Afterwards the generated content should be kept up manually. See the flow in Figure D2.
Figure D2 - Recomended flow of building an installer.
This approach, however, is not convenient for those people how are planning to use continues integration in their project. It is always very difficult to manually keep up output of a web application. The situation in web application is difficult because side by side adding some files (aspx, css, html) you have to manually update the WIX script. In continues integration you are expecting that your new files and therefore new web application publish will be automatically triggered by process of building install package and your new content will be added to the installer. In order to achieve this goal, you have to run the harvesting of the of the web application output every time a new project build is triggered up. But as I mentioned that’s not recommended.
What could happen if you run harvesting as part of every build? You can (but don’t have to) get strange warnings related to WIX components.
I will go on in this chapter by introducing commands for process I described in the first part of this chapter. I break the rule from Figure D2 and will keep harvesting of files as part of the build.
Let’s see the whole bat script in listing D1.
REM Setting variables...
REM Name of the folder where the 'publish' from msbuild target will be performed
set publishFolder=publish\
REM Remove complete publish folder in order to be sure that evrything will be newly compiled
rmdir /S /Q %publishFolder%
REM Rebuild entire solution
msbuild /p:Configuration=Release /t:ReBuild ..\MyWeb\MyWeb.sln
REM Publish your web site
msbuild /t:ResolveReferences;_CopyWebApplication /p:Configuration=Release;OutDir=..\..\Setup\%publishFolder%\bin\;WebProjectOutputDir=..\..\Setup\%publishFolder% ..\MyWeb\MyWeb\MyWeb.csproj
REM Delete debug and setup web.configs to prevent 'heat' from harveting it
del %publishFolder%web_setup.config
del %publishFolder%web.config
REM Harvest all content of published result
heat dir publish\ -dr MYWEBWEBSITE -ke -srd -cg MyWebWebComponents -var var.publishDir -gg -out WebSiteContent.wxs
REM After the files are beeing harvested, copy the setup web.config as regular web.config back to publish location
copy /Y ..\MyWeb\MyWeb\Web_setup.config %publishFolder%Web.config
REM At last create an installer
candle -ext WixIISExtension -ext WixUtilExtension -ext WiXNetFxExtension -dpublishDir=%publishFolder% -dMyWebResourceDir=. IisConfiguration.wxs Product.wxs WebSiteContent.wxs UiDialogs.wxs MyWebUI.wxs
light -ext WixUIExtension -ext WixIISExtension -ext WixUtilExtension -ext WiXNetFxExtension -out bin\Release\MyWeb.Setup.msi Product.wixobj WebSiteContent.wixobj UiDialogs.wixobj MyWebUI.wixobj IisConfiguration.wixobj
Listing D1 – bat script for building installer.
The script is not so difficult but contains quite interesting things. First two commands are just settings variable and cleaning after the previous build. For specific description please read comments in the script. Thirst command also seen in Listing D2 is building entire solution in order to be sure that all assemblies and linked projects will be up to date. It is also making sure that everything will be up to date in release mode.
msbuild /p:Configuration=Release /t:ReBuild ..\MyWeb\MyWeb.sln
Listing D2 – Building solution in release mode.
The following command seen on Listing D3 is calling also msbuild utility but for your web application and with specific targets.
msbuild /t:ResolveReferences;_CopyWebApplication /p:Configuration=Release;OutDir=..\..\Setup\%publishFolder%\bin\;WebProjectOutputDir=..\..\Setup\%publishFolder% ..\MyWeb\MyWeb\MyWeb.csproj
Listing D3 – Publish of the web application.
The result of the command is same like clicking to button “publish” in the Visual Studio. Basically the command will make a copy of the files which are needed to be deployed to target machine.
Next two commands seen on Listing D4 are deleting two configuration files from the application output. Surly you noticed that the web application has two configuration files: one for local run and one for deploy.
del %publishFolder%web_setup.config
del %publishFolder%web.config
Listing D4 – Deleting configuration files from the output.
Both of them have to be deleted before the harvesting because neither of them is wanted as a file to be harvested. It is so, because the web config file is registered to be in the installer in the Product.wxs. Therefore it can’t be harvested.
Since we have the web application output prepared to be harvested, we can execute the heat utility to do that job. See in Listing D5.
heat dir %publishFolder% -dr MYWEBWEBSITE -ke -srd -cg MyWebWebComponents -var var.publishDir -gg -out WebSiteContent.wxs
Listing D5 – Harvesting web application output.
After files are harvested we can copy the web configuration file back to publish folder but notice that the setup configuration is copied as regular ASP.NET web configuration file. So the final name of the configuration file is web.config.
copy /Y ..\MyWeb\MyWeb\Web_setup.config %publishFolder%Web.config
Listing D6 – copying web configuration file.
Finally everything is ready to compile the WIX code. See in Listing D7 for commands.
candle -ext WixIISExtension -ext WixUtilExtension -ext WiXNetFxExtension -dpublishDir=%publishFolder% -dMyWebResourceDir=. IisConfiguration.wxs Product.wxs WebSiteContent.wxs UiDialogs.wxs MyWebUI.wxs
light -ext WixUIExtension -ext WixIISExtension -ext WixUtilExtension -ext WiXNetFxExtension -out bin\Release\MyWeb.Setup.msi Product.wixobj WebSiteContent.wixobj UiDialogs.wixobj MyWebUI.wixobj IisConfiguration.wixobj
Lising D7 – compile installer.
Keeping the entire build of an installer in bat file could be quite odd and unprofessional. Also in continuous integration, we would like to add more features into build process which could be difficult (but not impossible) to add into bat file. The reason for having the previous chapter is for understanding matter. Now you understand the build process, thus, we can do it little more professional and transfer it to msbuild script. In this chapter I will rewrite the bat script from previous chapter to msbuild script. I expect that reader knows basics about msbuild and how to script in it. It’s really very easy but if you haven’t tried it yet, I point you out to the [3] for online resource or [4] for very nice book. The script could be seen in Listing E01.
="1.0"="utf-8"
<Project ToolsVersion="3.5" DefaultTargets="Build" xmlns="http://schemas.microsoft.com/developer/msbuild/2003">
<PropertyGroup>
<WebSiteSource>..\MyWeb\MyWeb\</WebSiteSource>
<ReleaseWebConfig>Web_setup.config</ReleaseWebConfig>
<PublishF>publish\</PublishF>
<Publish>..\..\Setup\$(PublishF)</Publish>
<MsiOut>bin\Release\MyWeb.Setup.msi</MsiOut>
<WebSiteContentCode>WebSiteContent.wxs</WebSiteContentCode>
<WebSiteContentObject>WebSiteContent.wixobj</WebSiteContentObject>
<WixPath></WixPath>
</PropertyGroup>
<ItemGroup>
<WebSiteContent Include="$(WebSiteContentCode)" />
<WebSiteContent Include="$(WebSiteContentFile)" />
</ItemGroup>
<ItemGroup>
<WebConfigs Include="$(PublishF)Web.config" />
<WebConfigs Include="$(PublishF)$(ReleaseWebConfig)" />
</ItemGroup>
<ItemGroup>
<WixCode Include="IisConfiguration.wxs" />
<WixCode Include="Product.wxs" />
<WixCode Include="$(WebSiteContentCode)" />
<WixCode Include="UiDialogs.wxs" />
<WixCode Include="MyWebUI.wxs" />
</ItemGroup>
<ItemGroup>
<WixObject Include="IisConfiguration.wixobj" />
<WixObject Include="Product.wixobj" />
<WixObject Include="$(WebSiteContentObject)" />
<WixObject Include="UiDialogs.wixobj" />
<WixObject Include="MyWebUI.wixobj" />
</ItemGroup>
<Target Name="Build">
<MSBuild
Projects="..\MyWeb\MyWeb.sln"
Targets="ReBuild"
Properties="Configuration=Release" />
</Target>
<Target Name="CreateInstaller">
<RemoveDir Directories="$(PublishF)" ContinueOnError="false" />
<MSBuild
Projects="..\MyWeb\MyWeb\MyWeb.csproj"
Targets="ResolveReferences;_CopyWebApplication"
Properties="OutDir=$(Publish)bin\;WebProjectOutputDir=$(Publish);Configuration=Release" />
<Delete Files="@(WebConfigs)" />
<Delete Files="@(WixObject)" />
<Delete Files="@(WebSiteContent)" />
<Exec
Command='"$(WixPath)heat" dir $(PublishF) -dr MYWEBWEBSITE -ke -srd -cg MyWebWebComponents -var var.publishDir -gg -out $(WebSiteContentCode)'
ContinueOnError="false"
WorkingDirectory="." />
<Copy
SourceFiles="$(WebSiteSource)$(ReleaseWebConfig)"
DestinationFiles="$(PublishF)Web.config"
ContinueOnError="false" />
<Exec
Command='"$(WixPath)candle" -ext WixIISExtension -ext WixUtilExtension -ext WiXNetFxExtension -dpublishDir=$(PublishF) -dMyWebResourceDir=. @(WixCode, ' ')'
ContinueOnError="false"
WorkingDirectory="." />
<Exec
Command='"$(WixPath)light" -ext WixUIExtension -ext WixIISExtension -ext WixUtilExtension -ext WiXNetFxExtension -out $(MsiOut) @(WixObject, ' ')'
ContinueOnError="false"
WorkingDirectory="." />
<Message Text="Install package has been created." />
</Target>
<Target Name="DeleteTmpFiles">
<RemoveDir Directories="$(PublishF)" ContinueOnError="false" />
<Delete Files="@(WebConfigs);@(WixObject);@(WebSiteContent)" />
</Target>
</Project>
Listing E01 – msbuild script for creating an installer
You probably noticed that the script provides three targets. For rebuilding a solution, creating installer and deleting temporary files. Executing all targets could be done by command from Listing E02.
msbuild /t:Build;CreateInstaller;DeleteTmpFiles build_setup.build
Listing E02 – Execute build script with all targets.
This article summarizes the steps needed for creating an installer in automation way. What else to say at the end? Just enjoy deploying your web application using install package :).
Please don’t hesitate to leave a comment or/and vote. Thanks for reading.
- 3 October 2010
- 12 November 2010
- WIX version added.
- Explaining the compatibility for IIS 7 in chapter IISConfiguration.wxs – configuration of IIS.


