Introduction
While experimenting with Linux programming and the Qt designer, we found it interesting to port to C# the QLayout component which allows to create a layout container that automatically arranges its components on resizing. It is not in a stage where it can be used, and perhaps you will find it a bit difficult, but we still wanted to post it in order to get feedback and to show how to add components, design time behavior and functionality. Let us cross the Rubicon.
Create the Controls
First, we will create our QLayout and QSpacer components. The QLayout is the container component, while the QSpacer is just a contained component. When the QSpacer appears among the QLayout contained components, it will absorb the extra space on resizing. Our intention is only to create some similar behavior rather than cloning the QLayout component.
- Click File -> New -> Project. Create a QtLikeLayout Visual C# Class Library Project
- Delete Class1.cs from QtLikeLayout project in Solution Explorer
- In Solution Explorer, right Click QtLikeLayout project -> Add -> Add Component
- Add a QLayout.cs component class
- Switch to source code. (Ctrl+Alt+0)
Change the inheritance to System.Windows.Forms.Panel
public class QLayout : System.Windows.Forms.Panel
But in order to inherit from Forms.Panel we need to add System.Windows.Forms to our references:
- In Solution Explorer, Right click
QtLikeLayout References -> Add reference. - In .NET tab, select System.Windows.Forms.dll click Ok.
To the using directives on top of the QLayout.cs file, add the following code:
using System.Windows.Forms;
Add a Property
In order to display the Horizontal and Vertical layout behavior of the QLayout component, we need to add a CmpLayout property exposed in designing mode, in the property editor. Given below is an explanation of how this can be done.
First we add a QLayoutProperty enumeration, just before the QLayout class definition:
public enum QLayoutProperty
{
    Horizontal,
    Vertical
}
We need a private property pHLayout to hold the value, and a public method CmpLayout to expose it to the designer property editor, so we add this code to the QLayout class properties and methods:
private QLayoutProperty pHLayout = QLayoutProperty.Horizontal;
[
Category("Layout"),
Description("Controls layout arrangement."),
DefaultValue(QLayoutProperty.Horizontal)
]
public QLayoutProperty CmpLayout
{
get
{
return pHLayout;
}
set
{
pHLayout = value;
this.OnLayout(new LayoutEventArgs(this,""));
}
}
When we add a custom property to a Control, it appears on the property editor at design time. But in the Miscellaneous section, we indicate a Category, Description and Default value Attribute to specify the category in which the property or event will be displayed in the visual designer, and the description and the default value it will get. Note that when we specify a default value, the designer does not add code to initialize the control. So we must be sure to initialize it in the code, either in the constructor or by assigning it a value in the declaration as we have done, and ensure that this value is the same we put in the DefaultValue attribute. In order to set the way controls are justified, we need to add a CtrlsDock property exposed in designing mode, in the property editor. Here is how this can be done.
Again we add a QDockProperty enumeration, just before the QLayout class definition:
public enum QDockProperty
{
Fill,
Side,
Center,
UpSide
}
But we also need a private property
pDock to hold the value, and a public method
CtrlsDock to expose it to the designer property editor, so we add this code to the
QLayout class properties and methods:
private QDockProperty pDock = QDockProperty.Center;
[
Category("Layout"),
Description("Controls justification."),
DefaultValue(QDockProperty.Center)
]
public QDockProperty CtrlsDock
{
get
{
return pDock;
}
set
{
pDock = value;
this.OnLayout(new LayoutEventArgs(this,""));
}
}
Now, let us program the main behavior. We do the Layout arrangement by overriding the
OnLayout Panel inherited component method:
protected override void OnLayout(LayoutEventArgs levent)
{
base.OnLayout (levent);
this.SuspendLayout();
if (pHLayout == QLayoutProperty.Horizontal)
{
int mHeight = this.Height / 2;
int ctrlCount = this.Controls.Count;
int mWidth = (ctrlCount != 0) ? this.Width / ctrlCount : 0;
int pLeft = 0;
int cntSpace = 0;
int ctrlWidths = 0;
foreach (Control ctrl in this.Controls)
{
if (ctrl.GetType().Name == "QSpacer")
cntSpace += 1;
else
ctrlWidths += ctrl.Width;
}
foreach (Control ctrl in this.Controls)
{
if (cntSpace == 0)
{
ctrl.Width = mWidth;
ctrl.Left = pLeft;
ctrlCount --;
pLeft += ctrl.Width;
}
else
{
if (ctrl.GetType().Name == "QSpacer")
{
ctrl.Width = (this.Width - ctrlWidths) / cntSpace;
((QSpacer)ctrl).CmpLayout = QLayoutProperty.Horizontal;
}
ctrl.Left = pLeft;
pLeft += ctrl.Width;
}
switch (this.pDock)
{
case QDockProperty.Fill:
ctrl.Top = 0;
ctrl.Height = this.Height;
break;
case QDockProperty.Side:
ctrl.Top = 0;
break;
case QDockProperty.Center:
ctrl.Top = mHeight - ctrl.Height / 2;
break;
case QDockProperty.UpSide:
ctrl.Top = this.Height - 1 - ctrl.Height;
break;
}
}
}
else
{
int ctrlCount = this.Controls.Count;
int mHeight = this.Height / (ctrlCount + 1);
int mWidth = this.Width / 2;
int pTop = 0;
int ctrlsHeight = 0;
int cntSpace = 0;
int ctrlHeights = 0;
foreach (Control ctrl in this.Controls)
{
if (ctrl.GetType().Name == "QSpacer")
cntSpace += 1;
else
ctrlHeights += ctrl.Height;
ctrlsHeight += ctrl.Height + 1;
}
int sHeight = (this.Height - ctrlHeights) /
(this.Controls.Count + 1);
foreach (Control ctrl in this.Controls)
{
if (cntSpace !=0)
{
if (ctrl.GetType().Name == "QSpacer")
{
ctrl.Height = (this.Height - ctrlHeights) / cntSpace;
((QSpacer)ctrl).CmpLayout = QLayoutProperty.Vertical;
}
}
else
pTop += sHeight;
switch (this.pDock)
{
case QDockProperty.Fill:
ctrl.Left = 0;
ctrl.Width = this.Width;
break;
case QDockProperty.Side:
ctrl.Left = 0;
break;
case QDockProperty.Center:
ctrl.Left = mWidth - ctrl.Width / 2;
break;
case QDockProperty.UpSide:
ctrl.Left = this.Width - 1 - ctrl.Width;
break;
}
ctrl.Top = pTop;
pTop += ctrl.Height;
}
}
this.ResumeLayout();
}
This method generates the automatic arrangement of the contained controls. In the case of Horizontal Layout, we get all components laid out horizontally one after another, and all of them absorb the width of the QLayout panel by resizing. If one or more QSpacers are found, they absorb the extra size and the components are left at the size that they are. The controls are aligned at the center or top or bottom according to the CtrlsDock justification. In the case of Vertical Layout, we get all components laid out vertically one above the other. Here, their distance is proportional to the space left, but they retain the original width. If one or more QSpacers are found, the components are aligned one above the other without any space between them, but the spaces absorb it by resizing. Now lets create the QSpacer control:
- In Solution Explorer, right Click QtLikeLayout project -> Add -> Add Component.
- Add a QSpacer.cs component class.
- Switch to source code. (Ctrl+Alt+0)
Change the inheritance to
System.Windows.Forms.Control
public class QSpacer : System.Windows.Forms.Control
Add a pHLayout private property and a CmpLayout method, to the QSpacer class methods and properties:
private QLayoutProperty pHLayout = QLayoutProperty.Horizontal;
[
Category("Layout"),
Description("Spacer layout arrangement."),
DefaultValue(QLayoutProperty.Horizontal)
]
public QLayoutProperty CmpLayout
{
get
{
return pHLayout;
}
set
{
if ((pHLayout != value) && (DesignMode))
{
pHLayout = value;
if (pHLayout != QLayoutProperty.Horizontal)
this.Width = 23;
else
this.Height = 23;
this.Invalidate();
}
}
}
The controls are usable as they are, but we want to go a step further and give the user feedback as well as more posibilities at design time.
Add a Toolbox Icon
First we will set an image for the controls to show when they appear in the toolbox window:
- In Solution Explorer, right Click QtLikeLayout project -> Add -> Add New Item.
- Expand Local Project Items -> Resources.
- Add a QLayout.bmp Bitmap resource. (Note the name is the same as the control Class)
- Right click QLayout.bmp -> Properties. Set the Build Action property to Embedded Resource.
- Add also a QSpacer.bmp Bitmap resource.
- Right click QSpacer.bmp -> Properties. Set the Build Action property to Embedded Resource.
- Edit the QLayout.bmp and QSpacer.bmp as you like. You must set its size to 16x16.
Push (F7) to build the solution.
Create a Control Designer
Now, we will create a
QSpacerComponentDesigner Control Designer for extending the design mode behavior of our
QSpacer control. We will use it to draw it like a spring just as the Qt Designer does at design time.
- In Solution Explorer, right Click the QtLikeLayout project -> Add ->Add Class.
- Add a QSpacerComponentDesigner.cs class.
Change the inheritance to System.Windows.Forms.Panel:
public class QSpacerComponentDesigner : System.Windows.Forms.Design.ControlDesigner
We need to add System.Design.dll and System.Drawing.dll to our references:
- In Solution Explorer, Right click
QtLikeLayout References -> Add reference. - In .NET tab, select System.Design.dll and System.Drawing.dll click Ok.
To the using directives on top of the QSpacerComponentDesigner.cs file, add the following code:
using System.Windows.Forms;
using System.Drawing;
Now we will override the WndProc for handling the resizing and OnPaintAdornments method in order to draw a spring like appearance on designing. Double click the startButton button. Replace the startButton_Click method with:
protected override void WndProc(ref Message m)
{
base.WndProc (ref m);
const int WM_SIZE = 0x0005;
if (m.Msg == WM_SIZE)
this.Control.Invalidate();
}
protected override void OnPaintAdornments(PaintEventArgs pe)
{
base.OnPaintAdornments (pe);
int bias = 3;
Point[] lines = new Point[10];
if (((QSpacer)this.Control).CmpLayout == QLayoutProperty.Horizontal)
{
int wInc = this.Control.Width / (lines.Length-1);
int wX = 0;
for(int i=0; i<lines.Length; i++)
{
lines[i].X = wX;
wX += wInc;
lines[i].Y = (i % 2 == 0 ? -1 : 1) *
(this.Control.Height / bias) + (this.Control.Height / 2);
}
}
else
{
int hInc = this.Control.Height / (lines.Length-1);
int hY = 0;
for(int i=0; i<lines.Length; i++)
{
lines[i].Y = hY;
hY += hInc;
lines[i].X = (i % 2 == 0 ? -1 : 1) *
(this.Control.Width / bias) + (this.Control.Width / 2);
}
}
pe.Graphics.DrawLines(Pens.Blue,lines);
}
}
Now add the Designer Attribute on top of the QSpacer class decaration:
[DesignerAttribute(typeof(QSpacerComponentDesigner), typeof(IDesigner))]
public class QSpacer : System.Windows.Forms.Control
Also add the System.ComponentModel.Design namespace to the using directives of QSpacer.cs file:
using System.ComponentModel.Design;
Push (F7)
Test the QLikeLayout Controls
Let's test the newly created QLayout and QSpacer controls.
- In Solution Explorer, right Click QtLikeLayout solution -> Add -> Add New Project.
- Add a Tester Visual C# Windows Application project to the solution.
- Click View -> Toolbox (Ctrl+Alt+X).
- Right Click the Toolbox window -> Add/Remove items.
- Push Browse button. Browse for the QtLikeLayout.dll in QtLikeLayout/bin/Debug folder.
- Click Ok. Right Click the Tester project -> Set as Startup Project
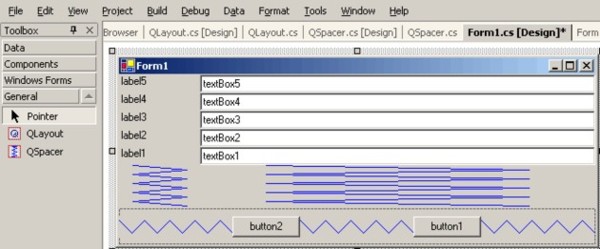
- From the Toolbox general tab, drag a
QLayout control into the form. Right click the qlayout1 control -> Properties. Set the Dock property to Bottom. - From the
Toolbox, drag another QLayout control into the form. Right click the qlayout2 control -> Properties. Set the CmpLayout property to Vertical; the CtrlsDock to Fill, and the Dock property to Left. - From the Toolbox, drag another
QLayout control into the form. Right click the qlayout3 control -> Properties. Set the CmpLayout property to Vertical; the CtrlsDock to Fill, and the Dock property to Fill. - Drag a
QSpacer and five label controls into the qLayout1 layout (left). - Drag a
QSpacer and five text boxes into the qLayout2 layout (right). - Select all labels in left layout and set the Height to 20. (The same as the text boxes)
- Drag three to the using directives on top of the QLayout.cs file.and two buttons alternatively into the botton layout.
- Right click the form1 form -> Properties. Set the Minimum size to 480,215.
- In the Properties window, select the
qLayout2 (Left) layout from the controls drop down list. Set With property to 90. - Push (F5) and test resizing the form.
Points of Interest
You must have the layout intended in mind before adding
QLayouts and controls. You can arrange the controls using the bring to front, and set to back verbs of controls. In later article updates and hopefully with your feedback, we will add a
QLayoutComponentDesigner control designer that will be more helpful at design time.
Rodolfo Ortega is a Cuban Computer Scientist. He works as IT Auditor for the CIMEX S.A. subsidiary in Holguin, Cuba. He lives and works in Holguin, in the eastern part of the island of Cuba.
You can contact him at rodolfom[]cimex.com.cu for any personal message: Ideas on new articles, bibliography about new APIs, questions, are wellcome.
Submit questions related with current article to the article forum.


 General
  News
News  Suggestion
  Question
  Bug
Bug  Answer
  Joke
Joke  Praise
  Rant
Rant  Admin
Admin 


