During the past few days, I have been working on a really cool personal project: finger tracking using Kinect version 2! As always, I’m providing the source code to you.
If you want to understand how things work, keep reading!
Prerequisites
Finger Tracking Algorithm
While developing the project, I had the following facts in mind: the algorithm should be able to track both hands and also know who those hands belong to. The Kinect SDK provides us with information about the human bodies. The finger tracking algorithm should be able to extend this functionality and assign fingers to specific Body objects.
Existing finger tracking algorithms simply process the depth frame and search for fingers within a huge array (512×424) of data. Most of the existing solutions provide no information about the body; they only focus on the fingers. I did something different: instead of searching the whole 512×424 array of data, I am only searching the portion of the array around the hands! This way, the search area is limited tremendously! Moreover, I know who the hands belong to.
So, how does the finger tracking algorithm work?
Step 1 – Detect the Hand Joints
This is important. The algorithm starts by detecting the Hand joints and the HandStates of a given Body. This way, the algorithm knows whether a joint is properly tracked and whether it makes sense to search for fingers. For example, if the HandState is Closed, there are no fingers visible.
If you’ve been following my blog for a while, you already know how to detect the human body joints:
Joint handLeft = body.Joints[JointType.HandLeft];
Joint handRight = body.Joints[JointType.HandRight];
If you need more information about how Kinect programming works, read my previous Kinect articles.
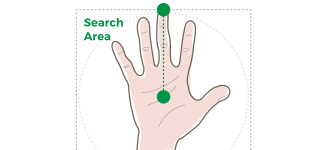
Step 2 – Specify the Search Area
Since we have detected the Hand joints, we can now limit the search area. The algorithm only searches within a reasonable distance from the hand. What exactly is a “reasonable” distance? Well, I have chosen to search within the 3D area that is limited between the Hand and the Tip joints (10-15 cm, approximately).

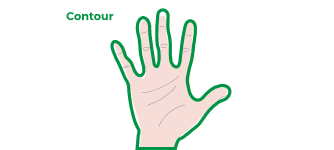
Step 3 – Find the Contour
This is the most interesting step. Since we have strictly defined the search area in the 3D space, we can now exclude any depth values that do not fall between the desired range! As a result, every depth value that does not belong to a hand will be rejected. We have an, almost perfect, shape of a hand. The outline of this shape is the contour of the hand!

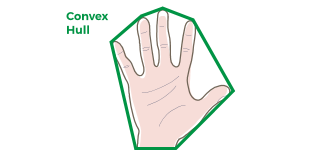
Step 4 – Find the Convex Hull
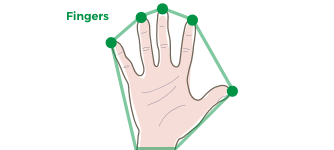
The contour of a hand is a big set of points. However, only five (or less) of these points correspond to valid fingertips. The fingertips are the edges of a polyline that contains all of the contour points. In the Eucledian space, this is called “convex hull”.

Consequently, the edges of the convex hull above the wrist define, well, the fingers.

So, you now understand how the algorithm works. Let’s see how to use it.
How-to-use
While building this project, my goal was simple: I did not want you to mess with all of the complexity. So, I encapsulated all of the above algorithm into a handy class: HandsController.
Finger Tracking is under the LightBuzz.Vitruvius.FingerTracking namespace. This namespace should be imported whenever you need to use the finger tracking capabilities.
using LightBuzz.Vitruvius.FingerTracking;
Everything is encapsulated into the HandsController class. To use the HandsController class, first create a new instance:
private HandsController _handsController = new HandsController();
You can specify whether the controller will detect the left hand (DetectLeftHand property), the right hand (DetectRightHand property), or both hands. By default, the controller tracks both hands.
Then, you’ll need to subscribe to the HandsDetected event. This event is raised when a new set of hands is detected.
_handsController.HandsDetected += HandsController_HandsDetected;
Then, you have to update the HandsController with Depth and Body data. You’ll need a DepthReader and a BodyReader (check the sample project for more details).
private void DepthReader_FrameArrived(object sender, DepthFrameArrivedEventArgs e)
{
  using (DepthFrame frame = e.FrameReference.AcquireFrame())
  {
    if (frame != null)
    {
      using (KinectBuffer buffer = frame.LockImageBuffer())
      {
        _handsController.Update(buffer.UnderlyingBuffer, _body);
      }
    }
  }
}
Finally, you can access the finger data by handling the HandsDetected event:
private void HandsController_HandsDetected(object sender, HandCollection e)
{
if (e.HandLeft != null)
{
var depthPoints = e.HandLeft.ContourDepth;
var colorPoints = e.HandLeft.ContourColor;
var cameraPoints = e.HandLeft.ContourCamera;
foreach (var finger in e.HandLeft.Fingers)
{
var depthPoint = finger.DepthPoint;
var colorPoint = finger.ColorPoint;
var cameraPoint = finger.CameraPoint;
}
}
if (e.HandRight != null)
{
}
}
And… That’s it! Everything is encapsulated into a single component!
Need the position of a finger in the 3D space? Just use the CameraPoint property. Need to display a finger point in the Depth or Infrared space? Use the DepthPoint. Want to display a finger point on the Color space? Use the ColorPoint.
Till next time… Keep Kinecting!
PS: Vitruvius
If you enjoyed this post, consider checking Vitruvius. Vitruvius is a set of powerful Kinect extensions that will help you build stunning Kinect apps in minutes. Vitruvius includes avateering, HD Face, background removal, angle calculations, and more. Check it now.
The post Finger Tracking using Kinect v2 appeared first on Vangos Pterneas.
 General
  News
News  Suggestion
  Question
  Bug
Bug  Answer
  Joke
Joke  Praise
  Rant
Rant  Admin
Admin 


