Introduction
Through many years of enterprise level software development and consulting, I became critically aware of the importance of good source code documentation, and several years ago when I began working with the first release of Visual Studio .NET beta 1 and found C# provided built-in support for inline XML code documentation, I was thrilled.
After forming my own professional services consulting company, it was even more important to me that my customers be able to support, maintain and extend any software that my company produces on their behalf, and solid, thorough source documentation is one of the steps that can be taken to assist in achieving this.
In all releases of Visual Studio .NET, only C# offers built-in support for inline XML code documentation; however, there are several free and third party add-ins that can be obtained to implement the same inline source XML documentation currently offered by C#.NET in C++, VB.NET and J#.
The good news for you non-C# developers is that Microsoft has included the same inline XML code documentation support for all .NET languages in Visual Studio .NET 2005.
Although Visual Studio .NET provides a built-in facility to produce code documentation reports, I prefer to use the open source NDoc tool, so I will not go into detail about how to produce .htm reports using Visual Studio, but I will demonstrate how to produce integrated, searchable and indexed source documentation for your source by using C#, Visual Studio .NET 2003 and NDoc.
NDoc does not support version 2.0 or newer. To use the details in this article and produce source documentation from your XML documentation in your source files, you can use the free tool that can be downloaded from http://www.stack.nl/~dimitri/doxygen/.
Article Goals
- Provide an overview of the built-in C#.NET code documentation features.
- Provide an overview of the most common C#.NET XML documentation tags.
- Demonstrate how to produce integrated, searchable and indexed API help files with NDoc.
Please provide a rating / vote before leaving this article.
This is the only way authors get any type of credit for their work they freely share with everyone. It's sad to see articles that have helped over 100,000 people and fewer than 200 bother to vote or provide a rating.
C# Built-in Features
There are three types of comment identifiers used to document C# source code:
| Marker | Example | Description |
| Double slash | // Comment | Used to remark or comment a single line. |
| Slash asterisk | /* Comment */ | Used to remark or comment multiple lines. |
| Triple slash | /// | Used to add an inline XML documentation tag. |
public void GetLoginAttempts( string userId ) { … }
C# offers several XML tags that can be placed directly within your source files to document the code, and Microsoft documents these tags very nicely in Visual Studio .NET help files. Once the developer has documented her source using the XML tags, she can use NDoc to produce integrated .chm files that contain the source documentation.
Although the description above and in the article may use the term 'comment', the XML tags are used to produce external source documentation. This differs from traditional code comments in that the realized documentation can be distributed as API (Application Programmer's Interface) documentation.
Before discussing NDoc and how to produce .chm files, let's first examine how to instrument C# source code with the XML tags and discuss some of the available XML documentation tags in more detail.
XML Documentation Tags
The XML documentation tags are used to document classes and their high level characteristics such as constructors, finalizers, methods, properties, fields, delegates, enums, events and other characteristics.
Visual Studio .NET recognizes the /// marker and will insert common, appropriate tags for the developer when instructed to do so. The developer instructs Visual Studio .NET to insert these tags by typing the /// marker directly above the target characteristic. The common tags Visual Studio will insert are: summary, param (if appropriate) and returns (if appropriate).
Figure 1 illustrates a standard method before and after the developer instructs Visual Studio to insert the XML tags by typing /// directly above the target characteristic.
public bool StringIsValid( string validateMe ) { … }
public bool StringIsValid( string validateMe ) { … }
Now that you know how to prompt Visual Studio .NET to insert the XML tags, let's discuss some of the common tags and their usage. Since the tags are XML, they need to be 'well formed'. At least in the sense you need to be sure to provide the proper closing marker and use single or double quotes as required.
In the table below, when indications are given that clicking on links will show or display other information, I am referring to links in the produced .chm documentation files not within Visual Studio .NET. Conversely, when I mention IntelliSense or the client, the information will be displayed in Visual Studio .NET.
Please note, I have not covered every XML tag supported by C# and Visual Studio .NET in this article, but rather the most commonly used tags.
| Tag | Usage | Description |
summary | <summary>Your summary</summary> | Provide a short description of the type or member.
The text typed between the opening and closing summary tags is displayed in Visual Studio's IntelliSense when you hover over the type. |
param | <param name='name'>Description.</param>
'name' must be surrounded by single quotes. | Provide a description of the related parameter.
The text typed between the opening and closing param tags is displayed when writing the client code. |
returns | <returns>Description.</returns> | Provide a description of what the method returns to the client. |
remarks | <remarks>Your remarks.</remarks> | Provide more detailed information about the type or member that may be important to someone using the type.
This is a good place to document things like whether the type is thread safe or not. |
para | <para>Your text.</para> | Allows you to control the format of the documentation output by inserting or wrapping segments within paragraphs.
You will nest para tags within other tags. |
c | <c>Your code sample.</c> | Indicates a short segment of code.
You will use the c tag to draw attention to particular words, phrases or code in the resulting documentation.
You will nest c tags within other tags. |
paramref | <paramref name="name"/>
Include the closing tag, and you must use double quotes around the "name" of the parameter. | Allows you to link the word to the parameter with the same name.
The paramref tag causes the contained word to be linked to the param description in the resulting documentation.
<param name='myParm'>Desc</param>
<remarks>Determines if <paramref name=”myParm”/> is either <c>null</c> or <c>empty</c>.</remarks>
You will find this will be one of the most often used tags. |
see | <see cref="member"/>
Include the closing tag, and you must use double quotes around the linked "member". | Allows you to create a reference to any type, member, or field that can be used within the class without causing a compilation error (this includes .NET types and your custom types as well).
One really neat integration feature with this tag is that the references integrate directly into the Visual Studio help system.
<returns>A <see cref=”System.String”/> containing the user's unique identifier.</returns>
When you click the link on String, you will see the actual Microsoft documentation for the String type. |
exception | <exception cref="member">
Include the closing tag, and you must use double quotes around the linked "member". | Allows you to document the type of exceptions your member will throw.
<exception cref="ArgumentException"> If <paramref name="firstName"/> is <c>empty</c>.</exception>
When you click on the member link, you will see the actual Microsoft documentation for the exception type.
It is not uncommon for your methods to use more than one <exception> tag. |
code | <code>Your code sample.</code> | The code tag is similar to the <c> tag, but it is intended to illustrate a true code usage example.
The code tag is generally enclosed within an <example> tag set (see below).
Use the code tag in concert with the example tag. |
example | <example>Your example.</example> | Provides a means to illustrate code examples.
Generally an example tag set will encompass a code tag set.
Use the example tag in concert with the code tag. |
Now that you're armed with the most common tags, let's discuss the source documentation.
Documenting your Code
Documenting source code should be a standard part of the development process. If you get in the habit of documenting your source as you write it, you will find that you can produce fully documented code much faster than if you write code and try and go back and instrument it with documentation at a later time. I have found, if I document the code as I write it, it takes about 50% less time to document it than if I try and go back and document it later.
If you are not used to fully documenting your source, you will have to get used to the fact that your .cs files will be longer which will cause you to scroll more; however, one trick that I've found is to make use of .NET's region functionality to reduce this side effect.
Although I will not address it in this article, you can write your XML documentation in an external file and use the <include> tag to link the external file to your source. You can produce the same documentation whether your comments are in the actual source .cs files or in an 'include' file.
I try to ensure I provide documentation for all types and their members in my source. Although the particular implementation dictates the tags used, I try to provide at least the following XML tags for the related types (I document all members regardless of their scope or access modifier):
| Type / Member | Tags |
| Classes | Summary, Remarks and Example (if necessary) |
| Methods | Summary, Remarks, Param, Returns and Exception |
| Properties | Summary, Value, Remarks and Exception
In the summary tag, indicate whether the property is read/write, read-only or write-only.
<summary>Gets or sets the first name of the user.<summary>
If you add this information to the summary tag, the developer will be able to see this information in IntelliSense when they are consuming the library ... a big help. |
| Fields | Summary |
| Constants | Summary and Value
Although there is a specific Value tag, indicate in the Summary tag the value of the constant, and you will be able to see the assigned value in IntelliSense during development. I have found that this removes the need for me to go and find the constant to determine what value is assigned because I can simply hover over the constant, and IntelliSense will do the work for me (you gotta' try this one).
<summary>Stored procedure to access all states. Value: MyStoredProcName <summary> |
| Delegates | Summary, Remarks, Param and Returns |
Figure 2 illustrates a short class documented with all the XML tags that have been discussed in this article.
namespace Mike.Elliott.Articles.XML.Documentation
{
using System;
public class DocumentationSample
{
public DocumentationSample() { … }
public string MyMethod( string someValue )
{
if ( null == someValue )
throw new ArgumentNullException( "Your message." );
if ( 0 >= someValue.Length )
throw new ArgumentException( "Your message." );
return someValue;
}
}
Now let's break down the source.
Breaking It Down
Let's look at the code snippets and the way the XML documentation is used. Each XML tag listed in the tag usage table provided earlier in this article is covered.
Figure 3 illustrates the use of <summary>, <c>, <remarks> and <para> XML documentation tags:
public class DocumentationSample { … }
Figure 4 illustrates the use of <summary>, <c>, <example> and <code> XML documentation tags:
public DocumentationSample() { … }
Figure 5 illustrates the use of <summary>, <param>, <see>, <exception>, <paramref>, <c> and <returns> XML documentation tags:
public string MyMethod( string someValue )
{
if ( null == someValue )
throw new ArgumentNullException( "Your message." );
if ( 0 >= someValue.Length )
throw new ArgumentException( "Your message." );
return someValue;
}
Once your source is documented, you need to generate the XML documentation file used to produce the Visual Studio .NET documentation reports or NDoc help files.
Producing the XML Documentation File
Visual Studio .NET parses the .cs files to produce the XML documentation file; however, there are a couple of configurations and steps we need to take to make this happen.
We must tell Visual Studio to produce the XML file, what to name the file, and where to create the file. To do this, in the Solution Explorer, right click the project and select Properties. This will bring up the project's property pages (see figure 6).
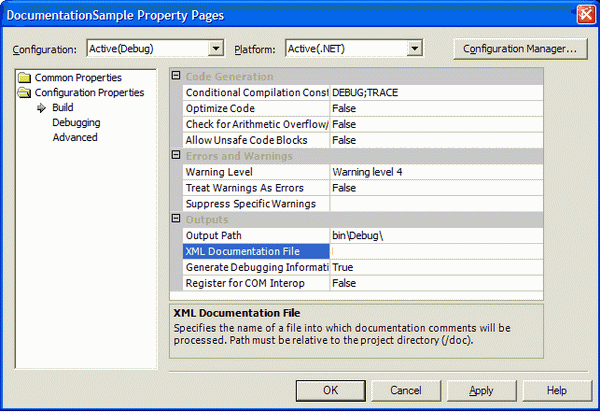
Figure 6
In the project's property pages, select the Build option under the Configuration Properties section. There are two properties you need to be concerned about on this page. First is the "Output Path" property which tells the compiler where to write the XML documentation file (I typically leave the path set to the bin/Debug directory because it makes using NDoc a little easier). Next, is the "XML Documentation File" property which will be the name of your XML documentation file (see figure 7). Click Apply and then OK to close the project's property pages.

Figure 7
The last step in producing the XML documentation file is to build the project. Once you build the project, navigate to the directory you set as the "Output Path" for the documentation file, and you will see the .xml file (in my case the bin/Debug directory).
If you open the XML file in a browser or Notepad, you will see that the XML documentation compiler has stripped out the XML documentation to produce the file. This also means that you can create your own XML stylesheets (XSLT) to format the documentation any way you want.
="1.0"
<doc>
<assembly>
<name>DocumentationSample</name>
</assembly>
<members>
<member name="T:Mike.Elliott.Articles.XML.
Documentation.DocumentationSample">
<summary>
The <c>DocumentationSample</c>
type demonstrates code comments.
</summary>
<remarks>
<para>
The <c>DocumentationSample</c> type
provides no real functionality;
however, it does provide examples of using the
most common, built in
<c>C#</c> code comment xml tags.
</para>
<para>
<c>DocumentationSample</c> types are not safe
for access by concurrent threads.
</para>
</remarks>
</member>
<member name="M:Mike.Elliott.Articles.XML.
Documentation.DocumentationSample.#ctor">
<summary>
Initializes a new instance of a
<c>DocumentationSample</c> type.
</summary>
<example>The following is an example of initializing an
<c>DocumentationSample</c> type:
<code>
// Create the type.
DocumentationSample ds = new DocumentationSample;
if ( null == ds )
return;
return ds.DoSomething( 5 );
</code>
</example>
</member>
<member name="M:Mike.Elliott.Articles.XML.
Documentation.DocumentationSample.MyMethod(System.String)">
<summary>Causes to happen.</summary>
<param name="someValue">
A <see cref="T:System.String"/> type representing some value.
</param>
<exception cref="T:System.ArgumentNullException">
if <paramref name="someValue"/> is <c>null</c>.
</exception>
<exception cref="T:System.ArgumentException">
if <paramref name="someValue"/> is <c>empty</c>.
</exception>
<returns><paramref name="someValue"/> as passed in.</returns>
</member>
</members>
</doc>
Almost There
Now that you have the XML documentation file, you are ready to build the actual help files or API documentation. For this task, we are going to use NDoc.
NDoc is an extensible open source code documentation generation tool for .NET developers. You can download a free fully functional copy of NDoc from SourceForge.net or NDoc (many thanks to SourceForge and the developers who contributed to the NDoc utility).
Once NDoc is installed, open up the GUI so that we can build our long awaited help files.
Building the Help Files
There are numerous configurations you can set within NDoc that dictate the content and format of the help files. I'll only cover a few here, but the contributing authors of NDoc did a wonderful job of documenting the options. When you click in one of the property boxes, a description of the property is displayed at the bottom of the GUI (see figure 8).
Figure 8
First, we need to add the .NET assembly(s) we want to include in the documentation. Notice we have the option to include as many assemblies as we want. This gives you the ability to create a fully integrated help file system for your entire system or organization. If your organization requires all C# development to be completely documented with the XML tags, you could add the production of the integrated help files to your standard build process.
Remember, earlier in the article I indicated that I typically leave the Visual Studio project's "Output Path" set to bin\Debug because it made working with NDoc a little easier? Click the Add button on NDoc and navigate to the Assembly file name and select the .exe or .dll assembly (see figure 9).
Figure 9
If you leave the "Output Path" pointing to bin\Debug, NDoc will automatically find the XML documentation file and populate the XML Doc Filename textbox. If you have changed the "Output Path", navigate to the XML documentation file to set the XML Doc Filename, and click OK.
Without going too deep into the NDoc properties, when validating the contents of your help files, one helpful thing you can do is navigate NDoc's UI (user interface) to the "Show Missing Documentation" section and set each property to true. This will cause the help files produced by NDoc to mark the missing documentation in red to indicate that the documentation type is missing. When you are satisfied with the documentation, you can turn off these properties (see figure 10).
Figure 10
OK, let's set a few properties and build our help files. The first property we want to set is the documentation type. I really like the MSDN format, so we'll accept it as the default.
Next, under the "Documentation Main Settings" area, we need to change the OutputDirectory. I generally create a Doc directory under the source code project folder, and point NDoc to this location (note: NDoc will produce several files).
Lastly, change DocumentInternals and DocumentPrivates, under the Visibility section, to true.
That's it for the basic properties, so all we have to do now is build the help files and take a look at them. To build the files, click the build icon on the toolbar or select Build from the Documentation menu. Once NDoc has completed the build process, open the help files by clicking View Icon on the toolbar or select View from the Documentation menu (see figure 11).
Figure 11
Documenting Namespaces
Additionally, I would like to discuss how to document the namespaces to which your classes belong.
Visual Studio .NET and C# do not provide a mechanism to document namespaces because namespaces are simple, logical containers for developers to organize and structure their code. In other words, you cannot document namespaces with the inline XML comment tags and expect them to be properly parsed into your .xml documentation file.
There is, however, an easy way to provide a summary level description for namespaces through NDoc's GUI. If you noticed in figure 10 (two images above), you will see the Namespace Summaries button located on NDoc's GUI. When you click this button, a dialog will appear with a drop-down box containing each namespace NDoc found within your code (see figure 12).
Figure 12
Here are the steps to add a namespace summary to your documentation:
- Click the Namespace Summaries button to obtain the Namespace dialog.
- Select the namespace, from the drop-down, for which you want to provide a summary description (see figure 12).
- Add the summary you want to appear in the realized documentation.
- Repeat steps 1 - 3 for each namespace you wish to document.
- Save the NDoc project to ensure you do not lose the namespace information just added.
Customizing the Format of Your XML Comments
One of the neat things about the realized documentation is they are HTML files. Think about that for a minute, this means you can use traditional HTML tags within your XML comments to achieve custom formatting. In fact, the XML tags listed in this article simply map to HTML transformations or CSS classes. For example, when you create a bullet list in your XML comments, the result produced by NDoc (or Visual Studio .NET's HTML reports) is the typical HTML <ul> / <li> tag pair.
public void HTMLCommentMethod() { ... }
Parsed, transformed and resulting comment output
<ul type="disc">
  <li><b>Bold</b>, <i>Italic</i>, <b><i>Bold-Italic</i></b></li>
  <li>Superscript - 1<sup>st</sup></li>
  <li>Subscript - 2<sub>nd</sub></li>
</ul>
I'm sure you can see how easy it is to add Bold, Italic and other standard HTML formatting to your documentation, and you can see the various uses for it. Since the output is simply HTML files, there is nothing preventing us from using anchors with links to external sites or pages, adding inline JavaScript to open new windows or even "pop up" alerts. The following code illustrates a bullet list with Bold, Italic, an Anchor (<a>) whose onclick pops up a JavaScript alert, and an Anchor (<a>) whose onclick opens a new window that navigates to a specific URL.
public void HTMLCommentMethod() { ... }
Figure 13 displays the NDoc documentation for the above method.
One valuable use for anchors pointing to external sites would be to document research found on the internet that solved certain problems within your project or code. As an example, you could add a link to a site that documents a fix you implemented for a known security issue.
Tips
To wrap up the article, I want to point out a few things that will make the C# XML documentation and NDoc integration really neat. A couple of things I particularly like about the produced help files are that they are in a standard .chm format and they provide the standard contents, index and search capability.
Also, notice that, if you had selected MSDN as the documentation type, your help files will be integrated with the .NET Framework's help files. Notice in figure 11, the DocumentationSample class derives from System.Object, and if you click the System.Object link, you will be taken to the .NET Framework's System.Object documentation (if you had installed the MSDN help files during your Visual Studio .NET installation).
Have you ever downloaded an open source .NET assembly that provided poor or no documentation? If the assembly was written in C#, and the developer used XML documentation tags, you can produce the API documentation yourself (I did this with the Microsoft.Web.UI.WebControls assembly which proved to be very helpful).
In Visual Studio .NET, once you configure your .NET project to produce an XML documentation file and if you build the project, you may see several warnings informing you of undocumented characteristics. Many a times you will have to use Rebuild instead of Build to get the XML file updated properly.
Once I have validated the documentation, I will typically save the NDoc project and add the .ndoc project file to my solution and place it in source control along with the source (note, I only have the .ndoc project file and not all the produced files as they are very easy to recreate).
Summary
By using the C# inline XML documentation tags and NDoc, you can create comprehensive API documentation for your source. By adding several assemblies to the same NDoc project and integrating with the .NET Framework help files, you can truly produce a professional set of source documentation of which anyone would be proud of.
History
- 1.0.0.0
- 1.1.0.0
- Added section on documenting namespaces
- 1.2.0.0
- Updated Documenting Namespaces section
- 2.0.0.0
- Added the Customizing the Format of Your XML Comments section
Michael has spent almost 2 decades in the Enterprise IT industry. Michael continues to be hands-on and involved in low-level details of technologies, and he loves to guide and help his clients achieve success.


 General
  News
News  Suggestion
  Question
  Bug
Bug  Answer
  Joke
Joke  Praise
  Rant
Rant  Admin
Admin 


 It's good to see that this article is still helping others. It's also good to get friendly feedback.
