Introduction
This article shows how to re-create Microsoft's Intellisense technology used in Visual Studio.
Intellisense has been around in source-editors for years now, and with it developers can not only type faster, but use it as a quick reference to the members and methods of a class. This replaces 1000+ page API reference books, making programming much simpler.
Background
I first used this source with my HTMLEditor program. I obtained reference foam SmallGuy78's article on "DIY Intellisense". I then adapted it for my own needs.
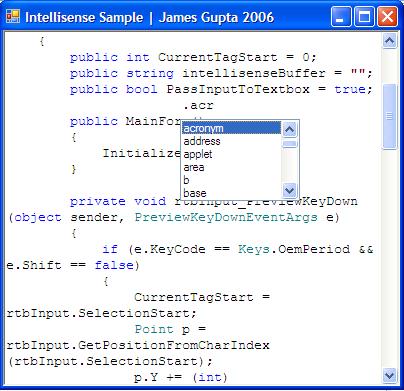
The source you will find here has various differences, the largest of these is that it overrides the default behaviour of listboxes where they search for the character typed in, then when you press another, it searches for that character. Instead it adds them all into a buffer and searches for the whole string ( i.e. "acr" instead of "a" "c" and "r").
It is also more closely modelled to the Visual Studio 2005 intellisense system.
Using the Code
The sample is a very simple text editor using the intellisense feature. It uses a list of HTML tags in this case, and you can easily edit it to suit your needs.
Points of Interest
A lot of the code is fairly straightforward, however there are a few obscure methods not many will have used before (such as richTextBox.GetPositionFromCharIndex). The actual system takes place within 3 event handlers, two of which are only very short.
The first event is to capture a key press which will trigger the intellisense listbox to open (in this case, I have chosen C#'s class accessor (".")). This goes in the richTextBox.PreviewKeyDown event like so:
if (e.KeyCode == Keys.OemPeriod && e.Shift == false)
{
    CurrentTagStart = rtbInput.SelectionStart;
    Point p = rtbInput.GetPositionFromCharIndex(rtbInput.SelectionStart);
    p.Y += (int)rtbInput.Font.GetHeight()*2;
    lbIntelli.Location = p;
    lbIntelli.Show();
    ActiveControl = lbIntelli;
}
Here's a quick run-down:
CurrentTagStart saves the position of the class accessor. This will be used later when we insert the selected intellisense item and add it to our code starting from this position.
We then make a point object, and call GetPositionFromCharIndex. This takes the selected text (just after the class accessor in this case) and returns a position in pixels. This is basically the position of the carat (blinking line thing which denotes where your text will appear). We then modify it a little, because having the listbox go there would cover our text as we type. To make it work for any font, we take the richTextBox's font height and multiply it by two. This can, of course, be touched-up to suit your individual needs. You then simple assign the listbox's position from our point and show it.
At this stage, we want the user to be able to type normally, and our home-made intellisense will search for the best item based on what has been typed. For this reason, there is a buffer to hold what has been typed since the listbox was opened. It is global to our form class and called intellisenseBuffer.
The next event which will be used to do this will be the listbox's KeyUp event, as follows:
Object ObjToSelect = new Object();

if (e.KeyCode != Keys.OemPeriod)
  if (e.KeyCode != Keys.Back)
  {
    bool startswith = false;
    intellisenseBuffer += e.KeyCode;
    foreach (object obj in lbIntelli.Items)
    {
            string str = obj.ToString();
           if (str != "")
          {
                startswith = str.StartsWith(intellisenseBuffer, true, null);
                  if (startswith == true)
                {
                    ObjToSelect = obj;
                    break;
                }
            }
    }

if (startswith == false)
{
    intellisenseBuffer = "";
    lbIntelli.Hide();
}

lbIntelli.SelectedItem = ObjToSelect;
}

if (e.KeyCode == Keys.Back) { rtbInput.Text.Remove(rtbInput.SelectionStart-1,1); }

if (e.KeyCode == Keys.Return)
{
    rtbInput.Select(CurrentTagStart+1, rtbInput.SelectionStart);
    rtbInput.SelectedText = lbIntelli.SelectedItem.ToString();
}
This is by far the longest event handler in this sample.
In the first part, you create an object which we will use to represent the listBox item we should choose based on the user's input. We then perform some basic ifs to check for regular text.
We then update our intellisenseBuffer with the latest key input, and search all items of the listbox, and see if they start with the text in our buffer. If we hit an item which does, we select that item. If there are no items starting with our buffer, then we close the listbox.
The last few lines are simple enough, if backspace is pressed then remove a character from the rtb, if enter is pressed then add the selected value to our rtb starting from where the class accessor was pressed.
The last event handler is incredibly simple, the listbox's keypress event simply passes input it captures to our rtb:
private void lbIntelli_KeyPress(object sender, KeyPressEventArgs e)
{
   rtbInput.SelectedText = e.KeyChar.ToString();
}
History
- 25/02/06: Submitted sample to CodeProject


 General
  News
News  Suggestion
  Question
  Bug
Bug  Answer
  Joke
Joke  Praise
  Rant
Rant  Admin
Admin 


