Introduction
This article describes a generic application framework that may be of some use in projects that would need an interface similar to Visual Studio. The application demonstrates approaches to providing a toolbox, a workspace, an object treeview, and an object editor.
The application framework will allow the user to create objects in the workspace by dragging items out of the toolbox and onto the work surface; the user may drag the objects around within the workspace to reposition them, and the user may select objects in the workspace and use the property editor to change the object’s properties. Changes made in the property editor will immediately be reflected in the appearance of the object and in the treeview. The treeview shows all of the workspace objects as well as child objects. The user may also select objects from the treeview to push them into the property editor or to delete them from the project. The user may save the workspace as a custom file type, and use the application’s file open command to restore the custom file back into the workspace for subsequent views and edits.
The application is not of any value in and of itself, it is just intended to demonstrate an approach to building a useful application that needs to incorporate these type of features. The application is intended to serve only as a demonstration of an approach to building this sort of interface; it is not the only way to do it, but it is a representative of a simple way to build a fairly powerful interface that will be familiar to many users through the use of similar products.
The application is not complete as much as a lot of typical functions are not described and mechanized in the project; for example, I have not addressed things like printing or object alignment and distribution. It is intended to serve as the basis for a more complex application, but it is not itself a complete or complex application. You can alter the approach, as I have described, in any number of different ways, and still achieve the same sort of resulting interface. For example, I will demonstrate using buttons as the objects in the toolbox, but in reality, any object that works with drag and drop can be used in place of the buttons.
This application and article will attempt to demonstrate the following concepts:
- Drag and drop to support an application toolbox interface
- Panel drag and drop to support moving existing objects at run time
- Treeview control used to provide a map to all existing parent and child objects
- Treeview control used to allow object selection
- Treeview control used to delete project objects and child objects through simple recursion
- The property grid control used to edit object properties
- Serialization used to store files containing all of the necessary data needed to reconstruct files between uses (collective object persistence through a custom file type)
- Deserialization used to recover stored, serialized objects to support a file open function, and subsequently used to restore a stored workspace to the active application
- Processing command line arguments to open a file immediately upon initialization
- Creation of a custom file type through the setup and deployment package
Getting Started
In order to get started, unzip the attachment and load the solution into Visual Studio 2005. Examine the Solution Explorer, and note the files contained in the project:

Figure 1: The Solution Explorer Showing the Project Files
Beneath the solution title node, observe that there are two added folders, one containing graphics, and one containing classes. The classes folder contains four classes; three are user controls and one is a standard class file. These classes are used for demonstration purposes only, and form the basis for the objects and object data used within the application. The three user controls are: Animal.vb, Person.vb, and Place.vb. The remaining class (ObjectNote.vb) is the standard class.
The graphics folder contains a collection of icons and images used within the application.
In the solution root, note that there are two files: FileSerialize.vb which is a module used to handle serialization and deserialization within the application. The remaining class is the frmMain.vb; this class is the main application, and it contains most of the code used to drive the application.
The main form (frmMain.vb) of the application has a layout consisting of a left side panel containing a tabbed panel; the tabbed panel has two tabs: Toolbox and Properties. The Toolbox panel contains three user controls represented by buttons; these buttons can be dragged onto the form, and whenever a control is dragged onto the form, a control of the associated type is added to the workspace panel control's control collection as well as to a sorted list containing references to those objects added to the panel. The Properties tab is used to expose a treeview control and a property grid control. The treeview control shows all objects contained within the current project; the property grid shows the properties for any object selected from either the workspace (panel control) or the treeview control. The user may edit any property exposed, but the application is only configured to persist the custom properties defined in the class; this could be modified to support persisting any or all of the values associated with the object, but in an effort to keep the code small and readable, I opted only to support a few properties in serialization and deserialization.
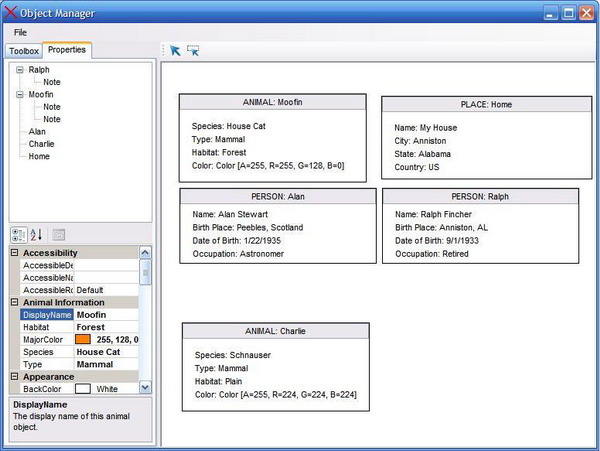
Take a look at figures 2 and 3 to see an example of the demonstration application running; figure 2 shows the application with the Toolbox tab selected; the objects in the Toolbox panel may be dragged and dropped onto the panel in the right; in this example, you can see several objects that have been dropped onto the panel. Figure 3 shows the Properties tab selected in the application, the treeview at the top shows all of the objects currently in the workspace. The property grid control is set to allow edits to be made to the last selected object. Each time a new object is selected from the treeview or the panel, the property grid will update to show the properties for that selected object.
Figure 2: Application Running with Toolbox Tab Selected
Figure 3: Application Running with Properties Tab Selected
The Code: User Controls
There are three user controls contained in the class folder in the solution. They all are basically constructed the same way, so I will only describe one of them and you can examine the others if you so desire; the user controls are arbitrary to this discussion; the application framework can be used to edit the properties of any object; the controls I have included are only useful for this demonstration.
Open up the Animal.vb class file. This is a user control; user controls can’t be easily serialized, so there is a little extra work involved to persist them and to bring them back to life between uses.
Each of the user controls start out with a few imports; these imports are used to add design support for the controls when in use. The class starts with the following code:
Imports System.ComponentModel
Imports System.ComponentModel.EditorAttribute
Imports System.ComponentModel.Design.DesignerCollection

Public Class Animal
After the class declaration, a region called Declarations is defined, and populated with private member variables and enumerations. I have included the enumerations to demonstrate how the property grid displays options based upon an enumeration (they are exposed in a combo box within the property editor); the declaration region content is as follows:
#Region "Declarations"
     Private mUniqueID As Guid
    Private mDisplayName As String
    Private mSpecies As String
    Private mType As AnimalType
    Private mHabitat As HabitatType
    Private mColor As System.Drawing.Color
    Private mLocation As Point


    Public Enum AnimalType
        Mammal
        Amphibeon
        Fish
        Bird
        Reptile
    End Enum

    Public Enum HabitatType
        Water
        Desert
        Forest
        Arid
        Mountain
        Plain
        Coastal
    End Enum

#End Region
Following the declarations region, the “New” subroutine is overloaded; one version of the subroutine is used to create new instances of the control whilst the other is used to recreate the controls following deserialization:
Public Sub New()
InitializeComponent()
Dim newGuid As Guid = Guid.NewGuid
Me.mUniqueID = newGuid
Habitat = HabitatType.Arid
Type = AnimalType.Mammal
DisplayName = "myAnimal"
End Sub
This is the default constructor used to create new instances of the control; it sets a unique ID for the control which is used in managing relationships within the treeview, and it sets a few default properties for the control. Next is the alternate constructor:
Public Sub New(ByVal theId As Guid, _
ByVal theDisplayName As String, _
ByVal theSpecies As String, _
ByVal theType As String, _
ByVal theHabitat As String, _
ByVal theColor As System.Drawing.Color, _
ByVal theLocation As Point)
InitializeComponent()
mUniqueID = theId
DisplayName = theDisplayName
Species = theSpecies
Type = theType
Habitat = theHabitat
MajorColor = theColor
Me.Location = theLocation
End Sub
This is the alternate constructor used to restore a control following deserialization; the values supplied to the constructor will be supplied by a structure populated from the original control’s properties at serialization. Additional properties could easily be added; however, in an effort to keep things simple, I opted to only support a few of the available properties and only one from the user control class (location). If you wanted to add in other properties such as a border style or background color, you could capture those values at serialization and post them back to the control whenever it is reconstructed through this alternate constructor.
The rest of the Animal class contains the properties used by the control. When looking at the properties, examine each of the attributes assigned to the properties that may be edited within the property editor control. That region is as follows:
#Region "Properties"
     Public ReadOnly Property ID() As Guid
        Get
            Return mUniqueID
        End Get
    End Property

    Public Property MyLocation() As Point
        Get
            Return mLocation
        End Get
        Set(ByVal value As Point)
            mLocation = value
        End Set
    End Property

    <CategoryAttribute("Animal Information"), _
    Browsable(True), _
    BindableAttribute(False), _
    DescriptionAttribute("The display name of this animal object.")>_
    Public Property DisplayName() As String
        Get
            Return mDisplayName
        End Get
        Set(ByVal value As String)
            mDisplayName = value
            txtTitle.Text = "ANIMAL: " & mDisplayName
        End Set
    End Property

    <CategoryAttribute("Animal Information"), _
    Browsable(True), _
    BindableAttribute(False), _
    DescriptionAttribute("The species of this animal object.")>_
    Public Property Species() As String
        Get
            Return mSpecies
        End Get
        Set(ByVal value As String)
            mSpecies = value
            lblSpecies.Text = "Species: " & mSpecies
        End Set
    End Property

    <CategoryAttribute("Animal Information"), _
    Browsable(True), _
    BindableAttribute(False), _
    DescriptionAttribute("The type of this animal object.")>_
    Public Property Type() As AnimalType
        Get
            Return mType
        End Get
        Set(ByVal value As AnimalType)
            mType = value
            lblType.Text = "Type: " & mType.ToString()
        End Set
    End Property

    <CategoryAttribute("Animal Information"), _
    Browsable(True), _
    BindableAttribute(False), _
    DescriptionAttribute("The habitat used by this animal object.")>_
    Public Property Habitat() As HabitatType
        Get
            Return mHabitat
        End Get
        Set(ByVal value As HabitatType)
            mHabitat = value
            lblHabitat.Text = "Habitat: " & mHabitat.ToString()
        End Set
    End Property

    <CategoryAttribute("Animal Information"), _
    Browsable(True), _
    BindableAttribute(False), _
    DescriptionAttribute("The primary color of this animal object.")>_
    Public Property MajorColor() As System.Drawing.Color
        Get
            Return mColor
        End Get
        Set(ByVal value As System.Drawing.Color)
            mColor = value
            lblColor.Text = "Color: " & mColor.ToString()
        End Set
    End Property

#End Region
As far as the attributes go, the Category attribute is used to group properties within the property editor. If three properties have a common Category attribute, they will appear grouped together during edit. The Browsable attribute determines whether or not the property will appear in the property editor. The Description attribute provides the text string that appears at the bottom of the editor; this is generally used to provide instructions to the user or to describe the property.
Figure 4: Property Grid in Use
That pretty much wraps up the content of the user controls; again, all three are basically built the same, and therefore, I have described only one of the three user controls.
The Code: The Serializable Class
The class folder contains one other class; it is called ObjectNote.vb, and it is a simple, serializable class. It is included in the demonstration for two reasons. The first is that everything in a serializable class can be serialized (you probably guessed that was coming), and therefore you will not need to do anything extra to serialize, deserialize, or to reconstruct objects between uses. The other reason I have included it in the demonstration is because I use it to show adding and removing child nodes from the treeview control.
The class is very simple, and it only contains three properties worthy of note: its unique ID, its parent’s unique ID, and a string used to hold the note itself. At runtime, if the user right clicks on an object in the treeview or in the panel, the application will reveal a context menu, and one of the two menu options is to add a note to the object. This is the container class that holds that note.
The code starts with a few imports and a class declaration. Note that the class is marked serializable:
Imports System.ComponentModel
Imports System.ComponentModel.EditorAttribute
Imports System.ComponentModel.Design.DesignerCollection
Imports System.Runtime.Serialization

<Serializable()>_
Public Class ObjectNote
Following the imports and class declaration, a default constructor is defined as follows:
Public Sub New(ByVal parent As Guid)
Dim newGuid As Guid = Guid.NewGuid
Me.mUniqueID = newGuid
Me.mParentID = parent
End Sub
As per the comments in the code, the constructor is passed in its parent's unique ID (a GUID), and its unique ID and parent ID properties are set. The parent ID is used to do two things: maintain the relationship between objects stored in the treeview, and allow child objects to be found and deleted if the primary node is deleted by the user.
Following the constructor, a few declarations are made within a region; that section is as follows:
#Region "Declarations"
     Private mUniqueID As Guid
    Private mParentID As Guid
    Private mDisplayName As String
    Private mNote As String

#End Region
These private member variables are set either when the control is created, or by the properties which are added next:
#Region "Properties"
     Public ReadOnly Property ID() As Guid
        Get
            Return mUniqueID
        End Get
    End Property


    Public Property MyParent() As Guid
        Get
            Return mParentID
        End Get
        Set(ByVal value As Guid)
            mParentID = value
        End Set
    End Property

    <CategoryAttribute("Object Note"), _
    Browsable(True), _
    BindableAttribute(False), _
    DescriptionAttribute("Enter text to describe the associated object.")>_
    Public Property Note() As String
        Get
            Return mNote
        End Get
        Set(ByVal value As String)
            mNote = value
        End Set
    End Property

    <CategoryAttribute("Object Note"), _
    Browsable(True), _
    BindableAttribute(False), _
    DescriptionAttribute("The display name of this note object.")>_
    Public Property DisplayName() As String
        Get
            Return mDisplayName
        End Get
        Set(ByVal value As String)
            mDisplayName = value
        End Set
    End Property

#End Region
Of the properties shown, the unique and parent IDs have already been mentioned. The display name is the name of the note as it is displayed at runtime, and the Note property is the note assigned to the parent node.
That wraps up the controls used by the application. Again, these classes were only defined to illustrate the approach used within this demonstration; aside from the demonstration, they don’t serve any useful purpose (well, unless you have some unusual requirements and just so happen to need controls to monitor people, animals, and places).
The Code: The Main Form
Main Form Layout
The main form contains a menu at the top of the form. A tabbed control is docked to the left and has two panels; one is used as a toolbox, and the other to show the treeview and the properties. The tabbed panel has a vertical splitter on its right side; within the property tab, that panel is split horizontally with the treeview docked to the top, the horizontal splitter under the treeview, and the property grid control set to dock fully under the horizontal splitter. On the right side of the splitter, a toolbar is docked to the top and a panel is set to dock fully beneath the toolbar. The panel is set to have a background color of white, and it is used as the container for the objects.
Given the panel control is going to be the target for objects dragged from the toolbar, the AllowDrop property of the panel has to be set to True.
Each of the three user controls is represented by a button placed into the toolbox. Each button has an image and a text label describing it.
The toolbar has two buttons added to it; one is called Select, and the other is called Drag or Move. If the user is in select mode, clicking on an item in the panel will select it and make the control active for edit in the property grid; if the user is in drag mode, the mouse may be used to drag the objects around on the panel to reposition them.
In addition to the visual elements, the form also contains a file open dialog, a save file dialog, and a context menu containing two options: Delete Selected Element and Add Note To Selected Element. There is also a tooltip and the main menu strip.
The main menu has a file menu with options to create a new file, open an existing file, save a file, and to exit the application.
The Main Form Code
The main form’s code is divided into several regions; these regions are as follows: Declarations, Drag and Drop – Mouse Down Handlers, Drag and Drop – Drop Handlers, and Methods.
The Declarations region contains a few member variables used within the application, that section is as follows:
#Region "Declarations"
Private mCurrentObjectName As String
Private mCurrentObject As Object
Private mObjectCollection As New SortedList
Private mObjectNotes As New SortedList
Private mObjectFileBundle As New SortedList
Private mSelect As Boolean = False
<Serializable()> _
Private Structure AnimalData
Public theId As Guid
Public theDisplayName As String
Public theSpecies As String
Public theType As String
Public theHabitat As String
Public theColor As System.Drawing.Color
Public theLocation As Point
End Structure
<Serializable()> _
Private Structure PersonData
Public theId As Guid
Public theDisplayName As String
Public thePersonName As String
Public theBirthPlace As String
Public theDateOfBirth As Date
Public theOccupation As String
Public theLocation As Point
End Structure
<Serializable()> _
Private Structure PlaceData
Public theId As Guid
Public theDisplayName As String
Public thePlaceName As String
Public theCity As String
Public theState As String
Public theCountry As String
Public theLocation As Point
End Structure
#End Region
The private member variables are used to keep track of the currently selected object and the name of that object. There are two other collections (sorted lists) used to contain all of the user controls and all of the notes. An additional sorted list is used to pack up all of the object data and notes for serialization into a single file with a custom extension.
After the member variables have been declared, three serializable structures are defined: one for each of the three user controls. Since we are not going to try to serialize everything in the user control, we are just adding in a few key properties. As was mentioned earlier, it would be easy to add additional properties from the user control and to serialize and deserialize those properties between uses.
In the Drag and Drop – Mouse Down region, each of the three buttons is set up to support the drag and drop operation. A handler has been written for each button, but since they are all basically the same, I will only show one here:
Private Sub Button1_MouseDown(ByVal sender As Object, _
ByVal e As System.Windows.Forms.MouseEventArgs) _
Handles Button1.MouseDown
drag one to the panel so we instance an animal, set its default
properties and make the DoDragDrop call. The control is not yet
added to the panel
user has to complete the drop onto the panel for this transaction
to complete.
Dim myAnimal As New Animal
mCurrentObjectName = "Animal"
mCurrentObject = myAnimal
myAnimal.DisplayName = "myAnimal"
Button1.DoDragDrop(myAnimal, DragDropEffects.All)
End Sub
The mouse down event is used to instance the associated class, set a couple of properties on the object, and evoke the button’s DoDragDrop method whilst passing it the new object and setting the DragDropEffect to All. That sets up the drag side of the house, now we need to handle the drop side. Looking at the drop handlers region, you will see two subroutines defined to prepare the panel control to receive the dropped items: Panel1_DragDrop, and Panel1_DragEnter; they are as follows:
Private Sub Panel1_DragDrop1(ByVal sender As Object, _
ByVal e As System.Windows.Forms.DragEventArgs) _
Handles Panel1.DragDrop
coordinates)
Dim dropX As Single = e.X
Dim dropY As Single = e.Y
Dim dropLocation = New Point(dropX, dropY)
Dim dropPoint As New Point()
dropPoint = Panel1.PointToClient(dropLocation)
object.
Select Case mCurrentObjectName.ToString()
Case "Animal"
Dim myAnimal As New Animal
myAnimal = CType(Me.mCurrentObject, Animal)
Panel1.Controls.Add(myAnimal)
myAnimal.Location = dropPoint
myAnimal.ContextMenuStrip = ContextMenuStrip1
mObjectCollection.Add(myAnimal.ID, myAnimal)
AddHandler myAnimal.MouseClick, AddressOf Object_MouseClick
AddHandler myAnimal.MouseDown, AddressOf Object_MouseDown
Case "Person"
Dim myPerson As New Person
myPerson = CType(Me.mCurrentObject, Person)
Panel1.Controls.Add(myPerson)
myPerson.Location = dropPoint
myPerson.ContextMenuStrip = ContextMenuStrip1
mObjectCollection.Add(myPerson.ID, myPerson)
AddHandler myPerson.MouseClick, AddressOf Object_MouseClick
AddHandler myPerson.MouseDown, AddressOf Object_MouseDown
Case "Place"
Dim myPlace As New Place
myPlace = CType(Me.mCurrentObject, Place)
Panel1.Controls.Add(myPlace)
myPlace.Location = dropPoint
myPlace.ContextMenuStrip = ContextMenuStrip1
mObjectCollection.Add(myPlace.ID, myPlace)
AddHandler myPlace.MouseClick, AddressOf Object_MouseClick
AddHandler myPlace.MouseDown, AddressOf Object_MouseDown
Case Else
mCurrentObject.Location = dropPoint
End Select
UpdateTreeview()
End Sub
The first part of this handler gets the current mouse position at the time of the drop, and converts it into a value usable by the panel control. This will make sure that the dropped item’s upper left hand corner will be located at the exact position indicated by the mouse when the drop was made. Following the location conversion, the subroutine evaluates the current object’s name (set when the button received its mouse down command) within a Select Case statement; depending upon the current object, the subroutine then creates an instance of the appropriate object type, sets it to be the current object, adds the control to the panel, sets its location to be at the drop point, and then adds a context menu and mouse click and mouse down event handlers to the control.
Once the object has been placed and added to the panel, the treeview control is updated to show the newly added object. The DragEnter event handler is set up to handle whether or not the drag drop will be used to move a control or add a new one.
Private Sub Panel1_DragEnter1(ByVal sender As Object, _
ByVal e As System.Windows.Forms.DragEventArgs) _
Handles Panel1.DragEnter
If (e.Data.GetDataPresent(DataFormats.Text)) Then
e.Effect = DragDropEffects.Copy
Else
e.Effect = DragDropEffects.Move
End If
End Sub
The last section of code to describe is contained in the Methods region; within this region, fifteen separate subroutines are defined. Some of these subroutines are very simple and are barely worth mentioning, others will require some explanation.
The first two subroutines in the Methods region are two generic handlers: a mouse down handler, and a mouse click handler.
Private Sub Object_MouseClick(ByVal sender As Object, _
ByVal e As System.Windows.Forms.MouseEventArgs)
control objects. This sets the current object, current object
name, and object associated with the property grid in response to a
click
Try
Me.mCurrentObject = sender
Me.mCurrentObjectName = sender.DisplayName.ToString()
Me.PropertyGrid1.SelectedObject = sender
Catch ex As Exception
End Try
End Sub
Private Sub Object_MouseDown(ByVal sender As Object, ByVal e As
System.Windows.Forms.MouseEventArgs)
control objects.
control to load
control to a new location on the form panel.
Try
If mSelect = True Then
mCurrentObject = sender
mCurrentObjectName = sender.DisplayName.ToString()
mCurrentObject.DoDragDrop(mCurrentObject,
DragDropEffects.All)
Me.PropertyGrid1.SelectedObject = sender
End If
Catch ex As Exception
End Try
End Sub
The comments provided within each of these two subroutines define the purpose of the handler. In general, these handlers are added to new instances of any control added to the panel control at run time.
The next two subroutines are used to set a Boolean value used to allow the application to determine whether or not it is in select or drag mode. This code is the Click event handler for the two toolbar controls. That code is as follows:
Private Sub tbnSelect_Click_1(ByVal sender As System.Object, _
ByVal e As System.EventArgs) Handles tbnSelect.Click
dragging
mSelect = False
End Sub
Private Sub tbnDrag_Click_1(ByVal sender As System.Object, ByVal e As
System.EventArgs) Handles tbnDrag.Click
them
mSelect = True
End Sub
Moving right along, the next thing up is the call that updates the treeview. This call is made whenever a property grid item is edited or an item is added or deleted from the current workspace. That code looks like this:
Private Sub UpdateTreeview()
TreeView1.Nodes.Clear()
Dim de As DictionaryEntry
For Each de In mObjectCollection
Dim nd As New TreeNode
nd.Name = de.Value.displayname.ToString()
nd.Text = de.Value.displayname.ToString()
nd.Tag = de.Value.ID.ToString()
Me.TreeView1.Nodes.Add(nd)
Dim de2 As DictionaryEntry
For Each de2 In mObjectNotes
If de2.Value.MyParent.ToString() = nd.Tag.ToString() Then
Dim newNoteNode As New TreeNode
newNoteNode.Text = "Note"
newNoteNode.Tag = de2.Value.ID.ToString()
nd.Nodes.Add(newNoteNode)
End If
Next
Next
change, this call forces all nodes to open.
TreeView1.ExpandAll()
End Sub
This code is pretty simple; it clears all of the items out of the current treeview, and then loops through the object collection to restore the treeview. As items are added and removed from the object collection, the treeview will reflect only the current status of the workspace.
Equally simple is the handler for the property grid’s PropertyValueChanged handler which just calls for the treeview to update:
Private Sub PropertyGrid1_PropertyValueChanged(ByVal s As Object, _
ByVal e As System.Windows.Forms.PropertyValueChangedEventArgs) _
Handles PropertyGrid1.PropertyValueChanged
object will update
treeview in response
UpdateTreeview()
End Sub
Whenever the user selects an item from the treeview control, the property grid control needs to be updated to display the selected item’s associated object for edit; this code accomplishes that:
Private Sub TreeView1_AfterSelect(ByVal sender As Object, _
ByVal e As System.Windows.Forms.TreeViewEventArgs) _
Handles TreeView1.AfterSelect
property
Dim de As DictionaryEntry
For Each de In mObjectCollection
If de.Key.ToString = e.Node.Tag.ToString() Then
Me.mCurrentObject = de.Value
Me.mCurrentObjectName = de.Value.DisplayName.ToString()
PropertyGrid1.SelectedObject = de.Value
End If
Next
Dim de2 As DictionaryEntry
For Each de2 In mObjectNotes
If de2.Key.ToString = e.Node.Tag.ToString() Then
Me.mCurrentObject = de2.Value
Me.mCurrentObjectName = de2.Value.DisplayName.ToString()
PropertyGrid1.SelectedObject = de2.Value
End If
Next
End Sub
As you can see, after the user selects an item from the treeview control, the application will loop through the collection of objects and the collection of notes looking for a match. When the match is made, the control is updated to show the selected object’s properties.
The call to delete a selected item works in a similar manner:
Private Sub DelectCurrentObjectToolStripMenuItem_Click(ByVal sender _
As System.Object, ByVal e As System.EventArgs) Handles _
DelectCurrentObjectToolStripMenuItem.Click
delete an object is presented in the context menu.
Dim de As DictionaryEntry
For Each de In mObjectCollection
If de.Value.ID.ToString = mCurrentObject.ID.ToString() Then
mObjectCollection.Remove(de.Key)
DeleteOrphanNotes(de.Key)
Exit For
End If
Next
UpdateTreeview()
Me.Panel1.Controls.Remove(mCurrentObject)
End Sub
In this code, when the user selects the Delete Current Object option from the context menu (after right clicking on either the treeview or one of the panel control’s objects), the object collection is looped through, searching for a match to the selected (current) object. When a match is found, two things happen, first the collection is updated to remove the current object, and second, the unique ID for the object just deleted is passed to a function called DeleteOrphanNotes. The DeleteOrphanNotes function is used to track down any and all notes assigned to the deleted object and remove them from the object note collection. After the change is made, the treeview control is updated, and the panel’s control collection is updated to remove the current object from that collection as well.
The next bit of code to examine is used to add a new note to the currently selected object. When this code is executed, a new note object will be created, and its parent ID will be set to the current object’s unique ID. After the note is added, the treeview is updated to show the new child node appended to its parent node. That code is as follows:
Private Sub AddNoteToolStripMenuItem_Click(ByVal sender As System.Object, _
ByVal e As System.EventArgs) Handles AddNoteToolStripMenuItem.Click
treeview or panel)
Dim newNote As New ObjectNote(mCurrentObject.ID)
newNote.DisplayName = "Note"
Me.mObjectNotes.Add(newNote.ID, newNote)
UpdateTreeview()
End Sub
Next up is the DeleteOrphanNotes subroutine. This function will continue to search for child notes until no more are found. In response to finding a node, the function will again call itself to look for notes with a parent ID that matches the argument passed to the function. The process will continue to operate recursively until the search term is not found. That code looks like this:
Public Sub DeleteOrphanNotes(ByVal parentID As Guid)
Dim blnFound As Boolean = False
Dim de As DictionaryEntry
For Each de In Me.mObjectNotes
If de.Value.MyParent = parentID Then
mObjectNotes.Remove(de.Key)
blnFound = True
Exit For
End If
Next
If blnFound = False Then
Exit Sub
Else
DeleteOrphanNotes(parentID)
End If
End Sub
Next up is a main menu item Click event handler. This code is used to handle a request for a new project, and all it does is call another subroutine called ClearAll. That code and the code for ClearAll are as follows:
Private Sub NewToolStripMenuItem_Click(ByVal sender As System.Object, _
ByVal e As System.EventArgs) Handles NewToolStripMenuItem.Click
ClearAll()
End Sub
Private Sub ClearAll()
mCurrentObjectName = ""
mCurrentObject = New Object()
mObjectCollection.Clear()
mObjectNotes.Clear()
mObjectFileBundle.Clear()
mSelect = False
Panel1.Controls.Clear()
TreeView1.Nodes.Clear()
PropertyGrid1.SelectedObject = Nothing
End Sub
If you take a look at the ClearAll subroutine, you will note that it empties all of the object collections, object selections, and the panel control’s Controls collection. It also empties the treeview control and sets the property grid control’s currently selected object to Nothing. This code was placed in a separate subroutine since it is called both in response to the “New” menu option selection as well as when a file is opened from the file system.
Moving on to the next menu option, “Open”, this bit of code is used to open a file from the file system and load its contents into the application. The Open menu item’s code looks like this:
Private Sub OpenToolStripMenuItem_Click(ByVal sender As System.Object, _
ByVal e As System.EventArgs) Handles OpenToolStripMenuItem.Click
.bmp)
OpenFileDialog1.Title = "Open BXS Document"
OpenFileDialog1.Filter = "BXS Documents (*.bxs)|*.bxs"
If OpenFileDialog1.ShowDialog = Windows.Forms.DialogResult.Cancel
Then
Exit Sub
End If
Dim sFilePath As String
sFilePath = OpenFileDialog1.FileName
If sFilePath = "" Then Exit Sub
If System.IO.File.Exists(sFilePath) = False Then
Exit Sub
End If
ClearAll()
mObjectFileBundle = New SortedList
mObjectFileBundle = FileSerializer.Deserialize(sFilePath)
Dim ObjectData As New SortedList
Dim de As DictionaryEntry
For Each de In mObjectFileBundle
If de.Key.ToString() = "TheObjects" Then
ObjectData = de.Value
ElseIf de.Key.ToString() = "TheNotes" Then
mObjectNotes.Clear()
mObjectNotes = de.Value
End If
Next
Dim de2 As DictionaryEntry
For Each de2 In ObjectData
Select Case de2.Value.GetType.ToString()
Case "ObjectManager.frmMain+AnimalData"
Dim ast As New AnimalData
ast = de2.Value
Dim animl As New Animal(ast.theId, _
ast.theDisplayName, _
ast.theSpecies, _
ast.theType, _
ast.theHabitat, _
ast.theColor, _
ast.theLocation)
animl.ContextMenuStrip = ContextMenuStrip1
mObjectCollection.Add(animl.ID, animl)
AddHandler animl.MouseClick, AddressOf Object_MouseClick
AddHandler animl.MouseDown, AddressOf Object_MouseDown
Panel1.Controls.Add(animl)
Case "ObjectManager.frmMain+PersonData"
Dim pst As New PersonData
pst = de2.Value
Dim pers As New Person(pst.theId, _
pst.theDisplayName, _
pst.thePersonName, _
pst.theBirthPlace, _
pst.theDateOfBirth, _
pst.theOccupation, _
pst.theLocation)
pers.ContextMenuStrip = ContextMenuStrip1
mObjectCollection.Add(pers.ID, pers)
AddHandler pers.MouseClick, AddressOf Object_MouseClick
AddHandler pers.MouseDown, AddressOf Object_MouseDown
Panel1.Controls.Add(pers)
Case "ObjectManager.frmMain+PlaceData"
Dim pls As New PlaceData
pls = de2.Value
Dim plc As New Place(pls.theId, _
pls.theDisplayName, _
pls.thePlaceName, _
pls.theCity, _
pls.theState, _
pls.theCountry, _
pls.theLocation)
plc.ContextMenuStrip = ContextMenuStrip1
mObjectCollection.Add(plc.ID, plc)
AddHandler plc.MouseClick, AddressOf Object_MouseClick
AddHandler plc.MouseDown, AddressOf Object_MouseDown
Panel1.Controls.Add(plc)
Case Else
End Select
Next
UpdateTreeview()
End Sub
This code is annotated well enough to follow, but in general, the option is used to open a Open File Dialog; the dialog is configured to show files that match the custom file extension we are using (.bxs). When the user selects a valid file, the path of that file is captured as a string and passed to the deserialization handler code; this code recovers the local file bundle object from the serialized bundle (the bundle is a sorted list that contains two other sorted lists, one for the control object data, and one for the note objects).
The bundled sorted list is examined, and the serialized object sorted list and the object note sorted list are used to populate the local object list and object note list. The objects contained in the control object sorted list are evaluated and new controls are instanced, their properties are set to match the stored property values, and the appropriate event handlers are associated with the new control. Once all of the new controls have been defined and added to the panel control, the treeview is updated. Note that the object notes sorted list did not require any processing other than to write it over directly to the current object notes sorted list. This is because the entire class and all of its properties were directly serializable.
The next bit of code accomplishes the save function called form the main menu:
Private Sub SaveToolStripMenuItem_Click(ByVal sender As System.Object, _
ByVal e As System.EventArgs) _
Handles SaveToolStripMenuItem.Click
Try
SaveFileDialog1.Title = "Save BXS Document"
SaveFileDialog1.Filter = "BXS Documents (*.bxs)|*.bxs"
If SaveFileDialog1.ShowDialog() =
Windows.Forms.DialogResult.Cancel Then
Exit Sub
End If
Catch ex As Exception
Exit Sub
End Try
Dim sFilePath As String
sFilePath = SaveFileDialog1.FileName
If sFilePath = "" Then Exit Sub
Dim ObjectData As New SortedList
Dim de As DictionaryEntry
For Each de In mObjectCollection
Select Case de.Value.GetType.ToString()
Case "ObjectManager.Animal"
Dim ad As New AnimalData
ad.theId = de.Key
ad.theColor = de.Value.MajorColor
ad.theDisplayName = de.Value.DisplayName
ad.theHabitat = de.Value.Habitat
ad.theSpecies = de.Value.Species
ad.theLocation = de.Value.Location
ObjectData.Add(ad.theId, ad)
Case "ObjectManager.Person"
Dim ps As New PersonData
ps.theId = de.Key
ps.theBirthPlace = de.Value.BirthPlace
ps.theDateOfBirth = de.Value.DateOfBirth
ps.theDisplayName = de.Value.DisplayName
ps.theLocation = de.Value.Location
ps.theOccupation = de.Value.Occupation
ps.thePersonName = de.Value.PersonName
ObjectData.Add(ps.theId, ps)
Case "ObjectManager.Place"
Dim pls As New PlaceData
pls.theId = de.Key
pls.theDisplayName = de.Value.DisplayName
pls.thePlaceName = de.Value.PlaceName
pls.theCity = de.Value.City
pls.theState = de.Value.State
pls.theCountry = de.Value.Country
pls.theLocation = de.Value.Location
ObjectData.Add(pls.theId, pls)
Case Else
End Select
Next
mObjectFileBundle = New SortedList
mObjectFileBundle.Add("TheObjects", ObjectData)
mObjectFileBundle.Add("TheNotes", mObjectNotes)
FileSerializer.Serialize(sFilePath, mObjectFileBundle)
End Sub
This code works in a manner similar to the Open File menu option, although it is operating in reverse. Here, the user is presented with a File Save dialog box; the dialog box is used to collect a valid path to be used to store the serialized application data as a custom (.bxs) file. Once a valid path is selected or created, the subroutine collects the control object data from the control object collection and moves it into a separate serializable collection. The structures defined for each control type are used to contain individual copies of each control object's properties; not all of the properties, but those that we have decided to keep.
Once the control data has been gathered into the object data collection, both the object note and object data sorted lists are added to the Object File Bundle sorted list (so that all data is now stored in a single sorted list). The object file bundle is then serialized to the file path specified.
The next two sections of code are used to handle opening the application by double clicking on an associated file of the custom file type from an Explorer window. The first subroutine configures form load to look for file path strings passed to the application on load, and if any are passed in, it passes the path to the second subroutine which loads it into the application on start up. That code looks like this:
Private Sub frmMain_Load(ByVal sender As Object, _
ByVal e As System.EventArgs) Handles Me.Load
For Each param As String In My.Application.CommandLineArgs
Try
OpenFromPath(param)
Catch
End Try
Next param
End Sub
Private Sub OpenFromPath(ByVal sFilePath As String)
mObjectFileBundle = New SortedList
mObjectFileBundle = FileSerializer.Deserialize(sFilePath)
Dim ObjectData As New SortedList
Dim de As DictionaryEntry
For Each de In mObjectFileBundle
If de.Key.ToString() = "TheObjects" Then
ObjectData = de.Value
ElseIf de.Key.ToString() = "TheNotes" Then
mObjectNotes.Clear()
mObjectNotes = de.Value
End If
Next
Dim de2 As DictionaryEntry
For Each de2 In ObjectData
Select Case de2.Value.GetType.ToString()
Case "ObjectManager.frmMain+AnimalData"
Dim ast As New AnimalData
ast = de2.Value
Dim animl As New Animal(ast.theId, _
ast.theDisplayName, _
ast.theSpecies, _
ast.theType, _
ast.theHabitat, _
ast.theColor, _
ast.theLocation)
animl.ContextMenuStrip = ContextMenuStrip1
mObjectCollection.Add(animl.ID, animl)
AddHandler animl.MouseClick, AddressOf Object_MouseClick
AddHandler animl.MouseDown, AddressOf Object_MouseDown
Panel1.Controls.Add(animl)
Case "ObjectManager.frmMain+PersonData"
Dim pst As New PersonData
pst = de2.Value
Dim pers As New Person(pst.theId, _
pst.theDisplayName, _
pst.thePersonName, _
pst.theBirthPlace, _
pst.theDateOfBirth, _
pst.theOccupation, _
pst.theLocation)
pers.ContextMenuStrip = ContextMenuStrip1
mObjectCollection.Add(pers.ID, pers)
AddHandler pers.MouseClick, AddressOf Object_MouseClick
AddHandler pers.MouseDown, AddressOf Object_MouseDown
Panel1.Controls.Add(pers)
Case "ObjectManager.frmMain+PlaceData"
Dim pls As New PlaceData
pls = de2.Value
Dim plc As New Place(pls.theId, _
pls.theDisplayName, _
pls.thePlaceName, _
pls.theCity, _
pls.theState, _
pls.theCountry, _
pls.theLocation)
plc.ContextMenuStrip = ContextMenuStrip1
mObjectCollection.Add(plc.ID, plc)
AddHandler plc.MouseClick, AddressOf Object_MouseClick
AddHandler plc.MouseDown, AddressOf Object_MouseDown
Panel1.Controls.Add(plc)
Case Else
End Select
Next
UpdateTreeview()
End Sub
The code for the Open From File subroutine is identical to a portion of the code used in the File Open menu click event handler except for the fact that is works with a file path passed into the function directly rather than through a value collected from an open file dialog. This function could be called directly from the File Open menu event handler with no impact on the application.
The last subroutine in the application is merely used to close the application in response to the user’s selection of the exit function from the main menu:
Private Sub ExitToolStripMenuItem_Click(ByVal sender As System.Object, _
        ByVal e As System.EventArgs) Handles ExitToolStripMenuItem.Click

        Application.Exit()
End Sub
That concludes the description of the code contained within the main form’s code and for all of the application code in general.
The Code: The File Serializer Module
The code module contains two methods; one to serialize data and one to deserialize data. Both methods use a binary formatter to handle the serialization and deserialization process. Take a look at the module and note how each is constructed.
The Serialize subroutine appears as follows:
Sub Serialize(ByVal strPath As String, ByVal myFile As SortedList)
Dim fs As New FileStream(strPath, FileMode.OpenOrCreate)
Dim formatter As New BinaryFormatter
Try
formatter.Serialize(fs, myFile)
fs.Close()
Catch ex As SerializationException
MessageBox.Show(ex.Message & ": " & ex.StackTrace, "Error",
MessageBoxButtons.OK, MessageBoxIcon.Error)
End Try
End Sub
The subroutine is quite simple; it opens a file stream pointed to the file path string passed in the argument list; the file mode is set to Open or Create. Following the creation of the file stream, a new instance of the BinaryFormatter is created. The Try Catch block is then set up; the Try section is used to evoke the formatter's Serialize method; this method accepts two arguments: one to identify the file stream to write to, and one to accept the file which, in this case, is the sorted list containing references to both the application objects and the note objects. Once the serializer completes writing to the file stream, the file stream is closed.
The other method in the file serializer class is used to deserialize the contents of the stored file back into the application’s file bundle sorted list. Once reconstructed from a file, the sorted list is used to recreate the workspace objects. That code looks like this:
Public Function Deserialize(ByVal strPath As String) As SortedList
Dim fs As New FileStream(strPath, FileMode.Open)
Dim myFile As SortedList
myfile = New SortedList
Try
Dim formatter As New BinaryFormatter
class.
myfile = formatter.Deserialize(fs)
fs.Close()
Return myFile
Catch ex As SerializationException
MessageBox.Show(ex.StackTrace, ex.Message, MessageBoxButtons.OK,
MessageBoxIcon.Error)
Return myFile
End Try
End Function
This code works much like the serializer subroutine in that it opens a file stream and returns the contents of the file (the file bundle sorted list) which is passed to a new sorted list called “myFile”. The deserializer function returns the reconstructed sorted list to the calling method. The calling method, in this case, is the file open command in the main form; the file open command then reconstructs the objects and notes sorted lists from the file bundle sorted list.
Custom File Association
If you want to create a custom file association such that when a user double clicks on a file of the custom type’s extension in a Windows Explorer window, the application will open it up directly; you will need to set that association up in the setup and deployment package, and you will need to modify the main entry point of the application to allow it to process a file passed to it immediately upon initialization.
The process of creating a file type association through the use of the Visual Studio 2005 setup and deployment project is far easier to manage than it once was; you can manually code the necessary information into the application, and depending upon the installation package you are using, you may need to do that. If you are interested in that approach, take a look at this link, [see File Associations the hard way].
First off, in the main form of the application, you will need to modify the form load event handler to respond to the receipt of a command line argument (the file name). This is now a trivial bit of code, and it should look something like this:
Private Sub frmMain_Load(ByVal sender As System.Object, _
ByVal e As System.EventArgs) Handles MyBase.Load
For Each param As String In My.Application.CommandLineArgs
Try
OpenFromPath(param)
Catch
End Try
Next param
End Sub
In this example, when the form loads, it will examine the contents of My.Application.CommandLineArgs to see if it contains a file name; since that is all that we are going to pass in, it will either be empty or will contain a file path. If a file path is present, it will be passed to a subroutine called “OpenFromPath” which captures the data from the file and then reconstructs the file’s objects.
In order to pass the file path to the command line arguments, you need to set up a couple of things in the Setup and Deployment project. To begin, add a setup and deployment project to the existing solution and configure it to suit your requirements. Once the project has been added, click on the setup project’s name in the Solution Explorer, click on “View”, and then click on the “File Types” option. This will bring up a File Types Designer in the main window of Visual Studio.
Once the file type designer has been displayed, right click on “File Types on Target Machine” and the click on the “Add File Type” option. This will add an empty file type to the tree view, select the new file type’s node, and look in the property editor:
Figure 5: File Type Property Editor
In the property editor, set the name to match the name of the custom type, set the command to point to the application (as the Primary output from the application), key in a description, set the extension to the custom file type’s extension, and set an icon for the file type. Having set those values, click on the Open node.
Figure 6: The Open node under the custom file type
Once you have clicked on the Open node, the property editor will show these properties:
Figure 7: Property Editor Set to Open Node
These default properties are correct in that the default process is set to “Open” and the “%1” is set to pass the file name of a selected file to the application’s command line arguments on startup. After a user installs the application, when they double click on a file of the custom file type, it will pass the file path to the application and open it. Also, if the user right clicks on the custom file type icon, they will be able to select the “Open with” option and be presented with a link to your application, as indicated in the following figure:
Figure 8: "Open With" Option in the Windows Explorer Context Menu
Summary
The purpose of this article has been to demonstrate an easy approach to providing a complete framework for an application that is centered upon creating and editing objects at runtime. In order to achieve that goal, the application demonstrates the following key elements:
- Drag and drop to support an application toolbox interface
- Panel drag and drop to support moving existing objects at runtime
- Treeview control used to provide a map to all existing parent and child objects
- Treeview control used to allow object selection
- Treeview control used to delete project objects and child objects through simple recursion
- The property grid control used to edit object properties
- Serialization used to store files containing all of the necessary data needed to reconstruct the file between uses (collective object persistence through a custom file type)
- Deserialization used to recover stored, serialized objects to support a file open function, and subsequently used to restore a stored workspace to the active application
- Processing command line arguments to open a file immediately upon initialization
- Creation of a custom file type through the setup and deployment package
This member has not yet provided a Biography. Assume it's interesting and varied, and probably something to do with programming.


 General
  News
News  Suggestion
  Question
  Bug
Bug  Answer
  Joke
Joke  Praise
  Rant
Rant  Admin
Admin 


