Introduction
This article explains how to write a library of graphic items for AGE graphic engine.
Background
AGE is "only" an engine that lets you manage graphic items at runtime, but these items aren't built in it, because you are completely free to create your own items to be used in an AGE graphic document.
Now I'll explain how you can create a graphic item to be used with AGE, and you'll see that it is really simple (it takes more time to explain than to do it).
Let's go make a diamond (hey, this is only an example!).
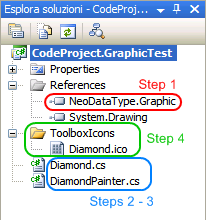
Step 1: What we need before we begin.
- Create a library project.
- Add a reference in your project to the engine assembly: NeoDataType.Graphic.dll.
- Add the import of the namespace.
using NeoDataType.Documents;
using NeoDataType.Graphic;
Imports NeoDataType.Documents
Imports NeoDataType.Graphic
Step 2: The item.
[SaveThisClass]
public class Diamond : GraphicItem
{
Color _foreColor = Color.Blue;
[SaveThisProperty(typeof(ColorFormatter))]
public Color ForeColor
{
get{ return _foreColor; }
set
{
_foreColor = value;
PropertyChanged();
}
}
public Diamond()
{
Painter = new DiamondPainter();
}
}
Step 3: The painter.
public class DiamondPainter : Painter
{
Point[] _points;
protected override void OnItemBoundsChanged()
{
base.OnItemBoundsChanged();
_points = new Point[]
{
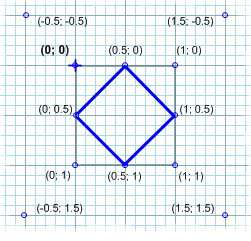
GetPoint(0.5, 0),
GetPoint(1, 0.5),
GetPoint(0.5, 1),
GetPoint(0, 0.5)
};
}
protected override void Paint(Graphics g)
{
Diamond diamond = (Diamond)Item;
Pen pen = new Pen(diamond.ForeColor);
g.DrawPolygon(pen, _points);
pen.Dispose();
}
}
Ok... let's explain something:
- Importing the
NeoDataType.Documents namespace is needed if you want your item to be saved to disk with the document.
If you plan to do all graphics at runtime without saving/loading items from the disk you don't need this nor SaveThisClassAttribute and SaveThisPropertyAttribute.
SaveThisClassAttribute and SaveThisPropertyAttribute define that the class or property must be written on file when we save the document.
In this example Color is not a IConvertible object, so cannot be saved automatically as if it was one i.e. an Int32, a Double, a String or an Enum value. So we need to specify a formatter.
A formatter is a class that implements NeoDataType.Documents.IObjectFormatter, that will convert the Color to a string representation and that will be able to reconvert the string to the given Color. But we are lucky because ColorFormatter and FontFormatter are built into NeoDataType.Graphic.dll.
PropertyChanged() in the set property tells the canvas to refresh because a property that influences the item aspect was changed.
Painter.OnItemBoundsChanged() is called when the position or the size of an item is changed. You can use this method to do all the compiling needed and the painting process avoids doing it each time the canvas is painted. Of course, you can do all in the Painter.Paint() method, but in this way you can reduce the wastage of resources.
Painter.GetPoint() and Painter.GetSize() return a Point or a Size relative to the item bounds. Painter.FlipPoint() and Painter.FlipRectangle() return a Point or a Rectangle flipped relatively to the item bounds.
You can indicate a factor from 0 to 1 for x and y coordinates to indicate the position of a point within the bounds.
In the example of this article, the top corner is at point (0.5; 0).
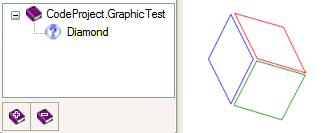
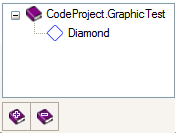
At this point, our item is already fully working: now we can compile the assembly, go to the designer and add the library to the document (or programmatically myDocument.LoadLibrary(libraryPath)). But as you can see... we don't have an icon for the diamond!
Step 4: The item icon.
The icon must be a 16 x 16 .ico file, if the icon has a different size, it will be resized.
The engine will look for it as a embedded resource named as AssemblyName.ToolboxIcons.ItemTypeName.ico, where AssemblyName is the name of the assembly defined in the project properties and ItemName is the name of the related GraphicItem (in this case Diamond).
So, in our example, using Visual Studio or an Express version, the assembly names must match one of the following:
Right examples
Assembly Name:      MyAssembly.Name
Default Namespace:  MyAssembly.Name
Icon Folder:        ToolboxIcons
Icon Name:          Diamond.ico

Assembly Name:      MyAssembly.Name
Default Namespace:  MyAssembly
Icon Folder:        Name.ToolboxIcons
Icon Name:          Diamond.ico
Wrong examples
Assembly Name:      MyAssembly.Name
Default Namespace:  MyAssembly.Name.AndMore
Icon Folder:        ToolboxIcons
Icon Name:          Diamond.ico

Assembly Name:      MyAssembly.Name
Default Namespace:  Something.Else
Icon Folder:        ToolboxIcons
Icon Name:          Diamond.ico
For the Assembly name and the default Namespace, you can check the project properties.
Some tips and suggestions
- Note that if you don't specify a full path for
myDocument.LoadLibrary(libraryPath), but only the file name, the library is searched first in the same folder of the document file and then in a subfolder named "Libraries" in the application folder. Only the library file names are saved into the document as references. - The painter class should be named as
<PaintedItem>Painter, where it <itempainted>is the name of the painted item (that is obvious). In this sample it is "Diamond".
How can you contribute?
If you think this article and the project published are interesting and/or useful, you can help me maintain it in many ways:
- Sending me your item library (that I'll publish with your credentials)
- Telling me if this article is clear or missing something.
- Voting for this article
- Visiting my website (www.neodatatype.net)
- Visiting my website and making a little contribution (this would be a great incentive)
This member has not yet provided a Biography. Assume it's interesting and varied, and probably something to do with programming.


 General
  News
News  Suggestion
  Question
  Bug
Bug  Answer
  Joke
Joke  Praise
  Rant
Rant  Admin
Admin 


