Introduction
Simple Tutorial for Developing Reports, Using Microsoft Reporting Add-In control.
Background
Now we can develope complex Reports, Using Microsoft Reporting Add-In control in within no time. Its very easy to create reports using Microsoft Reporting Add-In control.
Using the code
Download Reporting Add-In for Visual Studio Web Developer 2005 Express Edition form http://msdn2.microsoft.com/en-us/express/aa975050.aspx and install on your system.
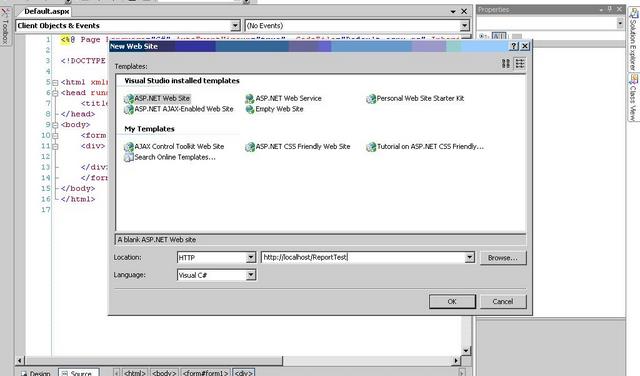
Step 1:
Create the ASP.NET web site as ReportTest
Step 2: Create Report File.
Click on File->New File and create report file as Report1.rdlc

Step 3: Now open Report1.rdlc file and click on DATA -> Show Data Sources.
Step 4: In Website Data Sources dialog box click on the Add New Data Source link.
Step 5: It will open TableAdapter Configuration Wizard.
Step 6: Click on New Connection.
Step7: In Add Connection Dialog box enter Server Name, User Name, Password and database
Step8: Click on Next button
Step9: select the check box 'Yes, Save the connection as ' and click on Next
Step10: In How should the TableAdapter access the database dialog box select 'Use Sql Statement' option and click on Next.
Step11: Specify the sql Query and click on Next button
Step12: Select 'Fill a DataTable' and 'Return a DataTable' and click on Finish button.
Step14: Form Toolbox, Drag 'table' from the Report Item in Report area to populate data from sql database.
Step15: From Website data sources drag 'U_name' in Table detail area as shown in the figure.
<shapetype id="_x0000_t75" stroked="f" filled="f" path="m@4@5l@4@11@9@11@9@5xe" o:preferrelative="t" o:spt="75" coordsize="21600,21600"><stroke joinstyle="miter"><formulas /><f eqn="if lineDrawn pixelLineWidth 0"><f eqn="sum @0 1 0"><f eqn="sum 0 0 @1"><f eqn="prod @2 1 2"><f eqn="prod @3 21600 pixelWidth"><f eqn="prod @3 21600 pixelHeight"><f eqn="sum @0 0 1"><f eqn="prod @6 1 2"><f eqn="prod @7 21600 pixelWidth"><f eqn="sum @8 21600 0"><f eqn="prod @7 21600 pixelHeight"><f eqn="sum @10 21600 0"></formulas /><path o:connecttype="rect" gradientshapeok="t" o:extrusionok="f"><lock aspectratio="t" v:ext="edit"><shape id="_x0000_i1025" style="WIDTH: 431.25pt; HEIGHT: 228.75pt" type="#_x0000_t75"><imagedata cropbottom="13046f" croptop="6220f" src="file:///C:\DOCUME~1\SATISH~1.PHA\LOCALS~1\Temp\msohtml1\01\clip_image001.png">
Step16: Now click on File New file and create new Web Form as ViewReport.aspx
Step17: Select 'ReportViewer' from Standard Tool box and drag in design area
Step18: Select ReportViewer and Right Click mouse button and select Smart Tag.
Step 21: Build the project and view in browser.
Points of Interest
Download Reporting Add-In for Visual Studio Web Developer 2005 Express Edition form http://msdn2.microsoft.com/en-us/express/aa975050.aspx and install on your system.
History
Keep a running update of any changes or improvements you've made here.
This member has not yet provided a Biography. Assume it's interesting and varied, and probably something to do with programming.


 General
  News
News  Suggestion
  Question
  Bug
Bug  Answer
  Joke
Joke  Praise
  Rant
Rant  Admin
Admin 


