Introduction
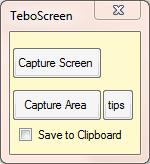
This application captures the screen in two different ways:
- Capture Screen: This does what is says; it basically captures the whole of the screen once the file name of the resulting image has been specified.
- Capture Area: Holding down the left mouse button, users draw a rectangle specifying which part of the screen they wish to capture. On double clicking, the user selects a file name and the area behind the drawn rectangle is captured to this file. Once drawn, the rectangle can be resized and moved around the screen before double clicking to save the image.
Background
This application was an exercise I set myself in C#. Being new to C#, I wanted to see how straightforward creating a screen capture application would be. In the end, it took me an afternoon to write the application (not too onerous).
I decided on a simple solution to the question of how do you allow the user draw a rectangle on a screen.
The application maximizes a form which has a transparency of 30%. The drawing of the rectangle involves drawing a rectangle and then erasing the previous rectangle by drawing a rectangle in the form's background colour.
As the form is maximized, any coordinates on this form correspond to screen coordinates underneath.
It is then a simple matter of returning the coordinates of the drawn rectangle to the ScreenShot.CaptureImage method.
Some additional features are the ability to save the image to the clipboard, include the cursor in the image (in this case, by pressing the 'S' key) and to enable the user to resize and drag the selection area once the initial selection area has been drawn.
Using the Code
There are two modes of screen capture - capture screen and capture area.
Capture Screen
All we need to do is pass the screen area to the ScreenShot.CaptureImage method. The only thing to note here is that we pause for 250 milliseconds to allow the screen to repaint itself. Not doing this can cause the form, from which the command was invoked, to be included in the capture even though it has been instructed to minimize.
System.Threading.Thread.Sleep(250);
Rectangle bounds = Screen.GetBounds(Screen.GetBounds(Point.Empty));
string fi = "";
if (ScreenPath != "")
{
fi = new FileInfo(ScreenPath).Extension;
}
ScreenShot.CaptureImage(showCursor, curSize, curPos,
Point.Empty, Point.Empty, bounds, ScreenPath, fi);
Capture Area
Holding down the left mouse button, the user draws a rectangle specifying which part of the screen they wish to capture. On releasing the left mouse button, the user can re-size or move the selection area or they can double click to select a file name - what is behind the drawn rectangle is then captured to this selected file.
The mouse_Move event is used to decide on whether the user is drawing, dragging(moving) or resizing the selection area.
Each of the methods erases the previous rectangle and to creates a new rectangle every time the mouse is moved (while the left mouse button is held down). This gives the illusion of a rectangle moving.
private void mouse_Move(object sender, MouseEventArgs e)
{
    if (LeftButtonDown && !RectangleDrawn)
    {
        DrawSelection();
    }

    if (RectangleDrawn)
    {
        CursorPosition();

        if (CurrentAction == ClickAction.Dragging)
        {
            DragSelection();
        }

        if (CurrentAction != ClickAction.Dragging && CurrentAction != ClickAction.Outside)
        {
            ResizeSelection();
        }
    }
}
Here is how we call ScreenShot.CaptureImage for Capture Area.
Point StartPoint = new Point(CurrentTopLeft.X, CurrentTopLeft.Y);
Rectangle bounds = new Rectangle(CurrentTopLeft.X, CurrentTopLeft.Y,
    CurrentBottomRight.X - CurrentTopLeft.X, CurrentBottomRight.Y - CurrentTopLeft.Y);
...
ScreenShot.CaptureImage(showCursor, curSize, curPos, StartPoint,
        Point.Empty, bounds, ScreenPath, fi);
The code that captures the screen is in a class called ScreenShot which contains a static method called CaptureImage.
This is where the code applies all the selected options - include/exclude cursor, save to clipboard/file and type of file the image is saved to.
class ScreenShot
    {
        public static bool saveToClipboard = false;

        public static void CaptureImage(bool showCursor, Size curSize, Point curPos,
    Point SourcePoint, Point DestinationPoint, Rectangle SelectionRectangle,
    string FilePath, string extension)
        {
            using (Bitmap bitmap = new Bitmap(SelectionRectangle.Width,
        SelectionRectangle.Height))
            {
                using (Graphics g = Graphics.FromImage(bitmap))
                {
                    g.CopyFromScreen(SourcePoint, DestinationPoint,
            SelectionRectangle.Size);

                    if (showCursor)
                    {
                        Rectangle cursorBounds = new Rectangle(curPos, curSize);
                        Cursors.Default.Draw(g, cursorBounds);
                    }
                }

                if (saveToClipboard)
                {
                    Image img = (Image)bitmap;
                    Clipboard.SetImage(img);
                }
                else
                {
                    switch (extension)
                    {
                        case ".bmp":
                            bitmap.Save(FilePath, ImageFormat.Bmp);
                            break;
                        case ".jpg":
                            bitmap.Save(FilePath, ImageFormat.Jpeg);
                            break;
                        case ".gif":
                            bitmap.Save(FilePath, ImageFormat.Gif);
                            break;
                        case ".tiff":
                            bitmap.Save(FilePath, ImageFormat.Tiff);
                            break;
                        case ".png":
                            bitmap.Save(FilePath, ImageFormat.Png);
                            break;
                        default:
                            bitmap.Save(FilePath, ImageFormat.Jpeg);
                            break;
                    }
                }
            }
        }
Two methods that have been added recently (January 2012) are Clipboard.SetImage and Cursors.Default.Draw. The first method will copy the screen or area captured to the clipboard and the second method includes the cursor (as an arrow) in the image.
The addition of the cursor can be particularly useful if you need to point something out in a screenshot such as a button.
To include the cursor in the image, the application's KeyUp events listen for the 'S' key - this then triggers the ScreenCapture method specifying the inclusion of the cursor.
I have added this event to each button on the application - a more efficient way to do this would be to handle any keys that are pressed while the application is open - the reason I have chosen this method is so that the software is not flagged as key logging by security software.
private void keyTest(KeyEventArgs e)
{
    if (e.KeyCode.ToString() == "S")
    {
      screenCapture(true);
    }
}
Both the addition of the cursor and clipboard feature are from requests, so please do keep the suggestions and requests coming in as I do tend to act on them.
I am also aware that Windows 7 now comes bundled with a snipping tool - this article was first created in 2007 before Windows 7 had been released.
I feel the article still has some relevance in terms of illustrating the drawing and moving of objects on the screen and taking screenshots.
Developments
TeboScreen has been branched into a new project and article called ScreenCap by Patrick Harris.
Amongst the extra features ScreenCap provides are:
Run in the background and become activated when the Print Screen button is pressed.
Support for dual monitors, regardless of whether there is a size difference in monitors.
Automatically send screen capture to three devices: Clipboard, Printer, and Email.
As a developer, I am very happy with this new development and I look forward to seeing where Patrick takes this new branch.
History
- 4 December, 2007 -- Original version posted
- 18 December, 2007 -- Downloads and article content updated
- New download code fixes bugs in the drawing of the selection rectangle
- Replacement article text for the
mouse_Move event
- 3 July, 2011 -- The updated code includes changes that allow the user to resize and move the image capture selection area. There is also a tips button which when clicked shows basic use instructions.
- 28 December, 2011 -- Downloads updated
- 19 January, 2012 -- Article and downloads updated
- 18 February, 2012 -- An addition in order to reference Patrick Harris' ScreenCap article
Graduated with BSc(hons) in Information Systems in 1992 and have had to learn pretty much everything on the job since then.
Currently: Software Developer (Oracle, .NET and Javascript).
Used to be: Developer (SQL Server and .NET), Analyst(Using Oracle, SAS, Excel...) and before that a SQLServer 2000 DBA, Microsoft XAL developer.
Main skill set includes SQL Server, PL/SQL, C#, Javascript, VB .NET, Access, Excel, Word - VBA, SAS...
Interests include reading and things that fly.
I am a keen origami(paper folding) amateur.
Was once a classical guitarist, however Metallica have corrupted my tastes.
I run teboweb.com as a hobby


 General
  News
News  Suggestion
  Question
  Bug
Bug  Answer
  Joke
Joke  Praise
  Rant
Rant  Admin
Admin 


 )
)
