Introduction
Recently, I needed to implement a wizard for the WP7 platform. I looked all over the internet for readymade solutions that I could use but didn’t find any. Because of this, I decided to implement my own. After I was done, I thought the wizard worked ok so I decided to share it. This article presents my work on the subject (the design considerations and the implementation of a wizard for the WP7 platform).
These wizard classes implemented in this article are very flexible. Although they were written for WP7, the classes can also be used in WPF and Silverlight projects without any additional modifications.
Article Contents
Design Considerations
There are a few things to take into account when designing a wizard. These are both UI and feature related. Regarding the UI, one of the critical decisions is how to display the wizard on the screen. After watching the video that introduced the pivot and the panorama controls, it became clear that a wizard should never be hosted in one of these controls. I remained with 2 options: implementing each step in a separate page or implementing the wizard in a single page. I chose the second option. The following will discuss the features a wizard should have.
A wizard should:
- have a title
- manage a collection of wizard steps
- expose the current step to the user
- allow the user to specify whether the wizard can be canceled or not
A wizard step should:
- have a title
- allow the user to specify whether or not the user can come back to the current step after passing it
- allow the user to specify whether or not the wizard can be finished from the current step without having to pass through the remaining steps
- have content that can be set by the user
The Wizard Implementation
My implementation of the wizard feature consists of 2 classes and one interface. These elements can be seen in the image below:

In the above image, the Wizard class represents the actual wizard. This class will be used to manage all the wizard steps. The WizardStep class represents an actual wizard step. The IValidableContent interface is used for validation. The WizardStep class implements this interface to support validation. This interface should also be implemented whenever there is a need to provide validation for a wizard step and more specifically for the content inside a wizard step. The following section will talk in detail about each of these components.
The IValidableContent Interface
This interface is used for the purposes of validation. By implementing this interface in the class that represents the content of a wizard step, the user can override the default validation behavior of that step. The interface diagram can be seen in the image below:
The interface exposes a single method, IsValid, which will contain the validation logic. If classes do not implement this interface, the wizard steps that will contain instances of those classes will be considered valid by default. If the classes that represent the content of the wizard step implement the interface, then the validity of the step will be determined by the value returned by the IsValid method.
The WizardStep Class
This class represents a wizard step. The class diagram can be seen in the image below:
The class has 5 properties that are described in the list below:
AllowFinish – This Boolean property is used to indicate if the wizard can be finished from this step. There are cases when a wizard is already populated with default values. If the user does not want to change these values, he shouldn’t be forced to go through each wizard step in order to finish the wizard. When this property is set to true on the current wizard step, the wizard will display a finish button that will let the user finish the wizard. If set to false, the finish button will not be displayed. AllowReturn – This Boolean property is used to indicate whether the user can come back to this step via a back command. If this property is set to false on a wizard step and the user has passed the step, the user cannot go to the previous step. In fact, when the user wishes to go to a previous step, he will be sent to the first step (in reverse order) that has the AllowReturn property set to true. Title – This property represents the step title Wizard – This property represents the wizard to which the step belongs. Content – This is the most important property of the class. This property is used to hold the content of the wizard step. In most cases, this should be a custom ViewModel class.
The WizardStep class also implements the IValidableContent interface. This interface is used to provide step validation. The implementation in the wizard step checks to see if the Content property implements the same interface. If it does, it returns the value returned from that implementation of the interface. If the type of the Content property does not implement the IValidableContent interface, the step is considered valid by default. The code can be seen below:
public bool IsValid()
{
	IValidableContent v = content as IValidableContent;
	if (v != null)
		return v.IsValid();
	return true;
}
The last thing I want to talk about regarding this class is the content change notification. Since the WizardStep class implements the INotifyPropertyChanged, if a property is changed, the changes are notified. This includes the case when the Content property changes. The question is what happens if the properties on the content change but not the Content instance itself. This question is important with regards to validation. What happens if the step Content property is set and the step starts as invalid? After the user modifies a property that would make the step valid, the wizard state should be invalidated to reflect the new content state and give the user the possibility to move on to the next step. These changes need to be notified to the wizard step so that it can then tell the wizard to invalidate the commands. There is also the question about how deep the content hierarchy is and if you should handle all levels or only the first level in the hierarchy. There is also the problem that the wizard step doesn’t know about the structure of the content in advance.
I decided to implement this using reflection. Whenever the Content property is set on a wizard step, the step subscribes to change notifications at all levels in the content hierarchy. This is accomplished using the method below:
private void subscribe(object obj)
{
INotifyPropertyChanged c = obj as INotifyPropertyChanged;
if (c != null)
c.PropertyChanged += ContentChanged;
else
return;
Debug.WriteLine("subscribed " + obj);
Type type = obj.GetType();
PropertyInfo[] pis = type.GetProperties();
for (int i = 0; i < pis.Length; i++)
{
object val = pis[i].GetValue(obj, null);
subscribe(val);
}
}
The method checks to see if the object implements the INotifyPropertyChanged interface. If it does, it subscribes to the PropertyChanged event of that object and then proceeds to check the properties of the object recursively. If the object does not implement the INotifyPropertyChanged interface, the method returns.
The definition of the Content property can be seen in the listing below:
public object Content
{
get { return content; }
set
{
if (content == value)
return;
unsubscribe(content);
content = value;
subscribe(content);
NotifyPropertyChanged("Content");
if (wizard != null)
wizard.Invalidate();
}
}
As you can see, before the new content is set, the property unsubscribes the current content by using the unsubscribe() method. After this, the new content is set and the wizard step subscribes to the change notification by using the subscribe() method described above. The wizard is also invalidated to reflect the state of the new content.
The definition of the unsubscribe() method is similar and can be seen in the listing below:
private void unsubscribe(object obj)
{
INotifyPropertyChanged c = obj as INotifyPropertyChanged;
if (c != null)
c.PropertyChanged -= ContentChanged;
else
return;
Debug.WriteLine("unsubscribed "+ obj);
Type type = obj.GetType();
PropertyInfo[] pis = type.GetProperties();
for (int i = 0; i < pis.Length; i++)
{
object val = pis[i].GetValue(obj, null);
unsubscribe(val);
}
}
The Wizard Class
This class represents the wizard itself and is a container for the wizard steps. The class diagram can be seen in the image below:
The class has 4 properties that are described in the list below:
Title – Represents the wizard title Steps – This is a collection of type ObservableCollection<WizardStep> that represents the wizard steps CurrentStep – Represents the current wizard step ShowCancel – This property is used to specify if the wizard can be cancelled. When this property is true, the wizard will display a cancel button that can be used to cancel the wizard. If the property is false, the cancel button will not be shown.
The wizard also exposes 2 events. The events are triggered when the wizard is finished and when it is canceled (provided that the ShowCancel property is set to true).
The class also has another 4 properties and 4 methods that relate to the wizard navigation. These are described in the paragraphs below.
The Navigation Properties
These properties specify whether the wizard can navigate in a particular direction. The first of these properties is CanNext. As its name implies, the property returns whether or not the user can move to the next step. The definition can be seen below:
public bool CanGoForward
{
get
{
int idx = steps.IndexOf(currentStep);
return idx < (steps.Count - 1) && CurrentStep.IsValid();
}
}
As you can see from the above definition, the user can always move forward as long as the current step is not the last step and if the current step is valid.
The second property is CanPrevious. This property indicates whether or not the wizard can move to the previous step. The definition can be seen below:
public bool CanGoBack
{
	get
	{
		WizardStepViewModel prev = GetPreviousAvailableStep();
		return prev != null;
	}
}
The property uses the GetPreviousAvailableStep() method to determine the previous step. If there is an available previous step, this method returns it and the property will return true. The definition for the GetPreviousAvailableStep method can be seen below:
private WizardStepViewModel GetPreviousAvailableStep()
{
	int idx = steps.IndexOf(currentStep);
	for (int i = idx - 1; i >= 0; i--)
	{
		if (steps.ElementAt(i).AllowReturn)
			return steps.ElementAt(i);
	}
	return null;
}
The method checks all the previous steps in reverse order and returns the first step that has the AllowReturn property set to true. This property indicates whether the user can come back to that step.
The third property is the CanCancel property. This property specifies whether the wizard can be cancelled. The definition can be seen below:
public bool CanCancel
{
get
{
return steps.Count > 0 && ShowCancel;
}
}
As you can see, this method always returns true if there are steps in the wizard and if the ShowCancel property is set to true.
The last navigation related property is CanFinish. This property specifies whether the wizard can be finished. The definition of this property can be seen below:
public bool CanFinish
{
get
{
int idx = steps.IndexOf(currentStep);
if (steps.Count == 0 || currentStep == null || !currentStep.IsValid())
return false;
if (idx < steps.Count - 1 && currentStep.AllowFinish)
return true;
return idx == steps.Count - 1;
}
}
The user can finish the wizard only if the current step is valid and is the last wizard step or if the current step is valid and has the AllowFinish property set to true.
The Navigation Methods
The first of the navigation methods is the Next() method. This method is responsible for moving the wizard to the next step. The definition can be seen below:
public virtual void Next()
{
if (CanNext)
{
int idx = steps.IndexOf(currentStep);
CurrentStep = steps.ElementAt(idx + 1);
}
}
The first thing to notice is that the method is declared as virtual. This will enable the user to override the method and provide additional functionality in derived classes. An example of this will be provided later in the article. The only thing this method does is to set the next step as the current step.
The second method is the Previous() method. This method is responsible for moving the wizard to the previous step. The definition can be seen below:
public virtual void OnPrevious()
{
WizardStepViewModel prev = GetPreviousAvailableStep();
if (prev != null)
{
CurrentStep = prev;
}
}
The method also uses the GetPreviousAvailableStep() to retrieve the available step and sets this as the current step.
The third method is the Cancel() method. This method is used to cancel the wizard. If the user can cancel the wizard, then this method raises the WizardCalcelled event. The definition for this method can be seen in the listing below:
public virtual void OnCancel(object param)
{
	if (CanCancel)
		OnWizardCanceled();
}
The last navigation method is the Finish() method. If the wizard can be finished, this method raises the WizardFinished event. The definition can be seen in the listing below:
public virtual void OnFinish(object param)
{
	if (CanFinish)
		OnWizardFinished();
}
Helper Methods
The Wizard class also exposes a few methods that are used to add steps to the wizard. These methods can be seen in the listing below:
public void AddStep(WizardStepViewModel step)
{
	if (step.Wizard != null && step.Wizard != this)
		step.Wizard.Steps.Remove(step);
	if (step.Wizard == this)
		return;
	step.Wizard = this;
	Steps.Add(step);
}
public void AddStep(string title, object content)
{
	AddStep(title, content, false, true);
}
public void AddStep(string title, object content, bool allowFinish, bool allowReturn)
{
	WizardStepViewModel vm = new WizardStepViewModel();
	vm.Title = title;
	vm.Content = content;
	vm.Wizard = this;
	vm.AllowFinish = allowFinish;
	vm.AllowReturn = allowReturn;
	Steps.Add(vm);
}
Since a wizard step can have only a single parent, the first method overload first checks to see if the step to be added already has a different parent. If it does, it removes it. After this, it sets the new parent and adds the step. The other 2 overloads add a new step by using a set of arguments.
The last helper method worth mentioning is the Invalidate method. This is a virtual method that will be called when the wizard is invalidated. The definition for this method can be seen below:
public virtual void Invalidate()
{
	NotifyPropertyChanged("CanNext");
	NotifyPropertyChanged("CanPrevious");
	NotifyPropertyChanged("CanCancel");
	NotifyPropertyChanged("CanFinish");
}
All that needs to be done at this level is to notify that the navigation properties have changed. Derived classes can add more functionality by overriding the method.
Using the Wizard Classes
In the simplest case, the wizard classes can be used without any modifications. The only requirements are to provide the appropriate templates and to integrate the classes in a particular application’s code. The wizard classes can be easily integrated with various MVVM frameworks. The samples attached to this article use both MVVM Light and Caliburn Micro in order to integrate the wizard classes into various applications. The examples in this article will show only the MVVM Light integration.
Basic Usage (MVVM Light)
The first usage example will consume the wizard classes as they are without any additional changes. This example will present a wizard with 3 steps. The wizard will allow the user to specify a person’s details. The first step will present the first and last names, the second step will present the address and the email. The address is a complex type that will contain the street and the city. This step also overrides the default validation logic. The last step is used to present the biography.
In order to successfully use the wizard, we need to do the following things:
- Define the content of each step
- Create the wizard and fill each step with the content defined previously
- Create views for the wizard and its steps
- Bind the wizard to a control on a page
Defining the Content for Each Step
Like I said at the beginning of this section, we need to define the content presented by the wizard for each step. For this particular wizard, we’ll define 4 view models. The view model for the first step can be seen in the listing below:
public class FirstPageViewModel:ViewModelBase
{
	private string firstName;

	public string FirstName
	{
		get { return firstName; }
		set
		{
			if (firstName == value)
				return;
			firstName = value;
			RaisePropertyChanged("FirstName");
		}
	}
	private string lastName;

	public string LastName
	{
		get { return lastName; }
		set
		{
			if (lastName == value)
				return;
			lastName = value;
			RaisePropertyChanged("LastName");
		}
	}
}
The view model for the second step can be seen in the listing below:
public class SecondPageViewModel:ViewModelBase,IValidableContent
{
	public SecondPageViewModel()
	{
		Address = new AddressViewModel();
	}
	private string email;

	public string Email
	{
		get { return email; }
		set
		{
			if (email == value)
				return;
			email = value;
			RaisePropertyChanged("Email");
		}
	}
	private AddressViewModel addr;

	public AddressViewModel Address
	{
		get { return addr; }
		set
		{
			if (addr == value)
				return;
			addr = value;
			RaisePropertyChanged("Address");
		}
	}

	public bool IsValid()
	{
		return !string.IsNullOrEmpty(email) &&
			Address != null && !string.IsNullOrEmpty(Address.Street) &&
			!string.IsNullOrEmpty(Address.City);
	}
}
This second view model also overrides the default validation behavior by implementing the IValidableContent interface. The content will be valid only if the Address is not null and if the address fields contain data. The view model for the address can be seen in the listing below:
public class AddressViewModel:ViewModelBase
{
	private string str;

	public string Street
	{
		get { return str; }
		set
		{
			if (str == value)
				return;
			str = value;
			RaisePropertyChanged("Street");
		}
	}
	private string city;

	public string City
	{
		get { return city; }
		set
		{
			if (city == value)
				return;
			city = value;
			RaisePropertyChanged("City");
		}
	}
}
The view model for the third step can be seen in the listing below:
public class ThirdPageViewModel:ViewModelBase
{
	private string bio;

	public string Biography
	{
		get { return bio; }
		set
		{
			if (bio == value)
				return;
			bio = value;
			RaisePropertyChanged("Biography");
		}
	}
}
Creating the Wizard
After the view models have been defined, the next step will create the wizard. Before creating the wizard, we need to create a view model that will host it. This view model will subscribe to the wizard’s WizardFinished event so that the data in the wizard can be processed. For this first example, the hosting view model will have the following definition:
public class BasicViewModel : SampleViewModel
{
private Wizard wizard;
public BasicViewModel()
{
PageTitle = "Basic";
}
public Wizard Wizard
{
get
{
if (wizard == null)
initWizard();
return wizard;
}
}
private void initWizard()
{
wizard = new Wizard();
wizard.Title = "Basic Wizard Title";
wizard.AddStep("First Title", new FirstPageViewModel());
wizard.AddStep("Second Title", new SecondPageViewModel());
wizard.AddStep("Third Title", new ThirdPageViewModel());
wizard.WizardCanceled += new EventHandler(wizard_WizardCanceled);
wizard.WizardFinished += new EventHandler(wizard_WizardFinished);
}
private void wizard_WizardFinished(object sender, EventArgs e)
{
string fname = ((FirstPageViewModel)wizard.Steps[0].Content).FirstName;
string lname = ((FirstPageViewModel)wizard.Steps[0].Content).LastName;
Debug.WriteLine(string.Format("Wizard completed for {0} {1}",
fname, lname));
}
private void wizard_WizardCanceled(object sender, EventArgs e)
{
Debug.WriteLine("The wizard has been canceled");
}
}
The BasicViewModel class exposes the wizard through the Wizard property. The initWizard() method initializes the wizard and subscribes to the wizard events. The next step is to define the data templates.
Creating the Views
Now that the wizard has been defined, we will need to define the way the wizard will present its data. This will be done by using some data templates. We will need to define data templates for the wizard itself, for the wizard step and for the content that will be presented.
The data template for the first step can be seen in the listing below:
<DataTemplate x:Key="FirstPageViewModel">
	<Grid>
		<Grid.RowDefinitions>
			<RowDefinition Height="Auto"/>
			<RowDefinition Height="Auto"/>
		</Grid.RowDefinitions>
		<Grid.ColumnDefinitions>
			<ColumnDefinition Width="Auto"/>
			<ColumnDefinition/>
		</Grid.ColumnDefinitions>
		<TextBlock Text="First Name" VerticalAlignment="Center"/>
		<TextBlock Text="Last Name" Grid.Row="1" VerticalAlignment="Center"/>
		<TextBox Text="{Binding FirstName, Mode=TwoWay}"
				 Grid.Column="1"/>
		<TextBox Text="{Binding LastName, Mode=TwoWay}"
				 Grid.Column="1" Grid.Row="1"/>
	</Grid>
</DataTemplate>
This is a very simple template. It uses 2 textbox controls to get the input from the user for the first and last names. The data template for the second step can be seen in the listing below:
<DataTemplate x:Key="SecondPageViewModel">
	<Grid>
		<Grid.RowDefinitions>
			<RowDefinition Height="Auto"/>
			<RowDefinition Height="Auto"/>
			<RowDefinition Height="Auto"/>
		</Grid.RowDefinitions>
		<Grid.ColumnDefinitions>
			<ColumnDefinition Width="Auto"/>
			<ColumnDefinition/>
		</Grid.ColumnDefinitions>
		<TextBlock Text="Email" VerticalAlignment="Center"/>
		<TextBlock Text="Address" Grid.Row="1" Grid.ColumnSpan="2"/>
		<TextBox Text="{Binding Email, Mode=TwoWay}"
				 Grid.Column="1"/>
		<Grid Grid.Row="2" Grid.ColumnSpan="2">
			<v:DynamicContentControl Content="{Binding Address}"
					VerticalContentAlignment="Stretch"
					HorizontalContentAlignment="Stretch"/>
		</Grid>
	</Grid>
</DataTemplate>
This template uses a textbox to get the email. In order to provide the user the option to also introduce the address data, the template uses a DynamicContentControl to display the address template. This DynamicContentControl is a custom content control that changes its data template whenever its content changes. I will talk about it a bit later.
The data template for the address can be seen below. This will be displayed in the DynamicContentControl.
<DataTemplate x:Key="AddressViewModel">
	<Grid>
		<Grid.RowDefinitions>
			<RowDefinition Height="Auto"/>
			<RowDefinition Height="Auto"/>
		</Grid.RowDefinitions>
		<Grid.ColumnDefinitions>
			<ColumnDefinition Width="Auto"/>
			<ColumnDefinition/>
		</Grid.ColumnDefinitions>
		<TextBlock Text="Street" Grid.Row="0" VerticalAlignment="Center"/>
		<TextBlock Text="City" Grid.Row="1" VerticalAlignment="Center"/>
		<TextBox Text="{Binding Path=Street, Mode=TwoWay}"
				 Grid.Column="1" Grid.Row="0"/>
		<TextBox Text="{Binding Path=City, Mode=TwoWay}"
				 Grid.Column="1" Grid.Row="1"/>
	</Grid>
</DataTemplate>
The data template for the third step can be seen below:
<DataTemplate x:Key="ThirdPageViewModel">
	<Grid>
		<Grid.RowDefinitions>
			<RowDefinition Height="Auto"/>
			<RowDefinition Height="*"/>
		</Grid.RowDefinitions>
		<TextBlock Text="Biograpgy"/>
		<ScrollViewer Grid.Row="1">
			<TextBox Text="{Binding Biography, Mode=TwoWay}"
				TextWrapping="Wrap" VerticalAlignment="Stretch" />
		</ScrollViewer>
	</Grid>
</DataTemplate>
The data template for the wizard step will present the wizard step title and below it the content for the particular step. This will also be achieved with a DynamicContentControl. The data template for the wizard step can be seen below:
<DataTemplate x:Key="WizardStep">
	<Grid>
		<Grid.RowDefinitions>
			<RowDefinition Height="Auto"/>
			<RowDefinition Height="*"/>
		</Grid.RowDefinitions>
		<TextBlock Text="{Binding Converter={StaticResource conv2}}"
				Style="{StaticResource PhoneTextTitle2Style}"/>
		<v:DynamicContentControl Content="{Binding Content}"
					Margin="5,20,0,5" Grid.Row="1"
					VerticalContentAlignment="Stretch"
					HorizontalContentAlignment="Stretch"/>
	</Grid>
</DataTemplate>
The last view to be defined is the view for the wizard. The view for the wizard will be a UserControl. This UserControl will have its DataContext property set to the wizard. We need a way to trigger the wizard navigation from this user control. The solution I chose was to implement click event handlers on the required methods. The XAML for this user control can be seen in the listing below:
<Grid x:Name="LayoutRoot" Background="{StaticResource PhoneChromeBrush}">
	<Grid.RowDefinitions>
		<RowDefinition Height="Auto"/>
		<RowDefinition Height="*"/>
		<RowDefinition Height="Auto"/>
	</Grid.RowDefinitions>
	<TextBlock Text="{Binding Path=Title}" Margin="-3,-8,0,0"
				Style="{StaticResource PhoneTextTitle1Style}"/>
	<v:DynamicContentControl Content="{Binding Path=CurrentStep}"
				VerticalContentAlignment="Stretch"
				HorizontalContentAlignment="Stretch" Grid.Row="1"/>
	<StackPanel Orientation="Horizontal" Grid.Row="2" HorizontalAlignment="Center">
		<Button Content="Previous"
		Visibility="{Binding Path=CanGoBack, Converter={StaticResource conv}}"
				Click="btnPrevious_Click"
				>

		</Button>
		<Button Content="Next" Visibility="{Binding Path=CanGoForward,
				Converter={StaticResource conv}}"
				Click="btnNext_Click"
				>

		</Button>
		<Button Content="Finish" Visibility="{Binding Path=CanFinish,
				Converter={StaticResource conv}}"
				Click="btnFinish_Click"
				>

		</Button>
		<Button Content="Cancel" Visibility="{Binding Path=CanCancel,
				Converter={StaticResource conv}}"
				Click="btnCancel_Click"
				>

		</Button>
	</StackPanel>
</Grid>
I know that many of you will say that this is not the MVVM way, but the handlers in the code behind don’t contain any business logic. They just delegate to the view-model methods. This can be seen in the listing below:
void BasicWizardView_Loaded(object sender, RoutedEventArgs e)
{
	wizard = DataContext as Wizard;
}

private void btnPrevious_Click(object sender, RoutedEventArgs e)
{
	if (wizard != null)
		wizard.OnPrevious();
}

private void btnNext_Click(object sender, RoutedEventArgs e)
{
	if (wizard != null)
		wizard.OnNext();
}

private void btnFinish_Click(object sender, RoutedEventArgs e)
{
	if (wizard != null)
		wizard.OnFinish();
}

private void btnCancel_Click(object sender, RoutedEventArgs e)
{
	if (wizard != null)
		wizard.OnCancel();
}
There is nothing in MVVM that says you should not write any code in the code behind. Since the file exists, it must be there for a reason. I thought this is an acceptable option when using the base Wizard class. Later in the article, I will change this by deriving from the Wizard class. This will allow me to add commands to the derived class and remove the method invocations from the code behind.
The DynamicContentControl Control
You have probably noticed by now that some of the data templates described above use a custom content control to present the wizard and its steps. The definition of this custom control can be seen in the listing below:
public class DynamicContentControl:ContentControl
{
protected override void OnContentChanged(object oldContent, object newContent)
{
base.OnContentChanged(oldContent, newContent);
if (newContent == null)
return;
Type t = newContent.GetType();
DataTemplate template = App.Current.Resources[t.Name] as DataTemplate;
ContentTemplate = template;
}
}
The DynamicContentControl class derives from ContentControl and overrides the OnContentChanged method. In the override, the control changes the current content template based on the type of the current content. This is necessary when trying to display different data structures in the same control in WP7 as there is no feature to apply data templates dynamically by type as in WPF (and SL5). I have written an article about this. If you want more details, you can read that article here.
Binding the Wizard to a Control on a Page
After defining the data templates, the last thing we need to do is to integrate the wizard into a page. In order to do this, I created a view model locator and added an instance of it in the App.xaml file. The relevant property of the locator can be seen below:
public static BasicViewModel Basic
{
	get
	{
		basic = new BasicViewModel();
		return basic;
	}
}
Now we will need to bind the data context of the page to this property. This can be seen in the line below:
DataContext="{Binding Path=Wizard, Source={StaticResource Locator}}"
The last thing that needs to be done is to add the control that will display the wizard. This will be done by using the BasicWizardView as below:
<Grid x:Name="ContentPanel" Grid.Row="1" Margin="12,0,12,0">
	<loc:BasicWizardView DataContext="{Binding Wizard}"
				HorizontalContentAlignment="Stretch"
				VerticalContentAlignment="Stretch"/>
</Grid>
In this view, I also subscribe to the BackKeyPress event so that I can integrate the device back button with the wizard. This handler also delegates to the view-model methods so it is an acceptable solution for now. The code for this can be seen below:
private void PhoneApplicationPage_BackKeyPress
	(object sender, System.ComponentModel.CancelEventArgs e)
{
	BasicViewModel vm = DataContext as BasicViewModel;
	if (vm != null && vm.Wizard != null)
	{
		if (vm.Wizard.CanPrevious)
		{
			vm.Wizard.Previous();
			e.Cancel = true;
		}
	}
}
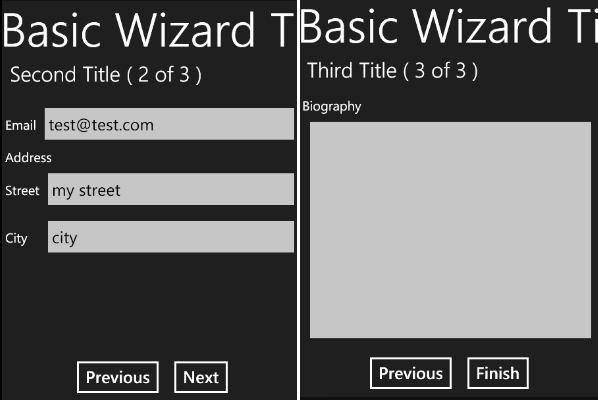
The results of running this first example can be seen in the images below:
As you can see from the image above, we can only move to the third step after we have entered valid data in the second step.
Basic Usage (Caliburn)
The integration of the Wizard in a Caliburn app is done almost the same way. In order to conform to the naming convention, I will derive from the Wizard class but I will not add any code. The new wizard will look like below:
public class WizardViewModel:Wizard
{}
The view for this wizard is a UserControl named WizardView and can be seen below:
<TextBlock Text="{Binding Path=Title}" Margin="-3,-8,0,0"
	Style="{StaticResource PhoneTextTitle1Style}"/>
<v:DynamicContentControl Content="{Binding Path=CurrentStep}"
			 VerticalContentAlignment="Stretch"
			 HorizontalContentAlignment="Stretch" Grid.Row="1"/>
<StackPanel Orientation="Horizontal" Grid.Row="2" HorizontalAlignment="Center">
	<Button Content="Previous" x:Name="Previous"
			Visibility="{Binding Path=CanPrevious,
				Converter={StaticResource conv}}" >

	</Button>
	<Button Content="Next" x:Name="Next"
			Visibility="{Binding Path=CanNext,
				Converter={StaticResource conv}}">

	</Button>
	<Button Content="Finish" x:Name="Finish"
			Visibility="{Binding Path=CanFinish,
				Converter={StaticResource conv}}">

	</Button>
	<Button Content="Cancel" x:Name="Cancel"
			Visibility="{Binding Path=CanCancel,
				Converter={StaticResource conv}}">
	</Button>
</StackPanel>
In Caliburn Micro, there is no longer a need to add code to the code behind in order to trigger the navigation as the framework automatically binds the corresponding methods and properties in the viewmodel to the appropriately named elements in the view. To wire up this functionality, I added the following lines to the bootstrapper class:
container.RegisterPerRequest(typeof(BasicSampleViewModel),
	"BasicSampleViewModel", typeof(BasicSampleViewModel));
container.RegisterPerRequest(typeof(WizardViewModel),
	"WizardViewModel", typeof(WizardViewModel));
The BasicSampleViewModel is the viewmodel that hosts the wizard. It instantiates the wizard and subscribes to its WizardFinished and WizardCancelled events. To integrate this wizard into a page, I used a simple content control like below:
<ContentControl x:Name="Wizard"
	HorizontalContentAlignment="Stretch"
	 VerticalContentAlignment="Stretch"
	/>
Deriving from the Wizard Class
Using the wizard in its current state is ok but maybe the user will want to encapsulate some of the logic and may even add a few more properties. To achieve this, we can derive from the wizard control in order to add the desired functionality. For the second usage example, I will create a wizard derived class. This class will encapsulate creating the steps and will also expose a few more properties. These new wizard properties will expose the properties in each wizard step. This will be done in order to increase usability and type safety when reading the properties in the WizardFinished event.
The definition of this new derived class can be seen in the listing below:
public class DerivedWizard:Wizard
{
private RelayCommand<object> nextCmd, prevCmd, finishCmd, cancelCmd;
public DerivedWizard()
{
Title = "Derived Wizard Title";
AddStep("First Step", new FirstPageViewModel());
AddStep("Second Step", new SecondPageViewModel());
AddStep("Third Step", new ThirdPageViewModel());
}
public string FirstName
{
get { return ((FirstPageViewModel)Steps[0].Content).FirstName; }
}
public string LastName
{
get { return ((FirstPageViewModel)Steps[0].Content).LastName; }
}
public string Email
{
get { return ((SecondPageViewModel)Steps[1].Content).Email; }
}
public AddressViewModel Address
{
get { return ((SecondPageViewModel)Steps[1].Content).Address; }
}
public string Biography
{
get { return ((ThirdPageViewModel)Steps[1].Content).Biography; }
}
public RelayCommand<object> NextCommand
{
get
{
if (nextCmd == null)
nextCmd = new RelayCommand<object>
(param => Next(), param => CanNext);
return nextCmd;
}
}
public RelayCommand<object> PreviousCommand
{
get
{
if (prevCmd == null)
prevCmd = new RelayCommand<object>
(param => OnPrevious(param), param => CanPrevious);
return prevCmd;
}
}
public RelayCommand<object> CancelCommand
{
get
{
if (cancelCmd == null)
cancelCmd = new RelayCommand<object>
(param => Cancel(), param => CanCancel);
return cancelCmd;
}
}
public RelayCommand<object> FinishCommand
{
get
{
if (finishCmd == null)
finishCmd = new RelayCommand<object>
(param => Finish(), param => CanFinish);
return finishCmd;
}
}
public void OnPrevious(object param)
{
CancelEventArgs args = param as CancelEventArgs;
if (args != null && CanPrevious)
{
Previous();
args.Cancel = true;
}
}
}
As you can see from the above code, I also added the commands that will be used to trigger the navigation. Another important thing to notice in this code is the OnPrevious method. This will be used to handle the back button integration.
The OnPrevious method checks the parameter to see if it is an instance of the CancelEventArgs class. If it is and if the wizard is not at the first step, the method will call the Previous navigation method in order to navigate to the previous step and will set the Cancel property to false in order to cancel the event. If the wizard is on the first step, the method will do nothing and pressing the back button will exit the wizard page.
In order to use this new wizard, we need to add a new property in the locator class that will expose an instance of this new type which we will then bind to a control. This property can be seen below:
public static DerivedViewModel Derived
{
get
{
derived = new DerivedViewModel();
return derived;
}
}
Now that I have added the commands, I can remove the logic in the code behind. The new wizard view can be seen below:
<DataTemplate x:Key="DerivedWizard">
	<Grid>
		<Grid.RowDefinitions>
			<RowDefinition Height="Auto"/>
			<RowDefinition Height="*"/>
			<RowDefinition Height="Auto"/>
		</Grid.RowDefinitions>
		<TextBlock Text="{Binding Path=Title}" Margin="-3,-8,0,0"
				Style="{StaticResource PhoneTextTitle1Style}"/>
		<v:DynamicContentControl Content="{Binding Path=CurrentStep}"
				VerticalContentAlignment="Stretch"
				HorizontalContentAlignment="Stretch" Grid.Row="1"/>
		<StackPanel Orientation="Horizontal" Grid.Row="2"
				HorizontalAlignment="Center">
			<Button Content="Previous"
			Visibility="{Binding Path=CanPrevious,
			Converter={StaticResource conv}}" >
				<i:Interaction.Triggers>
					<i:EventTrigger EventName="Click">
						<cmd:EventToCommand Command=
						"{Binding PreviousCommand}" />
					</i:EventTrigger>
				</i:Interaction.Triggers>
			</Button>
			<Button Content="Next" Visibility="{Binding Path=CanNext,
					Converter={StaticResource conv}}">
				<i:Interaction.Triggers>
					<i:EventTrigger EventName="Click">
					    <cmd:EventToCommand
					    Command="{Binding NextCommand}" />
					</i:EventTrigger>
				</i:Interaction.Triggers>
			</Button>
			<Button Content="Finish"
				Visibility="{Binding Path=CanFinish,
				Converter={StaticResource conv}}">
				<i:Interaction.Triggers>
					<i:EventTrigger EventName="Click">
						<cmd:EventToCommand Command=
						"{Binding FinishCommand}" />
					</i:EventTrigger>
				</i:Interaction.Triggers>
			</Button>
			<Button Content="Cancel"
				Visibility="{Binding Path=CanCancel,
					Converter={StaticResource conv}}">
				<i:Interaction.Triggers>
					<i:EventTrigger EventName="Click">
						<cmd:EventToCommand Command=
						"{Binding CancelCommand}" />
					</i:EventTrigger>
				</i:Interaction.Triggers>
			</Button>
		</StackPanel>
	</Grid>
</DataTemplate>
As you can see, the navigation is now done via the EventToCommand ActionTrigger. The back button integration is done in the same way. The code can be seen below:
<i:Interaction.Triggers>
	<i:EventTrigger EventName="BackKeyPress">
		<cmd:EventToCommand Command="{Binding Path=Wizard.PreviousCommand}"
					PassEventArgsToCommand="True"/>
	</i:EventTrigger>
</i:Interaction.Triggers>
Advanced Usage (Test Application Discussion)
Most of the time, a wizard’s structure is known at compile time. This includes the number of steps and the data that each step will present to the user. There are however situations when this is not true. In some cases, both the number of steps and the data presented in each step will be unknown until runtime. This happens, for example, in a testing application. In this kind of application, the user will need to go through questions one at a time. A wizard is a good option when trying to build such a testing application. In this case, both the number of steps and the content in each step will be known only at runtime, when the user starts the test.
For the advanced usage scenario, I will talk about how you might use the wizard classes in this article to build a testing application. The advanced usage example in the previous article version was ok but it was kind of abstract. I thought a more concrete scenario was needed to better present what you can do with the classes. If you still want to read the previous version, you can select it from the menu at the top of the page.
Recently, I had to implement a testing application. I thought long and hard about how I should present each question to the user and how I should let him navigate from question to question. Then it hit me: Present the questions one at a time in a wizard like fashion and use the wizard classes to do this. Although the testing application was implemented in WPF, I think the discussion will still be meaningful. These wizard classes are very flexible. Although they were written for WP7, the classes can also be used in WPF and Silverlight projects without any additional modifications.
Before a user’s test begins, the app will need to retrieve the test data from the server. This data will include the number of questions, the total time allocated for the test and other specific test properties (but no question data). This data will be used to initialize the wizard. The hypothetical code that will do this can be seen below:
public class TestWizard:Wizard
{
Test currentTest = null;
public TestWizard(Test test)
{
currentTest = test;
for (int i = 0;i< currentTest.NumberOfQuestions;i++)
Steps.Add(new WizardStep());
}
}
}
Test theTest = TestService.GetTest();
Workspace = new TestWizard(theTest);
After the wizard is initialized, the test will need to be started. We will do this by calling the hypothetical StartTest() method. This method will be implemented in the derived TestWizard class along with the commands used for navigation. This can be seen below:
public void StartTest()
{
IsBusy = true;
TestQuestion tq = TestService.GetQuestion(currentTest.Id,1);
CurrentStep.Content = tq;
IsBusy = false;
}
Now comes the interesting part. A particular test can contain a lot of questions. This means that a lot of data will have to be retrieved from the server, if we decided to get all the questions at once. One solution to this problem would be to retrieve one question at a time. Besides the small amount of data retrieved, this option offers other advantages. One of these is that the answer to each question can be saved when the user moves to the next question. On desktops, the biggest advantage this offers is that if the power is cut off during the test, you can maintain your answers. When power comes back on, you can continue from where you left off. This is what the hypothetical code presented above does. In retrieves only the first test question.
To navigate to the second question (and so on), the user will have to press the Next button. When he/she does this, the wizard should save the current question on the server and retrieve the new question. This can be done by overriding the Next() method. This can be seen in the hypothetical code below:
public override void Next()
{
IsBusy = true;
TestQuestion tq = (TestQuestion)CurrentStep.Content;
TestService.SaveQuestionAnswer(tq);
tq = TestService.GetQuestion(currentTest.Id, ++tq.QuestionNumber);
int idx = Steps.IndexOf(CurrentStep);
Steps[idx + 1].Content = tq;
IsBusy = false;
base.Next();
}
As you can see while the wizard gets the data from the server, the IsBusy flag is set. After the data is retrieved, the content for the next step is set and the wizard navigates by using the Next() implementation of the base class.
When the user wants to go to a previous question, the same thing happens. The current question is saved and the previous question is retrieved and displayed. This can be seen in the hypothetical code below:
public override void Previous()
{
IsBusy = true;
TestQuestion tq = (TestQuestion)CurrentStep.Content;
TestService.SaveQuestionAnswer(tq);
tq = TestService.GetQuestion(currentTest.Id, --tq.QuestionNumber);
int idx = Steps.IndexOf(CurrentStep);
Steps[idx - 1].Content = tq;
IsBusy = false;
base.Previous();
}
I think this is it. I hope you will find this wizard implementation useful. If you like the article and if you find this code useful for your applications, please take a minute to vote and comment. Also, if you think I should change something, please let me know.
History
- Friday, July 1, 2011 - Initial release
- Tuesday, July 5, 2011 - Article updated
- Monday, July 11, 2011 - Article updated
- Thursday, August 4, 2011 - Article updated
This member has not yet provided a Biography. Assume it's interesting and varied, and probably something to do with programming.


 General
  News
News  Suggestion
  Question
  Bug
Bug  Answer
  Joke
Joke  Praise
  Rant
Rant  Admin
Admin 


