Introduction
Speech bubbles (or message bubbles) are becoming more and more popular. They are now present in a vast number of mobile messaging applications across most of the platforms (iOS, Android, RIM and WP7). In this article, I’m going to present my implementation of this very nice UI feature for the RIM platform.
Article Contents
Speech Bubble Requirements
Before I get into the implementation of the speech bubble, I’m going to talk about the features that the speech bubble will need to support. These features can be seen in the list below:
- The bubble will need to have a variable size. For aesthetic reasons, the bubble should not have a width bigger than 3 quarters of the screen width.
- The bubble should contain both text and images. The text will be shown first followed by a list of images beneath the text.
- The images will need to be wrapped (if there are many) in order to respect the maximum with of the bubble.
A graphical example of these features can be seen in the image below:

As you can see from the above image, if the speech bubble contains only images, there will be no space left available for the text. The same thing happens if there is only text (no space is allocated for the images).
The Implementation
This section will present the speech bubble implementation. As you have probably guessed by now, the speech bubble contains two parts: the text part and the images part. These 2 parts are contained in the speech bubble manager. At the same time, all the message images are contained in another manager. This manager is a wrap panel.
The first part of this section will present the wrap panel implementation. After this, I'm going to present the speech bubble manager implementation.
Implementing the Wrap Panel Manager
When I thought about how I was going to implement the image panel, I tried to use an existing field manager (using the FlowFieldManager class). After spending a few hours trying to make this work, I gave up and I decided to implement my own wrap panel. This section will present this implementation.
In order to implement a custom field manager, the only requirement is to override the sublayout() method. In this method’s body, 2 things need to be done. The first is to position the child fields (by calling the layoutChild() method to measure the fields and the setPositionChild() method to position them) and the second is to set the manager’s size at the end (before exiting the method body).
The code listing presented below shows the implementation of this manager.
protected void sublayout(int width, int height) {
int currX=0, currY=0;
int maxX=0;
int maxY=0;
int count=getFieldCount();
for(int i=0;i<count;i++){
Field f=getField(i);
layoutChild(f, width, height);
int fw=f.getWidth()+f.getMarginLeft()+f.getMarginRight();
int fh=f.getHeight()+f.getMarginTop()+f.getMarginBottom();
if((currX+fw) > width && currX!=0){
if(maxX<currX)maxX=currX;
currX=0;
currY+=maxY;
maxY=0;
}
setPositionChild(f, currX+f.getMarginLeft(), currY+f.getMarginTop());
maxY=Math.max(maxY, fh);
currX+=fw;
}
currY+=maxY;
if(maxX<currX)maxX=currX;
setExtent(maxX, currY);
}
The sublayout() method takes 2 parameters. These parameters represent the maximum size available to the manager.
The first lines of code initialize a few helper variables. After these lines, the code iterates over all the child controls and tells them to measure themselves by using the layoutChild() method. After we call this method on a particular child, we can then access that child’s actual dimensions using the getWidth() and getHeight() methods.
int currX=0, currY=0;
int maxX=0;
int maxY=0;
int count=getFieldCount();
for(int i=0;i<count;i++){
Field f=getField(i);
layoutChild(f, width, height);
The next lines of code determine the width and height of each child field. These include the margins for each element. The code than tries to position the elements from left to right and from top to bottom.
int fw=f.getWidth()+f.getMarginLeft()+f.getMarginRight();
int fh=f.getHeight()+f.getMarginTop()+f.getMarginBottom();
After the dimension of the current field is retrieved, the code checks to see if a new line is required. If it is, we store the maximum width thus far, we reset the x position and we increment the y position.
if((currX+fw) > width && currX!=0){
if(maxX<currX)maxX=currX;
currX=0;
currY+=maxY;
maxY=0;
}
The next lines of code position the field at the current position taking into account the top and left margins. After the element is positioned, the new line height is calculated and the horizontal offset is updated.
setPositionChild(f, currX+f.getMarginLeft(), currY+f.getMarginTop());
maxY=Math.max(maxY, fh);
currX+=fw;
After all the fields have been iterated over, we need to adjust the final size of the manager. This is done by adding the max height of the final line to the existing height and by recalculating the maximum width. At the end, the setExtent() method is called.
Implementing the Message Bubble Manager
In this section, I will talk about the implementation of the speech bubble. The speech bubble is also implemented with a custom field manager. There are some additional things to consider here besides the implementation of the sublayout() method.
Another important part of the implementation is the background painting. In order to preserve resources, the images used to paint the background of the speech bubbles are loaded only once and are held in static variables. The code for this can be seen below:
private static final Bitmap sent_bubble = Bitmap.getBitmapResource("bubble_sent.png");
private static final Bitmap sent_left_bar = Bitmap.getBitmapResource("sent_left.png");
private static final Bitmap sent_top_bar = Bitmap.getBitmapResource("sent_top.png");
private static final Bitmap sent_right_bar = Bitmap.getBitmapResource("sent_right.png");
private static final Bitmap sent_bottom_bar = Bitmap.getBitmapResource("sent_bottom.png");
private static final Bitmap sent_inside_bubble =
			Bitmap.getBitmapResource("sent_inside.png");

private static final Bitmap rec_bubble = Bitmap.getBitmapResource("bubble_received.png");
private static final Bitmap rec_left_bar = Bitmap.getBitmapResource("received_left.png");
private static final Bitmap rec_top_bar = Bitmap.getBitmapResource("received_top.png");
private static final Bitmap rec_right_bar = Bitmap.getBitmapResource("received_right.png");
private static final Bitmap rec_bottom_bar =
			Bitmap.getBitmapResource("received_bottom.png");
private static final Bitmap rec_inside_bubble =
			Bitmap.getBitmapResource("received_inside.png");
The image below presents these resources. The code that paints the background will use different parts of these resources to paint the speech bubble. I will talk about this a bit later.
Besides these image resource, another set of constants that the class uses are those that represent the various margins. I have defined margins for the bubble, the text and the images. These constants can be seen in the code below:
private static final int BUBBLE_MARGIN=5;
private static final int TEXT_MARGIN_TOP=2;
private static final int TEXT_MARGIN_BOTTOM=0;
private static final int OUT_TEXT_MARGIN_RIGHT=17;
private static final int OUT_TEXT_MARGIN_LEFT=5;
private static final int IN_TEXT_MARGIN_RIGHT=5;
private static final int IN_TEXT_MARGIN_LEFT=17;
private static final int ASSET_MARGIN_TOP=4;
private static final int ASSET_MARGIN_BOTTOM=6;
Some of the values for these margins depend on the image resources, so if you want to change the way you paint the background, you will also have to adjust some of these margins.
The last private variables are the ones used to hold the message data and the ones used to display this data. These variables can be seen in the listing below:
private String message;
private int direction;
private WrapPanelManager wrap;
private EditField lbl;
The message bubble’s constructor performs all the necessary initialization. The constructor requires the message text and direction. The constructor code can be seen below:
public MessageBubble(String message, int direction){
super(direction==DIRECTION_IN?Manager.FIELD_LEFT:Manager.FIELD_RIGHT);
this.direction=direction;
this.message=message;
setMargin(BUBBLE_MARGIN, BUBBLE_MARGIN, BUBBLE_MARGIN, BUBBLE_MARGIN);
lbl=new EditField(Field.FIELD_LEFT);lbl.setEditable(false);
wrap=new WrapPanelManager(Field.FIELD_LEFT);
if(direction==DIRECTION_OUT){
lbl.setMargin(TEXT_MARGIN_TOP, OUT_TEXT_MARGIN_RIGHT,
TEXT_MARGIN_BOTTOM, OUT_TEXT_MARGIN_LEFT);
wrap.setMargin(ASSET_MARGIN_TOP, OUT_TEXT_MARGIN_RIGHT,
ASSET_MARGIN_BOTTOM, OUT_TEXT_MARGIN_LEFT);
}else{
lbl.setMargin(TEXT_MARGIN_TOP, IN_TEXT_MARGIN_RIGHT,
TEXT_MARGIN_BOTTOM, IN_TEXT_MARGIN_LEFT);
wrap.setMargin(ASSET_MARGIN_TOP, IN_TEXT_MARGIN_RIGHT,
ASSET_MARGIN_BOTTOM, IN_TEXT_MARGIN_LEFT);
}
if(message!=null && message.trim().length()>0){
lbl.setText(message);
add(lbl);
}
add(wrap);
}
As you can see from the code above, based on the direction of the message, the style for the speech bubble is set to either Manager.FIELD_LEFT or Manager.FIELD_RIGHT.
The constructor also sets the required margins for the text and image margins. At the end, depending on the message content, the label is added to the manager. The wrap panel is always added to the manager.
In order to implement the message bubble, we will need to override 2 methods. We need to override the paintBackground() method in order to paint the speech bubbles and we need to override the sublayout() method in order to arrange the bubble contents and to set its size.
The following paragraphs will describe the implementation of the paintBackground() override.
The first thing the method will do is to retrieve the bubble dimensions and the direction of the message.
protected void paintBackground(Graphics g) {
int col=g.getColor();
int height = this.getContentHeight();
int width = this.getContentWidth();
if(width>=33 && height>=28){
if(direction == DIRECTION_OUT){
If the message is an outgoing message, we will use the green resources to paint the background. We will first paint the bubble corners by using the drawBitmap() method.
g.drawBitmap(0, 0, 14, 14, sent_bubble, 0, 0);
g.drawBitmap(width-19, 0, 19, 14, sent_bubble, 24, 0);
g.drawBitmap(0, height-14, 14, 14, sent_bubble, 0, 18);
g.drawBitmap(width-19, height-14, 19, 14, sent_bubble, 24, 18);
The parts of the sent_bubble resource that are used can be seen in the image below:
The next step is to paint the rest of the bubble. This will be done with the help of the tileRop() method. Like the name says, the method will tile the specified image. The code for painting the rest of the bubble can be seen below:
g.tileRop(Graphics.ROP_SRC_ALPHA, 14, 0,
width-33, 14, sent_top_bar, 0, 0);
g.tileRop(Graphics.ROP_SRC_ALPHA, 0, 14, 14,
height-28, sent_left_bar, 0, 0);
g.tileRop(Graphics.ROP_SRC_ALPHA, 14, height-14,
width-33, 14, sent_bottom_bar, 0, 0);
g.tileRop(Graphics.ROP_SRC_ALPHA, width-19, 14, 19,
height-28, sent_right_bar, 0, 0);
g.tileRop(Graphics.ROP_SRC_ALPHA, 14, 14, width-33,
height-28, sent_inside_bubble, 0, 0);
The incoming bubble will be painted in the same way. The only difference is that the gray resources will be used. The code can be seen below:
} else{
g.drawBitmap(0, 0, 19, 14, rec_bubble, 0, 0);
g.drawBitmap(width-14, 0, 14, 14, rec_bubble, 29, 0);
g.drawBitmap(0, height-14, 19, 14, rec_bubble, 0, 18);
g.drawBitmap(width-14, height-14, 14, 14,
rec_bubble, 29, 18);
g.tileRop(Graphics.ROP_SRC_ALPHA, 19, 0,
width-33, 14, rec_top_bar, 0, 0);
g.tileRop(Graphics.ROP_SRC_ALPHA, 0, 14, 19,
height-28, rec_left_bar, 0, 0);
g.tileRop(Graphics.ROP_SRC_ALPHA, 19, height-15,
width-33, 14, rec_bottom_bar, 0, 0);
g.tileRop(Graphics.ROP_SRC_ALPHA, width-14, 14, 14,
height-28, rec_right_bar, 0, 0);
g.tileRop(Graphics.ROP_SRC_ALPHA, 19, 14, width-33,
height-28, rec_inside_bubble, 0, 0);
}
super.paintBackground(g);
}
The last method to override is the sublayout() method. The implementation can be seen below:
protected void sublayout(int width, int height) {
int maxBubbleWidth=width*3/4;
int realTextWidth = 0;
if(message!=null && message.trim().length()>0)
realTextWidth = getFont().getAdvance(message);
if(realTextWidth>0)
	layoutChild(lbl, Math.min(maxBubbleWidth, realTextWidth), height);
layoutChild(wrap, maxBubbleWidth, height);
if(realTextWidth>0)
setPositionChild(lbl, lbl.getMarginLeft(), lbl.getMarginTop());
int marginTop=wrap.getMarginTop();
if(realTextWidth>0)
marginTop+=(lbl.getHeight()+lbl.getMarginBottom()+lbl.getMarginTop());
setPositionChild(wrap, wrap.getMarginLeft(), marginTop);
int realWrapWidth=wrap.getContentWidth();
int w=Math.max(Math.min(realTextWidth,maxBubbleWidth),
Math.min(realWrapWidth, maxBubbleWidth));
w+=+lbl.getMarginLeft()+lbl.getMarginRight();
if(realTextWidth>0){
int h=lbl.getHeight()+wrap.getHeight()+
lbl.getMarginTop()+lbl.getMarginBottom()+
wrap.getMarginTop()+wrap.getMarginBottom();
setExtent(Math.max(33, w), Math.max(28, h));
}else{
int h = wrap.getHeight()+
wrap.getMarginTop()+wrap.getMarginBottom();
setExtent(Math.max(33, w), Math.max(28, h));
}
}
The first lines of code determine the maximum width of the bubble (3/4 of the available width) as well as the length of the text inside the message by using the getAdvance() method.
This length is determined only if there is text in the bubble.
The code then calls layoutChild() on the 2 child fields. You can see from the code that the width of the text is restricted to the minimum between the text length and the bubble’s maximum width. Also the EditField representing the bubble text is only measured if its length is greater than 0.
if(realTextWidth>0)
layoutChild(lbl, Math.min(maxBubbleWidth, realTextWidth), height);
layoutChild(wrap, maxBubbleWidth, height);
After the children are laid out, they are positioned inside the bubble using the setPositionChild() method. For this part, the code also takes into account the length of the text and the margins of the elements.
if(realTextWidth>0)
setPositionChild(lbl, lbl.getMarginLeft(), lbl.getMarginTop());
int marginTop=wrap.getMarginTop();
if(realTextWidth>0)
marginTop+=(lbl.getHeight()+lbl.getMarginBottom()+lbl.getMarginTop());
setPositionChild(wrap, wrap.getMarginLeft(), marginTop);
At the end of the method, the size of the bubble manager is set. The height is easily calculated by adding the height of the 2 children as well as the top and bottom margins, also taking into account the possible lack of text.
The width is a little trickier to calculate. The width is determined by choosing the maximum between the text width and the images width. We also need to add to this value the left and right margins.
int realWrapWidth=wrap.getContentWidth();
int w=Math.max(Math.min(realTextWidth,maxBubbleWidth),
Math.min(realWrapWidth, maxBubbleWidth));
w+=+lbl.getMarginLeft()+lbl.getMarginRight();
if(realTextWidth>0){
int h=lbl.getHeight()+wrap.getHeight()+
lbl.getMarginTop()+lbl.getMarginBottom()+
wrap.getMarginTop()+wrap.getMarginBottom();
setExtent(Math.max(33, w), Math.max(28, h));
}else{
int h = wrap.getHeight()+
wrap.getMarginTop()+wrap.getMarginBottom();
setExtent(Math.max(33, w), Math.max(28, h));
}
Using the Message Bubble
In order to test the message bubble, I am going to generate a few messages. These messages are generated in the code below:
public void addMessages(){
int count =30;
for(int i=0;i<count;i++){
int dir=(i%2);
String msg=texts[i%3];
MessageBubble bbl=new MessageBubble(msg, dir);
for(int j=0;j<i%9;j++){
bbl.addAsset(bmps[j%bmps.length]);
}
this.add(bbl);
}
}
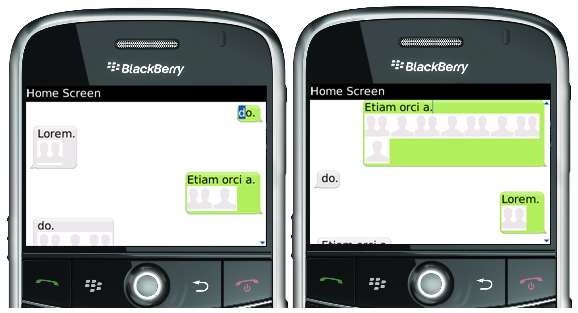
The result can be seen in the image below:
Final Thoughts
At first, I wanted to implement the speech bubble by deriving from the VerticalFieldManager class. There were a lot of issues with the bubble width in that implementation. I just couldn't constrain with the correct way because I also needed to call the base setExtent method. In the end, deriving the message bubble from the base Manager class solved the issues.
I think this is it. If you like the article and you think this code will be useful to you, please take a minute to comment and vote.
History
- 10/6/2011 - Initial release
- 10/11/2011 - Updated article contents and code sample
This member has not yet provided a Biography. Assume it's interesting and varied, and probably something to do with programming.


 General
  News
News  Suggestion
  Question
  Bug
Bug  Answer
  Joke
Joke  Praise
  Rant
Rant  Admin
Admin 


