Introduction
In my previous article Cutting-edge web development with jsRazor I proposed my own jsRazor solution as a simplest and fastest possible client-side rendering approach. Since then I got quite a bit of good feedback from web developers and some of them asked me to do clear comparison between jsRazor and the existing frameworks such as Angular, Knockout, etc. to demonstrate the difference. So, today we are going to take a couple of well known AngularJS demo apps and implement them using jsRazor!
Based on the community feedback and discussions, I'm going to issue another version of jsRazor to better meet web development demands. In the first part of this article I will quickly overview the new features and changes I've made. The rest will be a jsRazor coding walkthrough to develop "Todo" and "JS Projects" apps from AngularJS.org home page.
UPD: I renamed jsDaST (jsRazor+DaST) into jScope - this name is better, because it tells us what this thing is about. All docs you'll find here once available. I also deployed all demos on my site so you can run them LIVE!
Table of Contents
jsRazor as Application Framework
The biggest concern about jsRazor was that it is focused on rendering task, while frameworks like AngularJS also provides infrastructure for building complete applications and eliminate lots of boilerplate code (events, both-way model bindings, etc). This is reasonable, but I really wanted jsRazor to stay tiny, simple, and fast without any programming complexity like other frameworks have. After thinking about this for a while, I came up with an interesting solution that combines facilities for building web apps with unmatched simplicity of "vanilla" jsRazor leaving all programming just as trivial as it was before.
Introducing jsRazor+DaST
What we did before with raw jsRazor, we took some template, rendered it with repeat-n-toggle, and manually assigned the result back to innerHTML of some element. Now we are going to formalize this process saying that jsRazor is applied within some scope. Scope is a rectangle corresponding to some container element (DIV, SPAN, etc) with innerHTML property within the HTML document.
Every scope has 2 things associated with it:
- Rendering callback - a function that is executed to render scope template. All jsRazor repeat-n-toggle stuff happens inside this function. Once callback is finished, the result is assigned to
innerHTML of the scope container element. - Generic data - optional JSON data object to store variables and functions for the current scope. This object is automatically available within the rendering callback.
The easiest way to control the web page is to divide it into the set of nested rectangles and control them individually. Those who followed my other projects might recognize the DaST (Data Scope Tree) pattern that I developed as alternative to ASP.NET MVC and WebForms. Now I basically want to apply similar idea on the client side. Of course, there are differences between doing DaST on the server and on the client side, but essence of the idea stays the same: just divide your page into the scopes and control them individually. And this will be our application framework providing all needed scoping, encapsulation, modular design, etc. We will see how everything works in coding walk-through section.
I call this solution jsRazor+DaST or just jsDaST for simplicity. On GitHub I'll keep jsRazor project as is (in case you want to use this rendering engine in its original "vanilla" state), and I'll start new jsDaST project which will be a modified version of jsRazor that we're talking about in this article. Note that jsDaST is currently a BETA version, so I'm not even publishing the official API, because after I get your feedback, I might review the syntax. When you download the source code, the framework is inside jsdast.js file. Let's now turn to a quick API and usage overview. Don't worry if something is not clear - examples section that follows will give better explanation.
UPD: I renamed jsDaST into jScope - this name is better, because it tells us what this thing is about. All docs you'll find here once available. I also deployed all demos on my site so you can run them LIVE!
Short Usage & API Overview
From rendering point of view, everything is left the same as before. It is still the fastest possible text-only transformation with only 2 functions. The only thing we added is a way to group cohesive functionality around the scope and encapsulate your data and functions. Let's look at the usage now.
Scope template
First of all, we define the scope container inside the template. Scope container is an element supporting innerHTML property and having special jsdast:scope attribute:
<div jsdast:scope="Todo">...jsRazor scope template goes here...</div>
This code defines the "Todo" scope. Initially scope contains the template which will be rendered and assigned back to innerHTML property of this scope. In jsDaST BETA we assume for simplicity that template is taken from scope container.
Scopes can be nested in any random configuration. The more advanced case is when the scope is nested inside the repeater of other scope resulting in multiple instances of the same scope. But this is more advanced topic and I'll talk about this in my next article.
Scope controller
Scope controller is essentially the code that defines scope rendering callback and some optional data - and this is it. It is just as simple as it sounds and there is nothing to learn here. The following is the scope controller skeleton that we will always use:
jsdast("Todo").renderSetup(
function (scope)
{
},
function (scope)
{
});
jsdast("Todo").data({
helloText: "Hello World!",
sayHello: function()
{
alert(this.helloText);
}});
jsdast("Todo").refresh();
This is a uniform structure of the controller that every scope will have. Here are some explanations:
- Everyithing starts from scope selector -
jsdast("Todo") selects the "Todo" scope. - Rendering callback is set using
renderSetup() API where we pass two functions. First function is an actual rendering callback where we do all our repeat-n-toggle stuff using scope parameter (explained below). Second function is optional and is called after rendering callback is finished and all UI is ready (i.e. rendered result is assigned to innerHTML of scope element). This means that you can use this callback to do UI adjustments such as jQuery event re-binding. Also, if you have nested scopes, it's a good idea to refresh them from inside the after-rendering callback of the parent scope. - Data is set using
data() API where we pass and random JSON object in which we can store both variables and functions. Every next call to data() with some other object, does not override current data, but extends it instead. Return value of data() function is the current data object. Also note, that due to the nature of JSON object, functions defined inside it can access other functions and variables using this pointer which is really neat. - Finally, we have the
refresh() call which basically causes the scope to re-render and rendering callback to execute.
Now, let's explain scope parameter passed to rendering callback. This is scope facade object used to do all template repeat-n-toggle rendering. For example:
scope.repeat("tasks", someArray, function (scope, idx, item) { });
This repeats "tasks" area for each item in someArray. You can see how syntax is changed. There is no more need to reassign the template each time - it is kept internally inside the scope object. Also note that scope param is passed to inner repeater rendering callback. While outer scope variable takes care of the entire "Todo" scope content, the inner scope in our example only impacts content of "tasks" area. And so on for other nested repeaters. The following table summarizes all scope object members:
| Member | Description |
|---|
scope.repeat() | (Type: Function(string name, Array items, Function render)) Performs jsRazor repeat within the current template. See jsRazor.repeat() API for more info. |
scope.toggle() | (Type: Function(string name, boolean flag)) Performs jsRazor toggle within the current template. See jsRazor.toggle() API for more info. |
scope.value() | (Type: Function(string placeholder, Object value)) Inserts value into the specified placeholders within the current template. |
scope.tmp | (Type: string) Gets or sets current raw scope output. If no transformations were applied so far, then tmp contains initial template. Don't modify tmp directly, unless you really need to. |
scope.elem | (Type: HTMLElement) Gets the actual scope container element. |
scope.data | (Type: Object) Gets or sets JSON data object corresponding to the current scope. |
And we're done! This is all you need to know about jsRazor+DaST framework! This simplicity is the key of jsRazor - the whole thing is learned in 5 minutes and you don't need any advanced knowledge to start working with it. At this point you most likely have only one question: does this tiny and trivial tool really replace the huge and complex application framework like AngularJS? Yes, it does! To prove this, we're turning to the examples part to see everything in action and compare jsRazor+DaST vs. AngularJS side by side.
jsRazor+DaST vs. AngularJS
Ok, it's time for a battle. I will not say that something is better or something is worse in order to not hurt anyone's feelings :) I'll just walk through the coding examples, highlight some important differences, and let everyone do their own conclusions. Before going further, you need to download source code for this article and run index.htm in your browser.
Todo Demo
"Todo" is the most famous AngularJS technology demo. The full source code with explanations is provided on AngularJS.org home page (just scroll down a bit). You can also run the thing in JSFiddle clicking "Edit Me" button on the right. Play with it to understand the functionality.
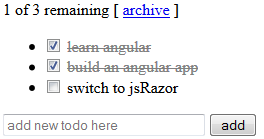
Let's now create this demo using jsRazor. I will not bother doing proper CSS, so my "Todo" version will look a bit uglier, but all functionality will be the same. Here is my screenshot:
AngularJS template
This code you can find on AngularJS.org home page, but to simplify the comparison, I want to show it here as well. So, below is AngularJS template for "Todo" app:
<div ng-app>
  <h2>Todo</h2>
  <div ng-controller="TodoCtrl">
    <span>{{remaining()}} of {{todos.length}} remaining</span>
    [ <a href="" ng-click="archive()">archive</a> ]
    <ul class="unstyled">
      <li ng-repeat="todo in todos">
        <input type="checkbox" ng-model="todo.done">
        <span class="done-{{todo.done}}">{{todo.text}}</span>
      </li>
    </ul>
    <form ng-submit="addTodo()">
      <input type="text" ng-model="todoText"  size="30" placeholder="add new todo here">
      <input class="btn-primary" type="submit" value="add">
    </form>
  </div>
</div>
jsRazor template
And here is the jsRazor template that I came up with:
01: <div jsdast:scope="Todo">
02:   <span>{{Left}} of {{Total}} remaining</span>
03:   [ <a href="javascript:jsdast('Todo').data().archive()">archive</a> ]
04:   <ul class="unstyled">
05:     <!--repeatfrom:tasks-->
06:     <li>
07:       <!--showfrom:done-1-->
08:       <input type="checkbox" onchange="jsdast('Todo').data().checkTodo(
                        this, {{Idx}})" checked="checked" />
09:       <!--showstop:done-1-->
10:       <!--showfrom:done-0-->
11:       <input type="checkbox" onchange="jsdast('Todo').data().checkTodo(this, {{Idx}})" />
12:       <!--showstop:done-0-->
13:       <span class="done-{{done}}">{{text}}</span>
14:     </li>
15:     <!--repeatstop:tasks-->
16:   </ul>
17:   <input type="text" size="30" placeholder="add new todo here">
18:   <input class="btn-primary" type="button"
               value="add" onclick="jsdast('Todo').data().addTodo(this)">
19: </div>
Everything is pretty simple here. On line 1 we surround everything by a "Todo" scope to encapsulate data and functions. The list of tasks is output by "tasks" repeater on lines 5-15. Switching between checked and non-checked item state is done by toggles on lines 7-9 and lines 10-12. It should all be familiar to you from my previous tutorial. And let's see how event handling is done. The "archive" link on line 3 calls archive() handler that we will define inside our data object. The "add" button on line 18 has onclick event bound to addTodo() handler. Finally, the checkbox onchange is bound to checkTodo() handler on lines 8 and 11. This is it.
Compare templates
Now it is time for comparison. I'd like to highlight a couple of things:
- The most important thing here is that doing jsRazor template we did not go beyound standard HTML knowledge! We're already familiar with repeat-n-toggle comment delimiters. Everything else is just our old friendly HTML that every web designer can read with her eyes closed :) Event bindings are absolutely standard function calls. You have full control here - nothing happens behind the scenes. AngularJS template, in contrary, has lots of special markup that web designer will hardly understand without framework knowledge. Also, Angular does lots of stuff behind the scenes, so, again, without special knowlege you have no clue how your events get handled.
- Next important thing - jsRazor does not mess with your markup. Whatever you put in your jsRazor template markup, you'll get in the resulting output! You have 100% WYSIWYG here in terms of markup, full consistency between template and output. Remember that jsRazor uses text-only transformation, so it does not even care what you put in your markup, because the whole thing is treated as text anyway. In AngularJS template you see lots of extra things that go away when template is rendered. Plus this is, obviously, DOM transformation that heavily relies on validity of your markup.
Controller
Let's see the JavaScript code now. First, take a look at AngularJS code. I'll not put it here, so just go to their site, scroll down to the demo, and open todo.js file tab. The code is pretty clear, but, again, in order to know how it works, you have to learn AngularJS framework which is not that small.
I'd like to say few words about jQuery. Remember that jsRazor and jsDaST are fully standalone and do not require any 3rd party to run. I prefer to use jQuery inside controller callbacks to simplify programming, but framework does not need it. By the way, is it fare to use jQuery during comparison? Yes it is, because AngularJS also uses jQuery internally to work with DOM.
So, below is my jsRazor code that achieves the same demo functionality:
01: jsdast("Todo").renderSetup(function (scope)
02: {
03:
04: scope.repeat("tasks", scope.data.todos, function (scope, idx, item)
05: {
06: scope.toggle("done-1", item.done);
07: scope.toggle("done-0", !item.done);
08: scope.value("{{Idx}}", idx);
09: });
10:
11: var countLeft = 0;
12: for (var i = 0; i < scope.data.todos.length; i++) if (!scope.data.todos[i].done) countLeft++;
13:
14: scope.value("{{Left}}", countLeft);
15: scope.value("{{Total}}", scope.data.todos.length);
16: });
17:
18: jsdast("Todo").data({
19: todos:
20: [
21: { text: 'learn angular', done: true },
22: { text: 'build an angular app', done: false }
23: ],
24: addTodo: function (input)
25: {
26: this.todos.push({ text: $(input).prev("input").val(), done: false });
27: $(input).prev("input").val("");
28: jsdast("Todo").refresh();
29: },
30: checkTodo: function (chk, idx)
31: {
32: this.todos[idx].done = chk.checked;
33: jsdast("Todo").refresh();
34: },
35: archive: function ()
36: {
37: var oldTodos = this.todos;
38: this.todos = [];
39: for (var i = 0; i < oldTodos.length; i++)
40: {
41: if (!oldTodos[i].done) this.todos.push(oldTodos[i]);
42: }
43: jsdast("Todo").refresh();
44: }
45: });
46:
47: jsdast("Todo").refresh();
jsRazor controller has a bit more code lines than Angular one, but there is a good reason for that. As I said before, I intentionally keep jsRazor architecture straightforward and I don't want to hide the things that should not be hidden. For example, when you click task checkbox in "Todo" example, jsRazor has an explicit checkTodo() handler function for this. You know how it gets called, you know where it is defined, you can follow and customize every step here. But if you look at AngularJS code, you have no clue how checkbox is actually checked, what is invoked, and what is done behind the scenes - it's all hidden from you. So, for less code lines you sacrifice the transparency and the ability to fully control your app.
Now let's see how the code actually works. This is the typical scope controller discussed in Usage section. Let's start from data definition on line 18. First thing we put in the JSON data is todos variable containing the array of tasks. Initially we populate this array with two items which will be displayed on first load.
Now turn to the rendering callback on lines 1-16. We don't need after-rendering callback for this demo, so there is only primary callback specified. Here we do all repeat-n-toggle rendering stuff for "Todo" scope. Syntax is a bit different now, but anyway should be familiar from my previous article. On lines 4-9 we repeat the tasks passing todos array to the repeater. On lines 6-7 we toggle between checked and non-checked task. On line 8 we output current item index. The rest of code (lines 11-15) is needed to count remaining tasks and output these values.
Next, let's see how events are handled. The idea is to store all needed event handler functions inside data object and call them directly - could it be easier? When all handlers are inside the same JSON object, we can use this pointer to access other data object members.
The "add" button (line 18 of HTML template) calls jsdast('Todo').data().addTodo(this) for onclick event. The jsdast('Todo').data() is used to access scope data object and addTodo() function is a part of this object. It is defined on line 24 of our controller. Its purpose is to add new task to the array which it does on line 26. Note that I use jQuery to get the actual input test and clear the text box (line 27). Finally, on line 28 we call refresh() which re-executes our rendering callback and "Todo" scope gets updated.
The checkbox (lines 8 and 11 of HTML template) uses jsdast('Todo').data().checkTodo(this, {{Idx}}) for onchange event. The checkTodo() is defined on lines 30-34 and it's trivial. The {{Idx}} placeholder is replaced with real task index during rendering (line 8) so we have the right task item index passed to the callback. On line 32 we get the task by index and set its flag. Then scope is refreshed.
The "achive" link (line 3 of HTML template) uses jsdast('Todo').data().archive() for its href. The archive() is defined on line 35. It's purpose is to clean checked tasks and refresh the scope one more time to get updated UI.
And this is it! The code is absolutely straightforward and requires only regular HTML plus basic scripting skills to understand. The repeat-n-toggle rendering approach is intuitive and takes 2 minutes to learn. The app can be easily maintained by a beginner web designer without any special framework knowledge.
JavaScript Projects Demo
"JS Projects" demo is a bit more advanced. On the AngularJS.org home page it follows right after the "Todo" demo. Again, read the description and play with it to clearly understand the functionality. As before, I'm not doing any pretty CSS here, only functionality. Here are my screenshots of all app states:

So, in this app we have a list of projects with description. As you type text in the search bar on the top, the list is immediately filtered. You can add new projects using project edit/new screen. You can modify or delete existing projects. Input form fields are validated to prevent invalid values. Note that AngularJS example uses Mangolab DB and API to store the items. We're not going to do this and I'll imitate database by a simple array. Now let's use jsRazor+DaST to build the whole thing.
AngularJS template
Again, for simpler comparison I'm putting the AngularJS template below. You don't have to understand it - it's here only to help you feel the difference. On AngularJS.org page, the template for this app is in 3 files: index.html, list.html, and detail.html. Below I put them one after another in the single code area:
<!doctype html>
<html ng-app="project">
  <head>
    <script src="https://ajax.googleapis.com/ajax/libs/angularjs/1.0.7/angular.min.js"></script>
    <script src="https://ajax.googleapis.com/ajax/libs/angularjs/1.0.7/angular-resource.min.js">
    </script>
    <script src="project.js"></script>
    <script src="mongolab.js"></script>
  </head>
  <body>
    <h2>JavaScript Projects</h2>
    <div ng-view></div>
  </body>
</html>
--------------------------------------------------
<input type="text" ng-model="search" class="search-query" placeholder="Search">
<table>
  <thead>
  <tr>
    <th>Project</th>
    <th>Description</th>
    <th><a href="#/new"><i class="icon-plus-sign"></i></a></th>
  </tr>
  </thead>
  <tbody>
  <tr ng-repeat="project in projects | filter:search | orderBy:'name'">
    <td><a href="{{project.site}}" target="_blank">{{project.name}}</a></td>
    <td>{{project.description}}</td>
    <td>
      <a href="#/edit/{{project._id.$oid}}"><i class="icon-pencil"></i></a>
    </td>
  </tr>
  </tbody>
</table>
--------------------------------------------------
<form name="myForm">
  <div class="control-group" ng-class="{error: myForm.name.$invalid}">
    <label>Name</label>
    <input type="text" name="name" ng-model="project.name" required>
    <span ng-show="myForm.name.$error.required" class="help-inline">Required</span>
  </div>

  <div class="control-group" ng-class="{error: myForm.site.$invalid}">
    <label>Website</label>
    <input type="url" name="site" ng-model="project.site" required>
    <span ng-show="myForm.site.$error.required" class="help-inline">Required</span>
    <span ng-show="myForm.site.$error.url" class="help-inline">Not a URL</span>
  </div>

  <label>Description</label>
  <textarea name="description" ng-model="project.description"></textarea>

  <br>
  <a href="#/" class="btn">Cancel</a>
  <button ng-click="save()" ng-disabled="isClean() || myForm.$invalid"
          class="btn btn-primary">Save</button>
  <button ng-click="destroy()"
          ng-show="project._id" class="btn btn-danger">Delete</button>
</form>
jsRazor template
And here is jsRazor template:
01: <div jsdast:scope="JSProj">
02: <!--
03: <input type="text" placeholder="Search" class="search-query" value="" />
04: <table>
05: <thead>
06: <tr>
07: <th>Project</th>
08: <th>Description</th>
09: <th><a href="javascript:jsdast('JSProj').data().onItemEdit(null)">Add</a></th>
10: </tr>
11: </thead>
12: <tbody jsdast:scope="JSProjList">
13: <!--
14: <tr>
15: <td><a href="{{site}}" target="_blank">{{name}}</a></td>
16: <td>{{description}}</td>
17: <td><a href="javascript:jsdast('JSProj').data().onItemEdit({{ProjIdx}})">Edit</a></td>
18: </tr>
19: <!--
20: </tbody>
21: </table>
22: <!--
23: <!--
24: <div>
25: <div class="form-name">
26: <label>Name</label>
27: <input type="text" value="{{EditName}}" class="txt-name" />
28: <span class="err-info req">Required</span>
29: </div>
30: <div class="form-site">
31: <label>Website</label>
32: <input type="text" value="{{EditWebsite}}" class="txt-site" />
33: <span class="err-info req">Required</span>
34: <span class="err-info url">Not a URL</span>
35: </div>
36: <label>Description</label>
37: <textarea rows="4" cols="20" class="txt-desc">{{EditDescription}}</textarea>
38: <br />
39: <a href="javascript:jsdast('JSProj').data().onEditCancel()">Cancel</a>
40: <button onclick="jsdast('JSProj').data().onEditSave()" class="btn-save">Save</button>
41: <!--
42: <button onclick="jsdast('JSProj').data().onEditDelete()">Delete</button>
43: <!--
44: </div>
45: <!--
46: </div>
The interesting thing is that we have 2 scopes now: "JSProj" on line 1 and "JSProjList" on line 12. The "JSProjList" is needed, because when filter is input, we don't want to update the entire widget, but only the list part. Switching screens is achieved using toggle areas on lines 2-22 and 23-45. Project repeater is on lines 13-19. There is also a few event handlers here for all buttons: "Add" (line 9), "Edit" (line 17), "Cancel" (line 39), "Save" (line 40), and "Delete" (line 42). Note that "Delete" button is put inside toggle (lines 41-43), because it only needs to show up for existing item edit screen.
And, again, jsRazor template contains only regular HTML native for every web designer. Look how much simpler this template is comparing to AngularJS one! There are only repeat-n-toggle comment delimiters and clean HTML without any special attributes or classes. So, the difference is pretty obvious here. Let's now look at the code.
Controller
First, look at AngularJS controller code on their site. It looks nice and clean to me, but, again, you have to know AngularJS well to understand what's going on there. And below is my jsRazor controller code for comparison:
001: jsdast("JSProj").renderSetup(
002: function (scope)
003: {
004: if (scope.data.currEdit)
005: {
006: scope.toggle("screen-list", false);
007: scope.toggle("screen-edit", true);
008:
009: scope.toggle("can-delete", scope.data.currEdit.idx != null);
010:
011: var proj = scope.data.currEdit;
012: scope.value("{{EditName}}", proj ? proj.name : "");
013: scope.value("{{EditWebsite}}", proj ? proj.site : "");
014: scope.value("{{EditDescription}}", proj ? proj.desc : "");
015: }
016: else
017: {
018: scope.toggle("screen-list", true);
019: scope.toggle("screen-edit", false);
020: }
021: },
022: function (scope)
023: {
024: if (scope.data.currEdit)
025: {
026:
027: $(".txt-name,.txt-site,.txt-desc", scope.data.elem).bind("input", function ()
028: {
029: scope.data.currEdit.name = $(".txt-name", scope.data.elem).val();
030: scope.data.currEdit.site = $(".txt-site", scope.data.elem).val();
031: scope.data.currEdit.desc = $(".txt-desc", scope.data.elem).val();
032: scope.data.validateEdit(scope.data.elem);
033: });
034:
035: scope.data.validateEdit(scope.data.elem);
036: }
037: else
038: {
039:
040: $(".search-query", scope.elem).bind("input", function ()
041: {
042: jsdast("JSProjList").data().filter = $(this).val().toLowerCase();
043: jsdast("JSProjList").refresh();
044: });
045:
046: jsdast("JSProjList").data().filter = null;
047: jsdast("JSProjList").refresh();
048: }
049: });
050:
051: jsdast("JSProj").data({
052: projects: data_AngularDB.projects,
053: currEdit: null,
054: onItemEdit: function (idx)
055: {
056: if (idx == null) this.currEdit = { name: "", site: "", desc: "", idx: null };
057: else this.currEdit = { name: this.projects[idx].name, site:
this.projects[idx].site, desc: this.projects[idx].description, idx: idx };
058: jsdast("JSProj").refresh();
059: },
060: onEditCancel: function ()
061: {
062: this.currEdit = null;
063: jsdast("JSProj").refresh();
064: },
065: onEditDelete: function ()
066: {
067: this.projects.splice(this.currEdit.idx, 1);
068: this.currEdit = null;
069: jsdast("JSProj").refresh();
070: },
071: onEditSave: function (input)
072: {
073: var proj = {};
074: if (this.currEdit.idx != null) proj = this.projects[this.currEdit.idx]
075: else this.projects.push(proj);
076: proj.name = this.currEdit.name;
077: proj.site = this.currEdit.site;
078: proj.description = this.currEdit.desc;
079:
080: this.currEdit = null;
081: jsdast("JSProj").refresh();
082: },
083: validateEdit: function (container)
084: {
085: $(".form-name", container).removeClass("error req");
086: if (!this.currEdit.name.match(/[^\s]/ig)) $(".form-name", container).addClass("error req");
087:
088: $(".form-site", container).removeClass("error req url");
089: if (!this.currEdit.site.match(/[^\s]/ig)) $(".form-site", container).addClass("error req");
090: else if (!this.currEdit.site.match(/(http|https):\/\/[\w-]+(\.[\w-]+)+(
[\w.,@?^=%&:\/~+#-]*[\w@?^=%&\/~+#-])?/ig))
$(".form-site", container).addClass("error url");
091:
092: if ($(".error", container).length > 0)
$(".btn-save", container).attr("disabled", "disabled");
093: else $(".btn-save", container).removeAttr("disabled");
094: }
095: });
096:
097: jsdast("JSProjList").renderSetup(
098: function (scope)
099: {
100:
101: scope.repeat("projects", scope.data.getProjects(), function (scope, idx, item)
102: {
103: scope.value("{{ProjIdx}}", item.idx);
104: });
105: });
106:
107: jsdast("JSProjList").data({
108: filter: null,
109: getProjects: function ()
110: {
111: var projects = jsdast("JSProj").data().projects;
112: var filteredProjects = [];
113:
114: for (var i = 0; i < projects.length; i++)
115: {
116: var proj = projects[i];
117: if (this.filter && proj.name.toLowerCase().indexOf(this.filter) < 0
&& proj.description.toLowerCase().indexOf(this.filter) < 0) continue;
118: proj.idx = i;
119: filteredProjects.push(proj);
120: }
121: return filteredProjects;
122: }
123: });
124:
125: jsdast("JSProj").refresh();
So, structure is the same as before - it's always uniform. It's a bit more coding here than in AngularJS example, but all this code is straightforward and you can understand it after 5 minute jsRazor tutorial. One new thing this time is that we use 2 nested scopes. Let's briefly go through the code.
Let's start from "JSProj" scope data definition on line 51. We add projects variable and initialize it to the initial array of projects (line 52). Then add currEdit variable to hold the project object that is currently being edited (line 53).
Now look at "JSProj" rendering callback on lines 2-21. The if condition on line 4 checks if we need to display edit view instead of the default view. If yes, we show edit screen and hide the default one using toggle on lines 6 and 7. On line 9 there is another toggle that hides "delete" button for "new item" screen (only existing items have idx property added on filtering). Then, on lines 11-14 we output project item values. If condition on line 4 is not satisfied, then default screen is displayed, so we show default and hide edit screens (lines 18 and 19). As you can see, primary rendering function of the "JSProj" is trivial. This callback renders everything except the project list itself, because projects are rendered by the nested "JSProjList" scope rendering callback. Let's have a look.
Next look at "JSProjList" rendering callback on lines 97-105. Its only purpose is to render the list of projects (lines 101-104). The getProjects() call used on line 101 returns only the projects that satisfy search condition. The getProjects() is a part of "JSProjList" scope data and is defined on lines 109-123. The filter variable defined on line 109 contains the search criteria and is updated every time user inputs something into the search box. So, getProjects() basically takes all projects from "JSProj" scope, chooses only those that match filter variable, and returns the results. The "JSProjList" scope is updated every time the "JSProj" scope is updated or the new search criteria is input. Let's see how this is done.
Look at line 22 of our controller now - there is an after-rendering callback defined. This callback is invoked after the rendering callback is finished and the result is populated into scope innerHTML, so we can put all our jQuery bindings here. If edit screen is shown, we bind form input fields to run validation procedure. This is done with jQuery on lines 27-33. We also run validation one initial time when screen is displayed (line 35). The validateEdit() function is a part of "JSProj" scope data defined on line 83 - it uses a couple of regular expressions to validate input values. Next case is the default screen. We need to bind search input field to update filter variable of "JSProjList" - this is done on lines 40-44. After filter is updated, the list needs to be updated too, so we refresh the "JSProjList" scope on line 43. Finally, for initial display we just clear filter and also refresh the nested scope (lines 46-47). It is important to understand that inner scope must render only when outer scope is rendered, so after-rendering callback is the right place to call the refresh() on the nested scope.
Finally, there is a bunch of event handlers defined as part of "JSProj" scope on lines 54-82. All of them are called in response to button clicks. The onItemEdit() is called when "Edit" button is clicked. It sets the currEdit to new or existing project and refreshes the scope to show edit screen. The onEditCancel() is for "Cancel" button and it simply returns the widget to default screen. The onEditDelete() deletes the current project. And onEditSave() populates the new project item.
And we're done!
Conclusion
Ok, it's time for conclusion. I think that jsRazor+DaST did pretty well in this battle :) It's much simpler and more intuitive than any other client-side templating approach whether it is DOM-based or compiled JavaScript. Every beginner web designer can adopt this tool and show master class rendering to the senior ASP-MVC-PHP-whatever devs. Also remember that jsRazor is based on text-only transformation, so it will be noticeably faster than AngularJS or similar framework.
jsRazor+DaST is currently in Beta. My purpose now is to collect all your feedback and create the ultimate framework that suits all front-end web development needs. The new project will be found on GitHub at http://github.com/rgubarenko/jsdast - I'll put all my code there within a couple of days. You're welcome to use jsRazor in your projects and please share your usage experiences. Whether your have syntax or feature suggestions or criticism, I'd be happy to hear that.
I plan to write another quick article to show how to deal with nested scopes within repeaters - this design might be useful for some apps (like hierarchical forum engine). Watch for updates on www.Makeitsoft.com and follow me on twitter @rgubarenko.
Software Architect with over 15 years in IT field. Started with deep math and C++ Computer Vision software. Currently in .NET and PHP web development. Creator of DaST pattern, open-source frameworks, and plugins. Interested in cutting Edge IT, open-source, Web 2.0, .NET, MVC, C++, Java, jQuery, Mobile tech, and extreme sports.


 General
  News
News  Suggestion
  Question
  Bug
Bug  Answer
  Joke
Joke  Praise
  Rant
Rant  Admin
Admin 


 Angular is actually great overall. I criticize it sometimes, but have to accept that there is no better framework at the current time. It's a complete product that just works. It saves a lot of time and money, even though there are still some weak sides. But summarizing all pros and cons it still beats other cool frameworks like Ember. I'm currently trying to use AngularJS to create a really HUGE application. I've heard a lot from people having problems with this framework developing bigger than average apps, so will see how it goes. If I have any good or bad experience, I'll share it here on CP. Thanks for suggestion on opensocial - I'll take a look.
 Regarding delimiters. Comments are used by default, because they are not considered displayable HTML so they'll not break your WYSIWYG experience. But if you dont care, you can set your own format. I also should be able to distinguish between opening and closing delimiters (in case same delimiter pair is nested in each other - stupid, but possible).