Introduction
In this article, I am going to discuss the Drag and Drop functionality inside a Silverlight ListBox control. This article will also cover the Drag and Drop operation between two ListBox controls. Here, we will use the Silverlight 4 Toolkit to implement the feature.

Background
Drag & Drop functionality is not present in Silverlight ListBox by default. Hence, there was a big problem implementing the feature. We had to write a huge code for this feature. But using Silverlight Toolkit, you can do it very easily. You can download the Silverlight 4 Toolkit from the CodePlex Silverlight Toolkit site.
Using the Code
Silverlight 4 Toolkit has a control named ListBoxDragDropTarget which has the functionality for doing the Drag & Drop operation inside a ListBox control. Let us start creating our sample application with two ListBox controls and populate one of them with some dummy data. We will be able to drag the ListBox element within the same ListBox control and also be able to drop it into the second ListBox control.
- First of all, create a Silverlight Application named "
Silverlight4.DragDropListBox". - Now, right click on the Silverlight project and click "Add Reference". From the "Add Reference dialog, add the Silverlight Toolkit assembly reference in your project. Once you are done with adding the assembly reference, you can use it anywhere inside your application.
- Now open the MainPage.xaml and add the Toolkit DLL reference inside it, so that we can use the toolkit controls inside the page. Once added, it will look like this:
<UserControl x:Class="Silverlight4.DragDropListBox.MainPage"
    xmlns="http://schemas.microsoft.com/winfx/2006/xaml/presentation"
    xmlns:x="http://schemas.microsoft.com/winfx/2006/xaml"
    xmlns:d="http://schemas.microsoft.com/expression/blend/2008"
    xmlns:mc="http://schemas.openxmlformats.org/markup-compatibility/2006"
    xmlns:toolKit="clr-namespace:System.Windows.Controls;
		assembly=System.Windows.Controls.Toolkit">
</UserControl>
Here, the line mentioned below is the reference to the Silverlight Toolkit. We prefixed the reference with “toolkit”, so that we can refer to the Silverlight toolkit using the “toolkit:” keyword.
xmlns:toolKit="clr-namespace:System.Windows.Controls;
	assembly=System.Windows.Controls.Toolkit"
Let us add the ListBoxDragDropTarget inside the Grid. Set the attribute “AllowDrop” to True. Once it is set to true, it will be able to catch the drop event inside the control.
<toolKit:ListBoxDragDropTarget AllowDrop="True">
</toolKit:ListBoxDragDropTarget>
Now we will add a ListBox inside the ListBoxDragDropTarget which we just added inside the XAML page. Set proper Height and Width of the ListBox control. Also, we will set the DisplayMemberPath=”Name”. This is because, we will fetch some dummy Person information and set the ItemSource of the ListBox to that data where the Person has a property named “Name”. The name of the person will be visible here in the drop down.
<toolKit:ListBoxDragDropTarget AllowDrop="True">
  <ListBox x:Name="customerListBoxMain"
	Height="200" Width="200" DisplayMemberPath="Name">
    <ListBox.ItemsPanel>
      <ItemsPanelTemplate>
        <StackPanel Orientation="Vertical"/>
      </ItemsPanelTemplate>
    </ListBox.ItemsPanel>
  </ListBox>
</toolKit:ListBoxDragDropTarget>
Let us create another ListBox control surrounded with ListBoxDragDropTarget. Here also, we will set the same properties that we mentioned earlier.
<toolKit:ListBoxDragDropTarget AllowDrop="True">
  <ListBox Height="200" Width="200" DisplayMemberPath="Name">
    <ListBox.ItemsPanel>
      <ItemsPanelTemplate>
        <StackPanel Orientation="Vertical"/>
      </ItemsPanelTemplate>
    </ListBox.ItemsPanel>
  </ListBox>
</toolKit:ListBoxDragDropTarget>
Once we are done creating the XAML view, we can go ahead to fetch some data and set it to the Source of the first ListBox from code behind. Here is the sample code:
public partial class MainPage : UserControl
{
    public MainPage()
    {
        InitializeComponent();

        customerListBoxMain.ItemsSource = PersonDataProvider.GetData();
    }
}
Drag and Drop between Two ListBoxes
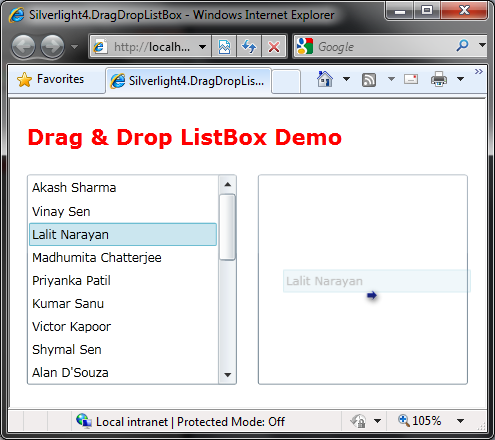
Once our design and coding is done, we can run the Silverlight application to showcase our work. Press F5 to run the application inside a browser. Once loaded, you will see two Listbox controls available in the screen. One contains some dummy data and another is empty.
Now, we will drag one element from the first listbox to outside. We will see that the mouse cursor changed to “Unavailable” icon. Once you release your mouse, you will notice that the item was not dropped at the specific point. Why? Because we marked only the two Listbox controls as DropTarget.
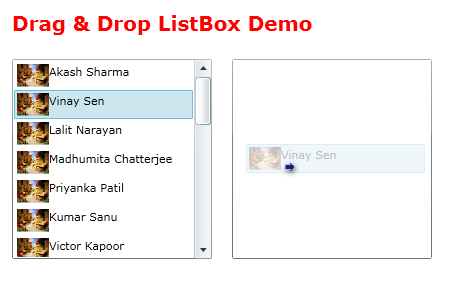
Now again we will start the drag operation from the first listbox and this time we will drag it inside the second Listbox control. What happened? The mouse cursor now has a small arrow with it. This is notifying that the item can be dropped here.
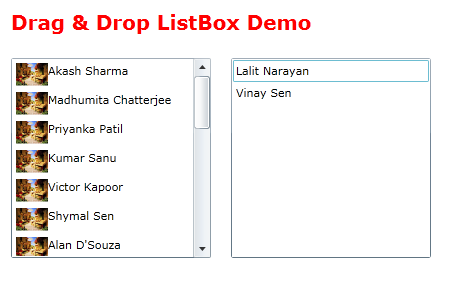
Just release the mouse cursor and you will see that the Element has been removed from the first listbox and added to the second list.
Drag and Drop Within the Same ListBox
Here we will see the drag and drop operation within the same ListBox control. Start dragging any element and move it upward or downward within the same ListBox control. You will see that, the cursor has been changed to drop icon, i.e., an arrow near the cursor. Also, it will show you a line inside the ListBox. This is the place where the drag and drop operation is going to happen.
Release your mouse and you will see that the item has been moved to a new position.
If the list is too big and you want to reposition your element in a specific location down the list, just do a drag to the end. You will see the scrollbar already started the scrolling operation automatically.
Points of Interest
This is very useful when you want to do some drag and drop operation within a treeview or between listbox controls. You will also find it useful while rearranging a list of items by the end user.
Please drop a line with your feedbacks/suggestions/comments.
Also, don't forget to vote for it.


 General
  News
News  Suggestion
  Question
  Bug
Bug  Answer
  Joke
Joke  Praise
  Rant
Rant  Admin
Admin 


 ="http://schemas.microsoft.com/expression/blend/2008"
