Introduction
This post is about how to implement Google Maps API with Windows Store App and I have taken the following link as reference:
For better understanding of how to use Google Maps API, there are several resources available out of which my personal favorite is:
Background
There are numerous resources available for integrating Google Maps API into Window Store App through JavaScript, but none is available through XAML. This tip uses the same concept but at the same time shows the integration with Windows store app.
Prerequisite: Windows 8, Visual Studio 2013, basic knowledge of JSON, basic knowledge of XAML.
Using the Code
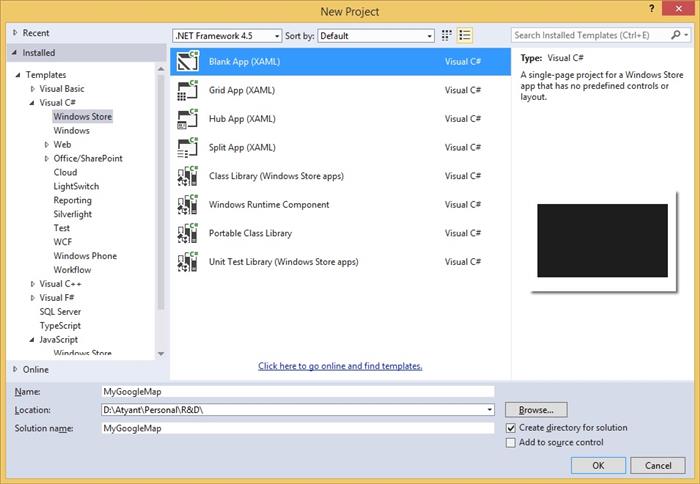
Step 1: Open Visual Studio 2013 and go to File -->New Project
Step 2: Then Select Templates-->Windows Store and Select Blank App(XAML), as shown below:
The above step will create a solution for you as shown below:

Step 3: We are using Google Map to show some information in the form of pins and for that we need data for the same. In this post, I am going to use the Google Maps API to display earthquake data from U.S. Geological Survey. And since we want our application to work offline also, I am just downloading the Json file from the below given link. Click on the below link and save the file as week.js file.
After saving the file, add it to your project. Solution right click --> Add --> Existing File.
Your week.js file is a pure json file created for consumption.
Step 4: Now add three mymap.css, mymap.js and mymap.html as given below:
Step 5: After adding all these 4 files given in the above two steps, create a folder named htmlPage and in that folder, add an HTML file by the name default.html or whatever name one wants to give. This will be the actual file which will be rendered on your Windows Store App XAML page. Although there are several ways to do the same but this article is only for the quick reference for adding Google map API in Windows store app.
Finally, your solution will look something like the image given below:
Once one is done with this setup, it's time to write some code to integrate the Google Map API.
Step 6: Add the below code to your mymap.css file which is just used to style your map.
html, body, #mapwindow {
margin: 0;
padding: 0;
height: 100%;
}
This can be changed to set the height and width of the Google Map shown.
Step 7: Now open mymap.html file and add Google Map API Reference, map references and USGS data source URL or local source (in our case, we are using local source):
<!-- USGS data source-->
<script src="week.js">
</script>
<!--map references-->
<link href="/mymap.css" rel="stylesheet" />
<script src="/mymap.js"></script>
<!-- Google Maps API reference -->
<script src="https://maps.googleapis.com/maps/api/js?sensor=false&libraries=visualization">
</script>
Also, add a body to the HTML as given below:
<body>
    <div id="mapwindow"></div>
</body>
This is the actual page where Google Map will be rendered. Finally, your page will look like this (for clear view of the image, right click and open image in new tab):
Step 8: Now open default.html and paste the below code in the body tag:
<h1>Google Maps API on Windows Store App</h1>
<iframe id="Map" src="ms-appx-web:///mymap.html" width="1800" height="500"></iframe>
Basically, we are rendering map.html page to default.html page through iframe. Height and Width of the frame can be set as per one's convenience.
Step 9: Now open mymap.js page where the integration code has been done, paste the below given code. Please read the comments given in the code to see what it is meant for.
var map;
var earthquakeResults;
function initialize() {
map = new google.maps.Map(document.getElementById('mapwindow'), {
zoom: 3,
center: new google.maps.LatLng(40, -187.3),
mapTypeId: google.maps.MapTypeId.TERRAIN
});
addMarkers();
}
eqfeed_callback = function (results) {
earthquakeResults = results;
}
var marker;
popUps = new Array();
positions = new Array();
function addMarkers() {
for (var i = 0; i < earthquakeResults.features.length; i++) {
var earthquake = earthquakeResults.features[i];
var coordinates = earthquake.geometry.coordinates;
var latiLong = new google.maps.LatLng(coordinates[1], coordinates[0]);
var place = earthquake.properties.place;
marker = new google.maps.Marker({
position: latiLong,
map: map,
});
positions[i] = marker;
popUps[i] = '<div id = "content">' +
'<div>' +
'</div>' +
'<p>' + place + '</h1>' +
'</div>';
addListener(i);
}
}
var infowindows;
var addListener = function (i) {
google.maps.event.addListener(marker, 'click', function () {
if (infowindows) infowindows.close();
infowindows = new google.maps.InfoWindow({
content: popUps[i]
});
infowindows.open(map, positions[i]);
});
}
google.maps.event.addDomListener(window, 'load', initialize);
Step 10: Huh!! Final Step
Now open MainPage.xaml and add the below given code:
<Grid Background="{ThemeResource ApplicationPageBackgroundThemeBrush}">
   <WebView x:Name="MapWebView" Width="Auto" Height="700"/>
</Grid>
Here WebView control is used, a WebView control works as a container control in which we can put web content or HTML content. When we want to show the web page content in the WebView control, we specify the URL of the page to the WebView.
The WebView control has basically two types of methods that we can use to set their content:
- By setting a URL, we can load a web page in the Web View control.
- By setting the HTML content in the WebView control.
So, here we are using the second approach wherein we are setting the HTML Content in the WebView Control.
Now open MainPage.xaml.cs and add the below given code:
public sealed partial class MainPage : Page
{
static string GeneratedHTML = "";
public MainPage()
{
this.InitializeComponent();
LoadData();
MapWebView.NavigateToString(GeneratedHTML);
}
private async void LoadData()
{
try
{
await loadJsonLocalnew("default.html", "");
}
catch (Exception ex)
{
throw;
}
}
public async static Task loadJsonLocalnew(string url, object ClassName)
{
try
{
StorageFolder folder = await Package.Current.InstalledLocation.GetFolderAsync("htmlPage");
StorageFile file = await folder.GetFileAsync(url);
Stream stream = await file.OpenStreamForReadAsync();
StreamReader reader = new StreamReader(stream);
String html = reader.ReadToEnd();
GeneratedHTML = html.ToString();
}
catch (Exception ex)
{
}
}
}
Run the code and you will get the below screens:
Thanks!!
This member has not yet provided a Biography. Assume it's interesting and varied, and probably something to do with programming.


 General
  News
News  Suggestion
  Question
  Bug
Bug  Answer
  Joke
Joke  Praise
  Rant
Rant  Admin
Admin 


