Introduction
This article describes the construction of a countdown timer application written in C# and WPF, using Laurent Bugnion's
MVVMLight Toolkit. This article is based on the work of some previous articles I've written:
As usual most of the code shown in this article is elided, particularly since no-one likes scrolling through
five screens worth of XAML to see one line of interest. Please download the source zip file to see the whole thing.
This was written, and more importantly, tested, on a Windows 7, 64-bit box, but uses the .NET 4.0 framework, so should 'just work'!
Requirements and Features
The Countdown Timer is going to be relatively simple:
- The starting time can be chosen by the user.
- Notify the user visually (in the application and task bar) and audibly.
- The application has settings that the user can change.
- The Windows 7 taskbar icon shows the progress of the timer.
The original motivation for this was that I came across the Pomodoro Technique whilst browsing
the web and thought it would be fun to write a countdown timer that could be used for this. It is, in short, a 'getting things done' idea which can be boiled down to:
- work for 25 minutes
- break for 5 minutes
- repeat
So I decided that the default setting for the timer is 25 minutes, and that it should record the number of completed countdowns unobtrusively,
should someone wish to use this application in that way.
Choosing the Underlying Timer
We use the WPF DispatchTimer to perform a count.
We are not making any guarantees about the accuracy of the timer.
In fact neither does the documentation:
Timers are not guaranteed to execute exactly when the time interval occurs, but they are guaranteed to not execute before
the time interval occurs. This is because DispatcherTimer operations are placed on the Dispatcher queue like other operations.
When the DispatcherTimer operation executes is dependent on the other jobs in the queue and their priorities.
By leveraging the .NET Framework, we use a TimeSpan that allows us to increment, and importantly, decrement by a specified amount.
We then simply decrement our starting value every time the DispatchTimer ticks, until we get a negative TimeSpan, and then we stop.
The code is written in such a way that the TimerModel is just a concrete implementation of ITimerModel and the concrete
instantiation of an ITimerModel is generated from a single factory method: in other words, you could write your own ITimerModel
derived class instead and update the factory method as required
(e.g., use System.Threading.Timer instead).
MVVM
Since this is a WPF application, we will use the MVVM pattern to layout the code.
What does this mean? The application will be divided into:
- Views - XAML-only layouts that the application uses: i.e., the GUI and all its windows!
- ViewModels - translate the data between the Views and the Models.
- Models - the actual code that does the work (and everything else).
If you find this confusing or want to know more, please see another of my articles: WPF/MVVM Quick Start Tutorial.
Application Settings
All applications have settings and this one is no different: to persist the application's settings, we take advantage of the class
System.Configuration.ApplicationSettingsBase. This is subclassed for the WPF application when you create it,
so you can then just address the application settings programmatically, for example:
_timer.Duration = Properties.Settings.Default.Duration;
where we have created a Duration property.
In the same way that we hide the implementation of the Timer behind a ITimerModel interface, we also use an interface called
ISettingsModel, and use a concrete instance called SettingsModel, along with a builder method to retrieve an instance of the class.
This gives us the option, as before, to change the settings backing store, to something else in the future (ini file anyone?).
Updating Settings Between Application Versions
To cater for updates to the application, we can use the following method: define UpgradeRequired in our settings, and set to True by default. We then use:
if (Properties.Settings.Default.UpgradeRequired)
{
  Properties.Settings.Default.Upgrade();
  Properties.Settings.Default.UpgradeRequired = false;
  Properties.Settings.Default.Save();
}
to force the upgrade of the application settings only when the UpgradeRequired flag is true. For newly versioned assemblies,
all settings take their default values, this code is triggered, and the settings are copied from a previous application version, if it exists, to the new one.
It is worth noting that for this 'trick' to work, you always need to define this field in your application settings in the very first version of your application.
The Views and ViewModels
The application has several views that are all UserControls and hosted in the MainWindow. This means no pop-up dialogs! They are:
- The main
TimerView - The
SettingsView - The
AboutView
with the corresponding ViewModels:
- The
TimerViewModel - The
SettingsViewModel - The
AboutViewModel
Changing Views and Messaging
As we want to use 'separation of concerns', or 'encapsulation' (if you prefer), we do not want view-models to communicate directly.
In order to do this, we simply use message passing, in other words:

The MVVMLight Toolkit provides us with a singleton Messenger class that we can register message consumers and message producers with.
So to raise an 'event' in one view model from another, we simple pass a message, for example:
public class MainViewModel : ViewModelBase
{
public MainViewModel()
{
Messenger.Default.Register<SimpleMessage>(this, ConsumeMessage);
}
private void ConsumeMessage(SimpleMessage message)
{
switch (message.Type)
{
case MessageType.TimerTick:
WindowTitle = message.Message;
break;
}
}
}
and in the TimerViewModel:
public class TimerViewModel : ViewModelBase
{
    private void OnTick(object sender, TimerModelEventArgs e)
    {
        Messenger.Default.Send(new SimpleMessage(MessageType.TimerTick, TimerValue));
    }
}
What this achieves is as follows: the TimerViewModel updates the TimerView countdown clock in the main window's ContentControl,
but we want to update the window's title to also show the countdown. The main window View is bound to the MainViewModel, so to do this,
and to keep the view-models separate, we pass a message containing the time remaining. The reason we update the window title bar is discussed a little later.
The TaskBar Preview and the Window Title
As you can see in this screenshot:
The countdown value is shown in the taskbar item thumbnail, and in the main window's title. The reason we update the window's title is that when a window is minimzed,
the taskbar item thumbnail is not updated by Windows, so if you were to hover your mouse pointer over the icon on the task bar when the item is minimized, the thumbnail
preview will display the countdown at the time you minimized the window. Fortunately, the title of the window is updated in the thumbnail preview,
so we ensure that we update that to provide a visual clue to the user.
TaskBar Messages
We need a second message type to communicate task bar progress updates in Windows 7: since the MainWindow 'view' is bound to the MainViewModel,
we need to receive messages from the TimerViewModel that are appropriate to update the task bar progress indicator. Fortunately this is relatively straightforward,
and once again we make use of the Messenger.Default.Register and Messenger.Default.Send pattern we saw earlier.
The second message class is simply:
public class TaskbarItemMessage
{
    public TaskbarItemMessage()
    {
        State = TaskbarItemProgressState.None;
        Value = -1.0;
    }
    public TaskbarItemProgressState State { get; set; }

    public double Value { get; set; }

    public bool HasValue { get { return ! (Value < 0.0); } }
}
Our TimerViewModel just sends instances of these messages and the MainViewModel receives them, and via the magic of data-binding,
between the view model (MainViewModel) and the view (MainWindow) the taskbar progress indicator just updates:
<Window x:Class="Btl.MainWindow"
DataContext="{Binding Main,
Source={StaticResource Locator}}">
<Window.TaskbarItemInfo>
<TaskbarItemInfo ProgressState="{Binding ProgressState}"
ProgressValue="{Binding ProgressValue}">
<TaskbarItemInfo.ThumbButtonInfos>
<ThumbButtonInfoCollection>
<ThumbButtonInfo Command="{Binding PlayCommand}"
Description="Start"
DismissWhenClicked="False"
ImageSource="Resources\icon.play.png" />
<ThumbButtonInfo Command="{Binding PauseCommand}"
Description="Pause"
DismissWhenClicked="False"
ImageSource="Resources\icon.pause.png" />
</ThumbButtonInfoCollection>
</TaskbarItemInfo.ThumbButtonInfos>
</TaskbarItemInfo>
</Window.TaskbarItemInfo>
</Window>
Since the TaskBarItemInfo thumbnail previews offer us more than just the preview, we can add a thumbnail 'Start' and 'Pause' button (just like Media Player),
so we can control the countdown timer from the thumbnail preview, hence the ThumbButtonInfo elements above.
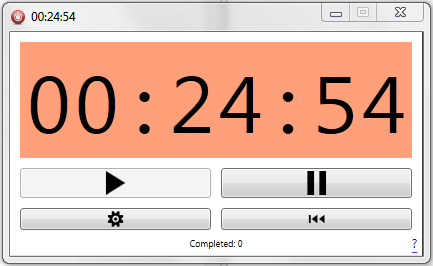
A Note on the UI Design
There is some method to the madness of the Countdown Timer UI: since the Play and Pause buttons are likely to be the most used, they are the largest,
then the settings and reset buttons are smaller so they are less likely to be clicked on. The 'About' window is accessed by a small '?' in the bottom right hand corner.
Similarly, the 'OK' and 'Cancel' buttons are widely separated in the Settings view so it is clear which one you want to click on.
And lastly, aside from the button icons (play, pause, etc.), I've left the theming of the application alone, so that the OS can choose how to theme it.
Of course, since this is an MVVM application, you can take the source code, fire up Blend, and change it however you like.
There are even some third-party libraries that will do a lot of the work for you, e.g., MahApps.Metro.
Bonus Features
In the downloads section at the start of the article, there is also an MSI installer for anyone that cares to use it and just wants to install the timer.
All the source code is also on github and you are free to fork it, copy it, break it, etc.
The MSI installer project uses InstallShield, so it is part of the solution hosted on github, but not included in the zip files above (in case you, the reader, do not have it installed).
Finally
If you found the article helpful, or interesting, please vote and/or add any comments below. Thanks!
Revision History
- 22 February, 2012: Updated code base slightly based on reader comments.
Jack of all trades.


 General
  News
News  Suggestion
  Question
  Bug
Bug  Answer
  Joke
Joke  Praise
  Rant
Rant  Admin
Admin 


 Hopefully "it does what it says on the tin."