Introduction
In this article, we will look at an elegant way to separate the UI concerns of the presentation layer of a WinForms application from the application business logic using a MVVM (Model-View-ViewModel) pattern. In this way, Test-Driven-Development (TDD) of the application can be facilitated.
Background
While reading an article by Peter Vogel (see VSMagazine2014-05-01), I was reminded again of the difficulty WinForm application designers have working with modern design patterns. I have been searching for a long time for an easier way to accomplish what Brian Noyes appears to have accomplished with WinForms (see Composite Extensions for WinForms) without the contortions of using code borrowed from the Patterns and Practices Composite WPF Contrib library (http://compositewpfcontrib.codeplex.com/), which is difficult to follow and appears to have been abandoned (like so many things on the internet). However, the recent appearance of ReactiveUI promises to improve the development of WinForms applications. ReactiveUI is a Model-View-ViewModel framework that's used along with the Reactive Extensions library in constructing testable UIs.
Using the Code
First, the source code for this article is available at GitHub for those who wish to learn more.
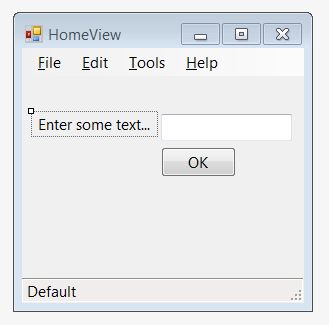
Let’s go through a brief example of using ReactiveUI to construct a WinForms application that uses the MVVM pattern. I will be using Visual Studio 2017 Community Edition and the default WinForms template. Open up the main form created by the template and add the following controls:
- Text label
- Text box
- OK button
StatusStrip Status string
Use the NuGet Package Manager under the Tools menu and add the reactiveui-winforms package to the solution. This package will add all the necessary references and components we will need.

Due to refactoring of the new System.Reactive 4.0 namespaces, I found I had to also add references to the following NuGet packages:
At this point, since the view is partially constructed, we construct the ViewModel that will process data and events. Let's set up properties with backing fields for the controls on the view and one command for the button.
namespace WinFormMVVM.ViewModels
{
public class HomeViewModel : ReactiveUI.ReactiveObject
{
string ModelString;
public string EnteredText
{
get { return ModelString; }
set { this.RaiseAndSetIfChanged( ref ModelString, value);}
}
string statusString = "";
public string Status
{
get{return statusString;}
set{this.RaiseAndSetIfChanged(ref statusString,value);}
}
public ReactiveCommand OKCmd { get; private set; }
public HomeViewModel
{
OKCmd = ReactiveCommand.Create(() => { Status = EnteredText + " is saved."; }
, this.WhenAny(vm => vm.EnteredText, s => !string.IsNullOrWhiteSpace(s.Value)));
}
}
}
The ViewModel inherits from the ReactiveObject class. This class grants your classes access to the RaiseAndSetIfChanged helper function. This conveniently wires up your properties to the INotifyPropertyChanged/IObservable interfaces, so in one step, you have a class that can be data bound AND observed using Reactive Extensions.
In the constructor for the ViewModel, we set up the conditions under which something happens, i.e., when the OK button is clicked. The first parameter to the Create function is the Action we wish to take when when the button is clicked, which will update the status message. It is our subscription to the event. The second parameter is the canExecute parameter, an IObservable that is returned from the WhenAny extension, which allows you to observe whenever one or more properties on an object have changed. Note that the ViewModel has no references to any UI elements, which allows us to perform testing without worrying about the particular UI technology used.
The astute reader will notice that at this point there is no link between the View and the ViewModel. Let's take care of that now that the ViewModel is built. Edit the View to inherit from the interface IViewFor<T>, where T is our ViewModel.
namespace WinFormMVVM
{
public partial class HomeView : Form, IViewFor<HomeViewModel>
{
InitializeComponent();
VM = new HomeViewModel();
this.Bind(VM, x => x.EnteredText, x => x.textBoxMyInput.Text);
this.Bind(VM, x => x.Status, x => x.toolStripMyStatusString.Text);
this.BindCommand(VM, x => x.OKCmd, x => x.btnOK);
}
public HomeViewModel VM { get; set; }
object IViewFor.ViewModel
{
get { return VM; }
set { VM = (HomeViewModel)value; }
}
HomeViewModel IViewFor<HomeViewModel>.ViewModel
{
get { return VM; }
set { VM = value; }
}
}
What I really like about using this framework is the availability of intellisense in writing the bindings between the UI elements and the ViewModel properties. The absence of "magic strings" typical in XAML or regular WinForm data bindings, that really makes code maintenance difficult, is especially welcome.
Points of Interest
The present state of the ReactiveUI framework is not documented as well as might be hoped for. It took a fair amount of time to ferret out the meaning from outdated examples and code breaking changes. I hope this example will serve to inspire others to dig into ReactiveUI and provide more examples and better documentation.
History
- 2014-Jul-29: Initial draft
- 2017-Sep-29: Fixed broken link
- 2018-Jul-31: Updated to most recently available NuGet packages, added GitHub link.
You're not a real programmer until you have toggled binary into a PDP-11 and memorized Z80 op codes so you can program without an assembler. I've spilled more punch card decks than coffee cups and still managed to run light without overbyte into today's world. An eclectic programmer with experience in C, C#, Python, LabView, VB, SQL, and many other things, I happen to believe HTML5 and JavaScript are boring.


 General
  News
News  Suggestion
  Question
  Bug
Bug  Answer
  Joke
Joke  Praise
  Rant
Rant  Admin
Admin 


