Introduction
Until .NET 4.0, it was impossible to reliably create Windows Shell Extensions using .NET code. With improvements to the framework, it is now possible to use .NET to create these extensions. In this article, I'll show you how to quickly create Shell Context Menus as a C# class library.
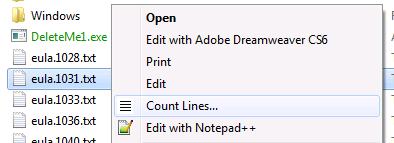
Above: A screenshot of an example Shell Context Menu Extension - the 'Count Lines...' item is a custom shell extension that this article demonstrates how to create.
The Series
This article is part of the series '.NET Shell Extensions', which includes:
- .NET Shell Extensions - Shell Context Menus
- .NET Shell Extensions - Shell Icon Handlers
- .NET Shell Extensions - Shell Info Tip Handlers
- .NET Shell Extensions - Shell Drop Handlers
- .NET Shell Extensions - Shell Preview Handlers
- .NET Shell Extensions - Shell Icon Overlay Handlers
- .NET Shell Extensions - Shell Thumbnail Handlers
- .NET Shell Extensions - Shell Property Sheets
- .NET Shell Extensions - Deploying SharpShell Servers
What are Shell Context Menus?
Shell Context Menus are COM servers that are registered in the system that allow the context menus of shell objects to be extended. This could be the context menu for a specific file type, such as *.txt files, file classes such as 'text files', drives, folders and more. The context menus can be used to provide advanced functionality that can be accessed quickly through Windows Explorer.
Getting Started
There's a lot of work involved in setting up Shell Extensions. Specific COM interfaces have to be implemented, servers must be built, the registry must be updated in a variety of ways. We're going to use a library I have developed called 'SharpShell' to do all of the hard work - leaving us with the task of creating a lightweight class library that contains our extension class.
Our Goal
The code below creates a Shell Extension that allows you to count the lines in any text file by right clicking on it and choosing 'Count Lines'. For the rest of the article, I'll show you how to create a library like this. The code is shown first because I want to highlight how straightforward writing these libraries is when using SharpShell.
[ComVisible(true)]
[COMServerAssociation(AssociationType.ClassOfExtension, ".txt")]
public class CountLinesExtension : SharpContextMenu
{
protected override bool CanShowMenu()
{
return true;
}
protected override ContextMenuStrip CreateMenu()
{
var menu = new ContextMenuStrip();
var itemCountLines = new ToolStripMenuItem
{
Text = "Count Lines...",
Image = Properties.Resources.CountLines
};
itemCountLines.Click += (sender, args) => CountLines();
menu.Items.Add(itemCountLines);
return menu;
}
private void CountLines()
{
var builder = new StringBuilder();
foreach (var filePath in SelectedItemPaths)
{
builder.AppendLine(string.Format("{0} - {1} Lines",
Path.GetFileName(filePath), File.ReadAllLines(filePath).Length));
}
MessageBox.Show(builder.ToString());
}
}
That's pretty clean and simple - now let's look in detail about how to create this Shell Context Menu with SharpShell.
Step 1: Creating the Project
First, create a new C# Class Library project.
Tip: You can use Visual Basic rather than C# - in this article, the source code is C# but the method for creating a Visual Basic Shell Extension is just the same.
In this example, we'll call the project 'CountLinesExtension'.
Now add the following references:
System.Windows.FormsSystem.Drawing
System.Windows.Forms is needed because we're going to use the WinForms ContextMenuStrip to define the context menu. System.Drawing is needed as we're going to want to use Icons.
Rename the 'Class1.cs' file to 'CountLinesExtension.cs'. We should now have a project structure that looks like this:

Step 2: Referencing SharpShell
We now need to add a reference to the core SharpShell library. You can do that in a few different ways.
Add Reference
Download the 'SharpShell Library' zip file at the top of the article and add a reference to the downloaded SharpShell.dll file.
Tip: The download on this article is correct at the time of writing - if you need the latest version, use Nuget (as described below) or get the library from sharpshell.codeplex.com.
Use Nuget
If you have Nuget installed, just do a quick search for SharpShell and install it directly - or get the package details at https://www.nuget.org/packages/SharpShell.
Use CodePlex
Rather than getting the library from this page, which may not be the latest version, you can always get the very latest version of the library from CodePlex - on the SharpShell home page which is https://sharpshell.codeplex.com. Nuget will always have the latest stable version - CodePlex may have betas available, and the CodeProject articles will have the version that was available at the time of writing.
Step 3: Deriving from SharpContextMenu
Now things get interesting. Derive your CountLinesExtension class from SharpContextMenu:
public class CountLinesExtension : SharpContextMenu
{
}
Now we must implement the abstract members of the class. Right click on the SharpContextMenu part of the line and choose 'Implement Abstract Class':
This'll create implementations of the two functions needed - CanShowMenu and CreateMenu:
public class CountLinesExtension : SharpContextMenu
{
protected override bool CanShowMenu()
{
throw new NotImplementedException();
}
protected override ContextMenuStrip CreateMenu()
{
throw new NotImplementedException();
}
}
By implementing these two functions, we can provide all of the functionality needed. Here's what they do:
CanShowMenu
This function is called to determine whether we should show the Context Menu Extension for a given set of files. The files the user has selected are in the property SelectedItemPaths. We can check these file paths to see whether we actually want to show the menu. If the menu should be shown, return true. If not, return false.
CreateMenu
This function is called to actually create the Context Menu. A standard WinForms ContextMenuStrip is all we need to return.
Here's how we'll implement the two functions:
protected override bool CanShowMenu()
{
return true;
}
protected override ContextMenuStrip CreateMenu()
{
var menu = new ContextMenuStrip();
var itemCountLines = new ToolStripMenuItem
{
Text = "Count Lines"
};
itemCountLines.Click += (sender, args) => CountLines();
menu.Items.Add(itemCountLines);
return menu;
}
private void CountLines()
{
var builder = new StringBuilder();
foreach (var filePath in SelectedItemPaths)
{
builder.AppendLine(string.Format("{0} - {1} Lines",
Path.GetFileName(filePath), File.ReadAllLines(filePath).Length));
}
MessageBox.Show(builder.ToString());
}
For CanShowMenu, we return true always - shortly, we'll see why we don't need to validate that we have text files. For CreateMenu, we build a context menu strip with one item only, that has the caption 'Count Lines' and calls the CountLines function.
The CountLines function goes through the SelectedItemPaths and counts the lines in each file - then displays a message box with the summary.
Step 4: Handling the COM Registration
There are just a few things left to do. First, we must add the COMVisible attribute to our class.
[ComVisible(true)]
public class CountLinesExtension : SharpContextMenu
Why? Well, even though our class doesn't really look like it, it is in fact a COM server. If you were to look at the base class, you'd see that we're implementing COM interfaces such as IShellExtInit, IContextMenu, and ISharpShellServer. We don't need to worry about what they do, but for the system to be able to create our extension, it must have this attribute.
Next, we must give the assembly a strong name. There are ways around this requirement, but generally this is the best approach to take. To do this, right click on the project and choose 'Properties'. Then go to 'Signing'. Choose 'Sign the Assembly', specify 'New' for the key and choose a key name. You can password protect the key if you want to, but it is not required:
The final step - we now need to associate our extension with some file types. We can do that with the COMServerAssociation attribute (provided by SharpShell):
[ComVisible(true)]
[COMServerAssociation(AssociationType.ClassOfExtension, ".txt")]
public class CountLinesExtension : SharpContextMenu
So what have we done here? We've told SharpShell that when registering the server, we want it to be associated with the class of *.txt files. This means that we won't just have it available for anything that ends in *.txt, but anything that is the same class. In basic terms, that's most things that share the same icon as the *.txt files.
You can do some pretty funky things with the COMServerAssociation attribute - you can associate with folders, drives, unknown files, specific extensions and so on. The full documentation for this feature is at COM Server Associations on the SharpShell CodePlex site.
And that's it! Building the project creates the CountLinesExtension assembly, which can be registered as a COM server to add the context menu to the system. Registering the COM server is a debugging and deployment task, so we'll talk about this in detail in the next section.
Debugging the Shell Extension
The Shell Extension is going to be hosted in Windows Explorer - due to the roundabout way that .NET COM Servers are loaded, it's damn near impossible to get a debugger into the process and step through the managed code. However, there is a way to debug your extension quickly. SharpShell comes with some tools that make working with SharpShell COM servers a bit easier, and one of them is the Server Manager. We can use this tool to debug our extension.
Open the Server Manager tool and use File > Load Server to load the built server file (the DLL). You can also drag the server into the main window. Selecting the server will show you some details on it.
The Server Manager is very useful - it will tell you whether the server is installed (32 or 64 bit mode) and some more details.
If you load the SharpContextMenu server, then select it, you can go to the 'Tools' menu and choose 'Test Context Menu'.
When you use 'Test Context Menu', you'll get a Test Shell Window. This is a basic implementation of the Windows Explorer application. You can right click on any item to test the Shell Context Menu.
Tip: Regardless of the COMServerAssocations you've set, the Test Shell will always attempt to create the context menu for the items created.
Attaching a debugger to the ServerManager.exe process will allow you to debug into your Context Menu and test its functionality, without having to register the server in Windows. Here's what the Test Shell will look like when running the Count Line Context menu extension.
Installing and Registering the Shell Extension
There are a number of ways to install and register SharpShell Shell Extensions. In this section, I'll detail them all.
The regasm Tool
You can use the tool 'regasm' to install and register a shell extension. When using regasm, the shell extension will be installed into the registry (i.e., the Class ID of the COM Server will be put in the COM Server Classes section and associated with the path to the actual server file), it will also register the associations.
The Server Manager Tool
The Server Manager Tool is my preferred approach for installing/uninstalling and registering/unregistering, at least during development, because it lets you install and register as separate steps. It will also let you specify whether you're installing/uninstalling etc in 32 bit or 64 bit mode.
Manual Registry Manipulation
Generally a bad approach, but if you absolutely have to then the MSDN documentation for Shell Extensions describes the changes that must be made to the registry to manually register a COM server, or a Managed COM Server. The documentation is listed in the 'Useful Resources' section.
Useful Resources
What's Next?
SharpShell will over time provide a mechanism to create all of the available Shell Extensions using .NET. Currently, Icon Handlers are implemented (I'm working on the documentation) and Property Sheet Handlers are implemented (with a few bugs to iron out). Each extension type will have an article.
I hope you've found this article useful - for feature requests, bugs or comments, you can use the comments section below or the CodePlex site.
History
- 27th November, 2014: Initial version


 General
  News
News  Suggestion
  Question
  Bug
Bug  Answer
  Joke
Joke  Praise
  Rant
Rant  Admin
Admin 


