Introduction
In this tip, we will create a very simple MapView application with an annotation on it.
Background<o:p>
Objective C and Xcode experience will make this tip more understandable.
Using the Code<o:p>
The steps we need to follow to create this sample app are:<o:p>
Create a new project
- Add MapKit Framework to your project
- Design your interface
- Add a class for annotation
- Finally set the coordinate of your points on the map
- Result
I assumed that you created a new project already, so let us start...
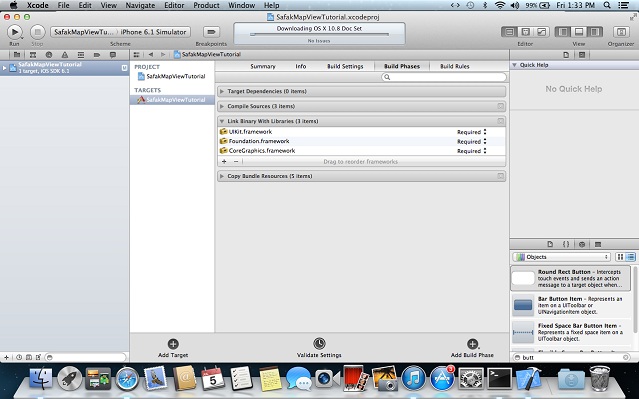
Add MapKit Framework to Your Project
Just click on your project and you will see the following screen, then click " + " sing and add MapKit Framework.

Design Your Interface
As you see, here is drag and drop stuff:
Here, right click on your MapView and drag it your Controller header. When you release, there will a pop-up menu, write a name there for your MapView. Here it is "ampView".
Here, same things for the button, but when the pop-up menu goes on, select the Connection as "Action" then give its name.
Add a Class For Annotation
After you added the class, add this code to your Annotation header file:
@property (nonatomic,assign) CLLocationCoordinate2D coordinate;
@property (nonatomic,copy) NSString *title;
@property (nonatomic, copy) NSString *subtitle;
Here, there are some terms:
Nonatomic
If a variable can be accessed by more than one thread at a point of a time, it is nonatomic. It provides performance, but it is not thread safe.
Atomic
If a variable accessed by only one thread at a point of time, it is atomic and it is thread safe but it decreases the performance.
Assign
Input value is directly assigned to parameter in the setter.
Copy
Input value is copied and assigned to parameter in the setter.
Weak
When an object is created in the setter, its retain count is not increased.
Retain
When an object is created in the setter, its retain count is increased.
Do not forget to import MapKit Header file in your Annotation header file.
Do not forget to synthesize them in the Annotation main file.
@synthesize coordinate,title,subtitle;
Finally, Set Your Coordinated of Your Point on Your Map
If we need to put an annotation on the map, we need to specify a region and set its span and center point interms of lat and lng.
MKCoordinateRegion myRegion;
CLLocationCoordinate2D myCoordinate;
myCoordinate.latitude  = 39.871738;
myCoordinate.longitude = 32.746382;
MKCoordinateSpan mySpan;
mySpan.latitudeDelta=0.30f;
mySpan.longitudeDelta = 0.30f;
myRegion.center = myCoordinate;
myRegion.span = mySpan;
So far, we create a region and set its parameters. Now, we will assign this region to our mapView.
[mapView setRegion:myRegion animated:YES];
Now, we are creating an annotation object and setting its coordinate, title and subtitle. Then, by using addAnnotation method of mapView, we add the annotation to our mapView.
Annotation *myAnnotation = [[Annotation alloc] init];
myAnnotation.coordinate = myCoordinate;
myAnnotation.title = @"Karmasis";
myAnnotation.subtitle =@"Cyberpark C blok 13";
[mapView addAnnotation:myAnnotation];
If we would like to add more annotation on a map, we need to create a NSMutableArray which takes annotation and we will add this array to mapView by using addAnntations method of mapView.
Result


