Docker, Kubernetes, and container technology in general have brought a great deal of flexibility and dynamism to applications. But they have also created a new challenge: Containerized applications have many more moving parts — and certain tasks, such as connecting them to persistent data storage, can be tough. These challenges sometimes lead IT teams to avoid containers because they are afraid of the time required to set up and maintain containerized infrastructure.
In this article, I show how to overcome these challenges with the help of Diamanti's bare-metal container platform. By providing a ready-made hardware and software platform for running containers, Diamanti eliminates the hard work of standing up a containerized application.
For our example, we'll focus on setting up a containerized WordPress installation that is powered by a MariaDB database and orchestrated by Kubernetes. We will also use this WordPress Helm chart to help with the deployment. The chart can be used as-is on a native Diamanti cluster, or can be customized to suit your own needs and performance levels. We will cover some of the customizations in this article. As we'll see, Diamanti makes it very simple to set up an environment, even though the environment requires persistent storage and orchestration.
The Hardware
To start, let's go over the hardware we'll be using.
The Diamanti cluster appliance comes initially with a minimum of three nodes. Diamanti built a hyperconverged infrastructure, including a minimum of three nodes, each with 10Gb Ethernet Linux network interfaces and NVMe block storage volumes that can deliver as little as 100 microseconds latency. With this bare-metal based infrastructure, Diamanti is able to consume up to 95% of the underlying hardware capabilities for the applications running in containers. When deploying applications at scale, the overall performance gains add up quickly and provide real and long-lasting costs savings.
What really sets the Diamanti cluster apart is the ease of deployment and their guaranteed service levels for each container. By leveraging custom hardware interfaces, Diamanti can prioritize real-time traffic across nodes based on specific bandwidth metrics. As a software developer or application owner, rest assured that your applications will perform as designed and in line with the service levels you have selected. In addition, the self-service infrastructure allows you to automatically deploy and upgrade your container based applications as outlined below.
Over the past few years, Diamanti has made significant contributions to the Kubernetes Open Source project. In fact, their engineering team has contributed to the development of the CSI framework for persistent volumes and continues to do so. Until recently, containers were mainly used for stateless applications due primarily to the ephemeral nature of the storage. With the introduction of persistent volumes, coupled with Diamanti’s internal data mirroring capability, stateful applications such as databases can now run on this high-performance cluster with no data loss.
The Toolset
As a long-time Oracle professional, with only recent overall experience with Docker containers and Kubernetes clusters, I welcomed the Diamanti online dashboards, command line interface (CLI), documentation, and self-service application deployments. While only a few commands are necessary to get started, the ability to review all cluster information (e.g. nodes, pods, network interfaces, persistent volumes, endpoints) at a glance made it easy to get familiar quickly with the entire stack. Here is a view of one of the dashboards showing my database pod after my first deployment.

To get started with a new cluster setup, there is only a set of four commands required. These commands include tasks such as: create the cluster, set up the network, provision a persistent volume and deploy the application. Cluster administrators can create a cluster using Diamanti’s command line interface "dctl", and add and remove any nodes as needed. Once a cluster is formed, Diamanti pools all the resources available across the nodes to enable Kubernetes to efficiently schedule containers in the cluster based on the service levels selected.
Diamanti’s "dctl" command line tool is available for Linux and Mac OS, and dctl.exe is available for Windows. The "kubectl" command is Kubernetes’ command line tool and is also available for Linux, MacOS and Windows. In order to deploy applications composed of multiple microservices, Helm (Kubernetes’ package manager) can be used to manage the complete deployment stream. The "helm" command is also available for all platforms. These tools can be downloaded to your local machine directly from a link provided within Diamanti’s dashboard. It was just what I needed to get started.
Managing your Cluster
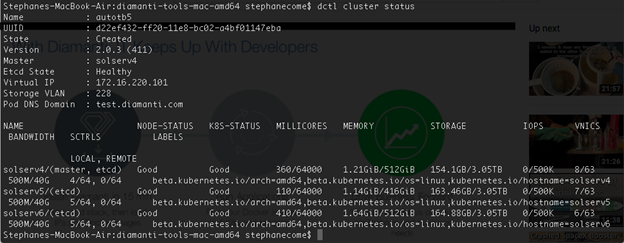
First off, let’s look at Diamanti’s cluster setup and the nodes available using the command line interface. You will need to log into the cluster with "dctl login" and provide your credentials (Cluster user management and security is beyond the scope of this article). Once logged into the cluster, you will be able to perform all other operations. Note that your cluster session will expire after one hour.

Once logged in, use "dctl --help" for a list of all cluster options available (or use the dashboard). Use "dctl cluster status" to monitor the current cluster status and get a list of all running nodes. In our case, the cluster is composed of three nodes with solserv4 as the master node.
While the minimum Diamanti cluster configuration is composed of three nodes, you can add more nodes using the following command (assuming your cluster has additional physical D10 nodes):
dclt cluster add host-4,host-5.
And to remove a node from the cluster, simply use:
dctl cluster remove host-5.
Adding Service Levels
Applications running in a cluster with other transient concurrent applications can suffer when resources are not readily available (known as noisy neighbor syndrome). As mentioned earlier, the cluster appliance allows you to choose from different service levels in order to enforce a minimum network throughput and storage IOPS for all your containers. Your application will be isolated from others and guaranteed a certain level of performance. There are three default built-in service levels to choose from as follows:
- high: Provides 20,000 IOPS and 500 Mbps of network bandwidth
- medium: Provides 5,000 IOPS and 125 Mbps of network bandwidth
- best-effort: There are no minimums when using this configuration
As a cluster administrator, you can create five additional custom service levels to match your own application requirements by simply using the command:
dctl perf-tier create <perf-tier-name> -i <storage iops> -b <network-bandwidth>
To assign a service level for your network interface, include a pod annotation in your Helm chart values.yaml configuration file.
podAnnotations:
diamanti.com/endpoint0: '{"network":"stef-wp-net","perfTier":"high"}'
In order to assign a service level for your persistent storage using one of Diamanti’s default options, set the storageClass in the WordPress values.yaml file.
persistence:
 enabled: true
  storageClass: "high"
Check out all the current service levels on your cluster with dctl perf-tier list

Managing the Network
Your application containers can connect to internal network subnets (defined objects) using endpoints. The endpoints determine the service level tier associated with the network object. You can create a network object using the Diamanti dashboard or by issuing the following command:
dctl network create <network_name> --subnet <subnet/class> --start <ip_range_start> --end <ip_range_end> --gateway <gateway> --vlan <vlan_id>
You can then simply list all the networks configured for your cluster with
dctl network list
You can specify the network to use in your pod definition file (Helm chart)
annotations:
  diamanti.com/endointpoint0: ‘{"name":"0", "network":"stef-wp-net","perf-tier":"high"}’
Note that when defining a pod deployment file, all objects (network and storage) must reference the same performance tier (i.e. "high"). If no performance tier is explicitly specified, the "best-effort" setting will be used.
Managing Storage
Physical files in a container are ephemeral in nature. They are lost when a container either stops or crashes. To solve this problem, Kubernetes introduced the notion of persistent volumes and persistent volume claims. A persistent volume (PV) is a resource created in the cluster. It is provisioned by the cluster administrator to reserve physical storage with a lifecycle independent from any pod. A persistent volume claim (PVC) is a request for pre-defined storage by a user or container at run-time.
A persistent volume can be created using the user interface (dashboard) or command line. Use the command below to create a new storage volume. Use the -m option to create volume mirrors. Diamanti will automatically spread the volume mirrors on different nodes within the cluster. You can configure up to a three-way mirror.
dctl create volume <volume-name> -s <size> -m <mirror count>
For example:
dctl create volume stef-vol -s 10G -m 1
Once the volume has been created (with one synced copy), you can modify the pod definition file to include the new volume. Diamanti uses their own custom drivers already installed on the cluster. Use the flexVolume plugin configuration item to enable these custom volumes:
volumes:
- flexVolume:
   name: stef-vol
     driver: diamanti.com/volume
      fsType: xfs
      options:
       name: stef-vol
        perfTier: high
        detachPolicy: auto
Use dctl volume describe <volume> to get detailed information about the volume(s) created or available in the cluster.

Final Step: Deploying the Application
For my tests, I’ve used a Helm chart to deploy the WordPress application running on MariaDB with minimal changes. The Helm chart directs Kubernetes to deploy all pre-configured components as a single step; however, each container and associated resource (network and storage) can be provisioned separately as well using Diamanti’s dctl utility as presented above.

In just a few minutes, our entire application is deployed and running on the cluster. Using Diamanti’s dashboard, you can monitor your application and all associated elements.
Conclusion
With Diamanti, you can deploy a containerized application quickly. Diamanti provides the hardware and software you need to host your containers so that you can focus on the application, and not where it lives. As we've seen in this article, even a complex Kubernetes-based application that requires persistent storage is simple to deploy with Diamanti.
Learn more about Diamanti at http://www.diamanti.com
Stephane is a lead technologist in the realm of enterprise and data architecture. He is the founder of LCS Technologies, a technology service company focused on Oracle, located in Sacramento. Before that, Stephane worked at Oracle Corp. Stephane is passionate about data and database architectures. He has worked as an Oracle database administrator, developer, performance tuning expert, architect, and is an AWS Certified Solutions architect. He recently published a curriculum for kids to learn JavaScript and Arduino using a comic book format, and is also working on a new series to teach AWS principles to kids. Stephane can be reached at stephane@lcs-technologies-inc.com.


