Introduction
The purpose of this article is to demonstrate how to create an animated MSN Live Messenger style popup window in WPF with MVVM design patterns. The popup window employs the fly-in and fade-in animation to move from the Taskbar to the screen area and then fade-out from the screen in 3 seconds.
Background
Traditionally, Windows desktop applications uses Notification Icon in system tray to notify user about some message or status notification. This is a good user experience which doesn't interrupt the user at work while keeping them aware of what's about. However, it renders a poor user experience in a real-time and highly interactive application where it failed to provide multiple or concurrent notification to the user. Personally, I prefer to use the MSN Live Messenger style popup window to solve the above mentioned problem.
Understanding the Code
This demo application is composed of several files, I will focus on the core functionality written in the following files:
- NotifyMessageWindow.xaml
- NotifyMessageViewModel.cs
- NotifyMessageManager.cs
NotifyMessageWindow.xaml
This is a skinnable and animated WPF popup window to show the message notification. To create a skinnable window, we need to set 3 properties of the Window to the following values:
AllowsTransparency = "True"Background = "Transparent"WindowsStyle = "None"
Then, we need to create 2 storyboards in the Window.Resources section.
The 'flyinStoryboard' storyboard is responsible for showing the fly-in window by animate the Window.Left and Window.Top properties.
The 'fadeInfadeOutStoryboard' storyboard is responsible for fade-in and fade-out the window by animating the attached property Window.Opacity in 3 seconds.
The data binding {Binding} properties in the resources are coming from the NotifyMessageViewModel view model, which will be revealed later in this article.
 <Window.Resources>
    <Storyboard x:Key="flyinStoryboard">
        <DoubleAnimation From="{Binding Location.FromLeft}"
        To="{Binding Location.ToLeft}"
            Storyboard.TargetProperty="(Window.Left)"
            Duration="0:0:1"></DoubleAnimation>
        <DoubleAnimation From="{Binding Location.FromTop}"
        To="{Binding Location.ToTop}"
            Storyboard.TargetProperty="(Window.Top)"
            Duration="0:0:1"></DoubleAnimation>
    </Storyboard>
    <Storyboard x:Key="fadeInfadeOutStoryboard">
        <DoubleAnimation Storyboard.TargetProperty="(Window.Opacity)"
        From="0.0" To="1.0" AutoReverse="True"
            AccelerationRatio="0.4" DecelerationRatio="0.6"
            Duration="0:0:3"></DoubleAnimation>
    </Storyboard>
</Window.Resources>
Upon Window.Loaded event triggered, we start the 'flyinStoryboard' and 'fadeInfadeOutStoryboard' storyboard together to create a smooth fly-in, then fade-in effect while showing the popup window.
<Window.Triggers>
    <EventTrigger RoutedEvent="Window.Loaded">
        <BeginStoryboard Storyboard="{StaticResource flyinStoryboard}" />
        <BeginStoryboard Storyboard="{StaticResource fadeInfadeOutStoryboard}" />
    </EventTrigger>
</Window.Triggers>
The content layout of the popup window is shown below and it simply binds the SkinName, HeaderText and BodyText properties from the view model.
 <Grid>
    <Grid Margin="5" Background="LightYellow">
        <Grid.Resources>
            <Style x:Key="headerTextStyle" TargetType="TextBlock">
                <Setter Property="FontSize" Value="14" />
                <Setter Property="FontWeight" Value="Bold" />
                <Setter Property="VerticalAlignment" Value="Center" />
                <Setter Property="TextTrimming" Value="CharacterEllipsis" />
                <Setter Property="Margin" Value="30 0 5 0" />
            </Style>
            <Style x:Key="bodyTextStyle" TargetType="TextBlock">
                <Setter Property="FontSize" Value="14" />
                <Setter Property="VerticalAlignment" Value="Top" />
                <Setter Property="TextWrapping" Value="Wrap" />
                <Setter Property="TextTrimming" Value="CharacterEllipsis" />
                <Setter Property="Margin" Value="10 0 10 0" />
            </Style>
        </Grid.Resources>
        <Grid.RowDefinitions>
            <RowDefinition Height="25" />
            <RowDefinition Height="*" />
        </Grid.RowDefinitions>
        <TextBlock Grid.Row="0" Style="{StaticResource headerTextStyle}"
        Text="{Binding Message.HeaderText}"></TextBlock>
        <TextBlock Grid.Row="1" Style="{StaticResource bodyTextStyle}"
        Text="{Binding Message.BodyText}"></TextBlock>
    </Grid>
    <Image Source="{Binding Message.SkinName}" Stretch="Fill" />
</Grid>
 The content layout of the Markup code shown above.
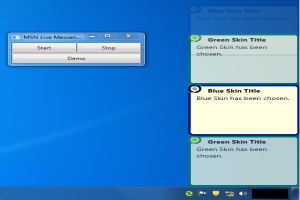
In this demo project, I've created 2 skin images named as 'BlueSkin.png' and 'GreenSkin.png', respectively. You will get to know how to use them in the section titled 'Using the Code' later in this article.


NotifyMessageViewModel.cs
This class serves as the view model to the popup window. It contains the following properties:
Message - It contains the SkinName, HeaderTe<code>xt and BodyText for content display.Location - It instructs the storyboard where to show the popup window in the screen location.ClickCommand - Action to be taken when popup window is being clicked.CloseCommand - Action to be taken while popup window is closed.
The properties shown above are pretty self-explanatory. User can customize the ClickCommand as of what to do when a popup window is being clicked. For example, showing the detailed message, navigate to another view, open the Internet Explorer and so on. The CloseCommand is used to notify NotifyMessageManager when the popup window is closed.
NotifyMessageManager.cs
This class is responsible for storing and displaying the queued messages. In order to support highly concurrent scenario, it employs a ConcurrentQueue data structure internally to store and retrieve the queued messages in First-In-First-Out (FIFO) manner. Its primary job is to start a background Task to display the popup window as soon as a message is enqueued in the system and stop while there is no message in the queue.
var dispatcher = Application.Current.MainWindow.Dispatcher;
return Task.Factory.StartNew(() => {
do
{
int nextLocation = FindNextLocation();
if (nextLocation > -1)
{
NotifyMessage msg = null;
if (QueuedMessages.TryDequeue(out msg))
{
var viewModel = new NotifyMessageViewModel(msg,
DisplayLocations[nextLocation],
() => DisplayMessages[nextLocation] =
null);
DisplayMessages[nextLocation] = viewModel;
dispatcher.BeginInvoke(
new MethodInvoker(() =>
{
var window = new NotifyMessageWindow()
{
Owner = Application.Current.MainWindow,
DataContext = viewModel,
ShowInTaskbar = false
};
window.Show();
}), DispatcherPriority.Background);
}
}
Thread.Sleep(1000);
} while (QueuedMessages.Count > 0 && !cancellationToken.IsCancellationRequested);
Stop();
});
Using the Code
First of all, create a singleton NotifyMessageManager in your application. You need to provide 4 required parameters to the constructor as shown in the code below. The popup window's width and height must be the same as the Skin's width and height. In our case, we are using 200x150 pixels skin here.
var notifyMessageMgr = new NotifyMessageManager(
Screen.Width,
Screen.Height,
200,
150
);
Next, create one instance of NotifyMessage and enqueue it to the NotifyMessageManager as shown in the code below:
var msg = new NotifyMessage(
"Images/BlueSkin.png",
"Blue Skin Title",
"Blue Skin has been chosen.",
() => MessageBox.Show("Blue Skin has been chosen.")
);
notifyMessageMgr.EnqueueMessage(msg);
You will see a popup window show up in the bottom left of the screen after the message is enqueued. Last, but not least, I've included a sample, available from the link at the top of this article, which demonstrates what I've described in this article.
Conclusion
To run this demo on your computer, you need to download the Microsoft Expression Blend Software Development Kit (SDK) for .NET 4 or manage to get the following library files:
- Microsoft.Expression.Interactions.dll
- System.Windows.Interactivity.dll
History
- 29th October, 2011: Initial version
Elvin Cheng is currently living in Woodlands, Singapore. He has been developing applications with the .NET Framework, using C# and ASP.NET since October 2002. Elvin specializes in building Real-time monitoring and tracking information system for Semi-conductor manufacturing industry. During his spare time, he enjoys reading books, watching movie and gym.


 General
  News
News  Suggestion
  Question
  Bug
Bug  Answer
  Joke
Joke  Praise
  Rant
Rant  Admin
Admin 


 Good job
