Introduction
For a while now, I have been looking for a solution to a chat program developed in VB.NET, but didn't find much, so I decided to try my own. The purpose of this article is to explain how to use TCP/IP Sockets and the My.Settings class included in .NET framework 2.0 and later. The good thing about this application is, the server and the client are not two separate applications. This form acts as both the Server and the Client.
Before You Start
Instead of creating my own file transfer functionality, I stumbled upon the UnoLibs.Net.dll. The beauty of this class is that all the work is done for you. Later in the article, I will explain how to put this code into practice.
To obtain a copy of this class, click here.
The Application
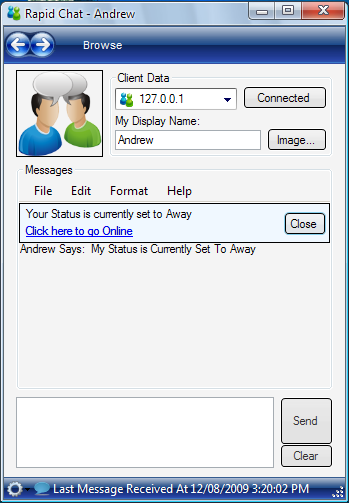
Using the Application (Rapid Chat)
- To add a new IP address to the address box, double click your display picture.
- Right click the "Send" button for more options.
- Make sure the selected client is available by clicking the Connect button.
1. Sending Messages Using TCP/IP
First off, we need to make some declarations:
Imports System.Net.Sockets
Imports System.Threading

Dim Listener As New TcpListener(65535)
Dim Client As New TcpClient
Dim Message As String = ""
You can use any socket you want. I usually choose one of the last few sockets just to be sure no other application is using them. Anything up to and including port 65535 is suitable for the job.
Now we need to start the listening process. This opens the specified socket to receive any packets of data sent to it. In the load event of the form, start the listener.
Dim ListenerThread As New Thread(New ThreadStart(AddressOf Listening))
ListenerThread.Start()

Private Sub Listening()
    Listener.Start()
End Sub
The listener would be useless without a timer. We need the timer to constantly update the listener to receive data.
Private Sub Timer1_Tick(ByVal sender As System.Object, _
ByVal e As System.EventArgs) Handles Timer1.Tick
If Listener.Pending = True Then
Message = ""
Client = Listener.AcceptTcpClient()
Dim Reader As New StreamReader(Client.GetStream())
While Reader.Peek > -1
Message = Message + Convert.ToChar(Reader.Read()).ToString
End While
RichTextBox1.ForeColor = Color.Black
RichTextBox1.Text += Message + vbCrLf
End Sub
Now to send a message to a particular client:
Private Sub btnSend_Click(ByVal sender As System.Object, _
ByVal e As System.EventArgs) Handles btnSend.Click
If txtName.Text = "" Or cmbAddress.Text = "" Then
MessageBox.Show("All Fields must be Filled", _
"Error Sending Message", _
MessageBoxButtons.OK, MessageBoxIcon.Error)
Else
Try
Client = New TcpClient(cmbAddress.Text, 65535)
Dim Writer As New StreamWriter(Client.GetStream())
Writer.Write(txtName.Text & " Says: " & txtmessage.Text)
Writer.Flush()
RichTextBox1.Text += (txtName.Text & " Says: " & txtmessage.Text) + vbCrLf
txtmessage.Text = ""
Catch ex As Exception
Console.WriteLine(ex)
Dim Errorresult As String = ex.Message
MessageBox.Show(Errorresult & vbCrLf & vbCrLf & _
"Please Review Client Address", _
"Error Sending Message", _
MessageBoxButtons.OK, MessageBoxIcon.Error)
End Try
End If
End Sub
And that's it for sending messages.
Now to set up file transferring using UnoLibs.Net.dll.
2. File Transfer Using the UnoLibs.Net.dll Class
The thing I love about this class is it is so simple to use. It's quick, easy, and best of all, it works!
Start off by referencing it in your project.
Imports UNOLibs.Net.ClientClass
Declare the client and the server.
Dim clnt As New UNOLibs.Net.ClientClass
Dim WithEvents server As UNOLibs.Net.ServerClass
Now to send some files to the client:
Private Sub SendFileToolStripMenuItem_Click(ByVal sender As System.Object, _
            ByVal e As System.EventArgs) Handles SendFileToolStripMenuItem.Click
    OpenFileDialog1.ShowDialog()

    If DialogResult.OK Then
        RichTextBox1.Text += (txtName.Text & " Is Sending You a File...") + vbCrLf
        clnt.SendFiles(cmbAddress.Text, 65533, OpenFileDialog1.FileNames)
    Else
        Exit Sub
    End If

End Sub
Using the My.Settings Class in VB.NET
I decided to put this section in my article because I know there is some confusion when it comes to saving user and/or application settings in VB.NET. The great thing about the My.Settings class is that very little code is needed to save a huge variety of settings. The My.Settings class allows you to save such things as:
- Strings (most common)
- Font
- Form size, colour, state etc.
- Checkstate
- Integers
- And many more
To create a setting, in your project, go to Project > (Your Project Name) Properties, and choose the Settings tab. Enter a name, Type (Usually String), Scope (User or Application), and a value for the setting.
To load a setting at startup, for a string setting, it might look something like this:
TextBox1.Text = My.Settings.RandomString
To change the value of a setting during runtime, it is virtually the same.
My.Settings.RandomString = RichTextBox1.Text
Your application will automatically save user-scoped settings on exit. To enable or disable this setting, do the following:
My.Application.SaveMySettingsOnExit = True
My.Application.SaveMySettingsOnExit = False
It's as simple as that. No need to load XML files and re-write them.
License
This code can be used freely without limitations. Check the code in the project file for more information on licensing.
History
- Aug 13, 2009 -- Original Post Date
- Aug 20, 2009
- Minor bug Fixes
- Some features added
- Missing source files added
This member has not yet provided a Biography. Assume it's interesting and varied, and probably something to do with programming.


 General
  News
News  Suggestion
  Question
  Bug
Bug  Answer
  Joke
Joke  Praise
  Rant
Rant  Admin
Admin 


