In the first article of this series, I went on a pretty long rant about how people are not using secure passwords, how that could lead to their information being stolen, etc, etc.
In this one, I’ll go over what I’m using for my own online security. It’s all based on free software and services, which have been around for years and everyone probably knows about, but since I have not seen any comprehensive tutorials on how to do this, I’ll try to explain in detail. Feel free to skip ahead if you think I’m wasting your time, you are not interested in the functionality I describe or whatever.
So enough beating around the bush…
Export Saved Passwords from Browser
The first thing to do is to export any passwords that you might have saved in your browser. For that, we’ll use the Firefox pluging - “Password Exporter”. Install it and follow the steps below. I’ll look into exporting from Chrome and Internet Explorer and will update the article at a later time.
Export Your Passwords from Firefox

In Firefox, select Tools->Options->Security, then click the “Import/Export Passwords” button.
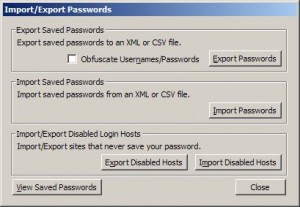
Click the “Export Passwords” button.
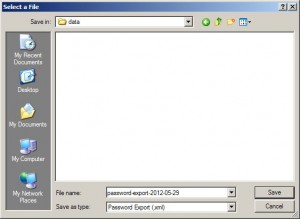
Save the password file.
Install KeePass
Download and install KeePass. Downloading the binary installer is the easiest way to do that, but if you want, you can download the portable version and extract in on a thumb drive – that will allow you to run KeePass on any machine without having to install it.
If you decide to install it, just follow the wizard – the default settings are fine, so just keep pressing Next. Once the application is installed, run it – you see the main application screen.

Now you want to create a new database to hold your keys. Click on the “New” menu icon and in the screen that pops up, give the new database a name and a master password.


Now we have a working database that has two sample entries (see below).

The folder tree on the left helps you organize your keys. You can right click on a folder and create sub-folders, drag and drop folders to re-arrange the hierarchy and obviously delete them.
The initial set of folders are not special, they are just regular folders with icons assigned to them. You can do that for the ones you create as well.

If you right click on a key entry, you can copy the user name and password to the clipboard.
Each key entry can have an URL associated with it. You can open that URL by selecting the appropriate browser from the URL entry in the drop-down.
To edit the entry, click Edit/View Entry.

Here is what the edit screen looks like. There is a meter showing the strength of the password, and you can see the password by clicking the little dots next to the password field.
You can also generate random password using the password generator, by clicking the gear button next to the repeat field.
Install KeePass Plug-in for Your Browser
Now comes the cool part. You can integrate the password manager with your browser, so when you open an URL, the appropriate username / password combination is automatically filled for you.
As a matter of fact, there are a whole bunch of plugins on the KeePass website that provide interface to pretty much anything you can think off.
The two I’ve used are PassIFox and ChromeIPass for Firefox and Chrome browsers. The installation is fairly straight forward, plus there is a very detailed instruction, so I won’t go over that.
Using the plug in is super simple. You start KeePass, mount the password file by using your master password and start the browser. That’s it. When you open an web address that has a key entry associated with it, the username and password will be filled in automatically.

If there is more than one entry for a given URL, you can pick which one to use by clicking the plug in icon that is shown in the address bar. That icon will also show you if the plug in can’t connect to the password database. Usually that’s because you don’t have it mounted. Just mount it and refresh the page and everything should work.
Some sites have multiple username/password fields you can right click on the one you need, and select where the username and/or password should go.
Finally, if the website has some sort of Java popup which confuses the plug in, you can always copy and paste the password, or use the auto-type function.
The auto-type is pretty cool. Open the page you want in the default browser, make sure it’s the selected tab, then open KeePass, select the password entry, right click on it and select “Perform Auto-Type”. The browser window will come up, and the username/password will be typed in the appropriate fields.
If you imported any old passwords, now is the time to look through them and close any accounts you no longer need. You’ll be surprised how many things you forgot about are still there – most companies tend not to delete any user accounts, even if you have used it half a decade ago.
Little by little, you can also change your passwords with long complicated ones generated by KeePass’ password generator.
Next, I’ll show you what I did to be able to access my passwords on virtually any computer and even my phone. So stay tuned.
I've been developing software for about 5 years now, specializing mostly in industrial and scientific programming. I'm experienced in C/C++ and C# both on Windows and Linux. I'm also fairly experienced in SQL as well.


