Introduction
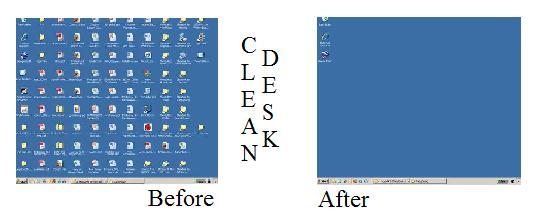
CleanDesk is a utility to keep your desktop clean. When you startup your PC, what you see first is your desktop, and most people like it to be clean. Seeing the desktop clogged with junk files which you might have downloaded from the mailbox, all those text files in which you wrote your notes, a plethora of shortcuts to new programs you have installed, and so on might not be a good start to your work.
Some people organize it as folders, some people dump it to a different folder, some people leave it as it is, some people re-install Windows (:) just an exaggeration). So basically, everybody likes their desktop clean. I would prefer an empty desktop, at the most two or three files. But it can get cumbersome at times organizing it because the number of objects might be too many. So I thought, let me try and automate this.
Yes, I know there is a Windows desktop cleanup wizard. But I prefer to have my own service, purely because of some additional tasks that I needed to perform like organize the files logically into folders instead of simply dumping into one folder, logging the activities, making my PC to do this automatically when I shutdown, and so on. What came out of these requirements is a Windows service, that moves the contents of your desktop to a pre-specified location, with additional sorting. This is performed when your system shuts down (or starts up, depending on your preference). I have a clean desktop now, and my files are organised, while I can work temporarily on the desktop and don't bother to organize it.
Although the story is presented here in the background of CleanDesk, I believe it is a job which includes creating a Windows service, making it do some file related work, and storing the settings in a file. The code can also act as a base for similar tasks.
Primer
Please note that the program is developed using Visual Studio 2010 which will be required to open the accompanying source code.
Before I get into the technical details of CleanDesk, let me tell you that it doesn't have a face (as of now), it just has a good soul - meaning, it is just a Windows service and I have not put an icon and options menu in the system tray. This will be done in the next stage, but for now, I have done it as a .NET based Windows Service. For now, you will have to use the services console to see the service and interact with it.
Two technical aspects worth mentioning here:
1. Windows Service
A Windows service is a daemon that runs in the background, performing your work. It usually doesn't have a front end.
When it comes to developing a Windows service using .NET, you have a template, which simplifies the task. The three functions that you should be familiar with at the very least when dealing with this job are:
OnStart - This is a function, which will be called by the framework when the service starts up. Usually, this is where you might want to invoke your worker thread as per the business logic you are putting in.OnStop - Will be called when the service is stopped from the services console panel. You might need to do your cleanup jobs here, like freeing up memory used and so on.OnShutdown - Will be called when the OS is shut down, while the service is in started state. Code written here will be executed when your Operating System is shutdown.
For CleanDesk, I have used only these three functions, and in fact I only needed two. I needed to check if my folders are in place and start the organization (if the setting specifies it to do at startup) in the OnStart, or do the organization when the system is shutdown if the settings says so, at OnShutdown. I used OnStop only to write logs.
Installing a Windows service involves executing the command installutil. One important point worth mentioning here is that we have to use a user account when installing the service and not local system or the admin account. The way, CleanDesk finds the desktop is based on your login credentials. If you want to use one of the other possible approaches, like installing using the local system account, there might be slight tweaking required. Anyways, I used the approach of using the user account, by specifying the username and password and letting the service automatically find out the desktop. Installutil comes with Visual Studio, and you have to use the Visual Studio console to run it. If you are using Express Edition, you may have to install the .NET Framework SDK for this. If you simply want to install the service without bothering to change the code or anything, I have provided a Windows setup project for CleanDesk which does just this. Just run the setup and give your username and password to install the service. The process should look like this:
Step 1: Run the setup. Give the username of the account for which you want to install CleanDesk. Note that the desktop of the given account's owner will be organized by CleanDesk.

Step 2: Verify the service at the services console. You can go to "run" and type services.msc to access the services console. Or you can use the computer management snap-in to access this console. The first time after you install the service, you will have to start the service explicitly. The next time onwards, it will start with Windows.
Also, I have not tried to change the laws of the society here. You need to have access to your whereabouts to use it. The service acts as your surrogate when doing its job of moving the files to the necessary folders and cleaning up the desktop. So the user account under which the service is installed will sort that user's desktop, and he/she is assumed to have rights both on the desktop and the destination folder specified. Dealing with rights can be frustrating at times, but yes, the whole point is - your security.
Windows event viewer is a good help to use when you face issues with installing and running the service, like service not able to move the file, etc.
2. Using Settings in .NET Projects
To add settings to your project, go to the properties of your project and select the Settings tab. In the Settings tab, select Add Settings. Once you have added the settings, you will get a grid, where you will be able to add your contents. The settings grid consists of the columns: Name, Type, Scope, and Value.
Once you have added the values here, what you get is an XML file with the .config file prepended with the application name. This is a very easy way to store your application settings. You can specify the values at design time or at run time. If you decide to do it at design time, these are the steps that you can follow (as per Microsoft):
In Solution Explorer, expand the Properties node of your project.
In Solution Explorer, double-click the .settings file in which you want to add a new setting. The default name for this file is Settings.settings. In the Settings designer, set the Name, Type, Scope, and Value for your setting. Each row represents a single setting. The diagram here should better explain this.
Once you want to change the settings, follow this:
- In Solution Explorer, expand the Properties node of your project.
- In Solution Explorer, double-click the .settings file in which you want to add a new setting. The default name for this file is Settings.settings.
- In the Settings Designer, find the setting you want to change and type the new value in the Value column.
Once CleanDesk is installed and you want to change the values, do this:
- Using Microsoft Notepad or some other text or XML editor, open the <AssemblyName>.exe.config file associated with your application.
- Locate the entry for the setting you want to change.
For instance, if you want to change the log path, locate the value Log and change its value as required:
<setting name="Log" serializeAs="String">
   <value>d:\log.txt</value>
</setting>
Type a new value for your setting and save the file.
In CleanDesk, I have used StringCollection as well, to store the extension->folder map. Yes, the setting does allow to store collections as well, which I have made use of.
Dive into the Code
Before getting into the specifics of the code, let me explain a couple of CleanDesk terms here. A Runis a running sequence number which I will be appending to a file/folder name, in the event it already exists in the destination location. A DropBox is a location where the files with an unspecified extension will be dropped into. The user will have to manually sort it from here. One can also think of a rules based sorting here, but as of now, let's keep it simple.
Let's get deeper into the code now. We have two classes which are the powerhouses of CleanDesk. Shown below is the class diagram.
It's pretty mundane. No exciting oops here. Most of them are static functions. Oh yeah, the job in hand is something like a script which performs the task of moving the file, which you might be scheduling it to Tivoli (a job scheduler from IBM). As the name explains, I have grouped all the file related functions in FileRelatedFunctions and the organization related functions in OrganizerCode.
The core of the program is the function StartOrganizing(). This function does the job of moving the files in the desktop to its organized folder. To simplify the explanation of business logic, let's take the help of a flowchart. The one below does just that.
Here's the corresponding code for the flowchart:
public static void StartOrganizing(String[] objectsOnDesktop)
{
String moveFileTo = String.Empty;
String newFileName = string.Empty;
String newFolderName = string.Empty;
int attempt = 0;
foreach (String objectOnDesktop in objectsOnDesktop)
{
try
{
FileInfo fi = new FileInfo(objectOnDesktop);
if (fi.Attributes != FileAttributes.Directory)
{
if (IgnorableFiles.Contains(fi.Name.ToLower()))
continue;
moveFileTo = FolderExtensionMapping.ContainsKey(
fi.Extension.Remove(0, 1)) ?
FolderExtensionMapping[fi.Extension.Remove(0, 1).ToLower()] :
"DropBox";
DirectoryInfo di =
new DirectoryInfo(OrganizedFolder + "\\" + moveFileTo);
if (!di.Exists)
di.Create();
FileRelatedFunctions.WriteLog("Attempting to move " +
fi.FullName + " to " + di.FullName);
newFileName = fi.Name;
FileInfo checkDest = new FileInfo(OrganizedFolder + "\\" +
moveFileTo + "\\" + newFileName);
if (checkDest.Exists)
{
FileRelatedFunctions.WriteLog("Destination file " +
"already exists. Attempting with new extension");
newFileName = GetUniqueFileName(newFileName);
attempt = 1;
bool fileExists = true;
while (fileExists && (attempt <= Cap))
{
FileInfo checkDestAgain = new FileInfo(OrganizedFolder +
"\\" + moveFileTo + "\\" + newFileName);
if (checkDestAgain.Exists)
fileExists = true;
else
fileExists = false;
if (fileExists)
{
newFileName = GetUniqueFileName(newFileName);
attempt++;
}
}
}
if (attempt != Cap)
{
FileRelatedFunctions.WriteLog("Attempt = " +
attempt.ToString() + " : Cap = " + Cap.ToString());
fi.CopyTo(OrganizedFolder + "\\" + moveFileTo +
"\\" + newFileName, false);
FileInfo newFi = new FileInfo(OrganizedFolder + "\\" +
moveFileTo + "\\" + newFileName);
if (newFi.Length == fi.Length)
{
FileRelatedFunctions.WriteLog("File Size Verification Sucess");
fi.Delete();
}
FileRelatedFunctions.WriteLog("Move File Complete. Source = [" +
fi.FullName + "] Dest = [" + OrganizedFolder +
"\\" + moveFileTo + "\\" +
newFileName + "]");
}
else
{
FileRelatedFunctions.WriteLog("Same file exists more than " +
Cap.ToString() + " times. Aborting move file operation.");
}
}
else
{
DirectoryInfo di = new DirectoryInfo(fi.FullName);
newFolderName = fi.Name;
FileRelatedFunctions.WriteLog("Attempting to move folder " +
fi.FullName + " to " + OrganizedFolder +
"\\Folders\\");
DirectoryInfo newDi = new DirectoryInfo(OrganizedFolder +
"\\Folders\\" + newFolderName);
if (newDi.Exists)
{
FileRelatedFunctions.WriteLog("Destination folder " +
"already exisis. Renaming using running sequence");
newFolderName = GetUniqueFileName(newFolderName);
attempt = 1;
bool folderExists = true;
while (folderExists && (attempt <= Cap))
{
newDi = new DirectoryInfo(OrganizedFolder +
"\\Folders\\" + newFolderName);
if (newDi.Exists)
{
folderExists = true;
newFolderName = GetUniqueFileName(newFolderName);
}
else
folderExists = false;
if(folderExists)
attempt++;
}
}
if (attempt != Cap)
{
if (Directory.GetDirectoryRoot(fi.FullName) ==
Directory.GetDirectoryRoot(OrganizedFolder +
"\\Folders\\"))
{
Directory.Move(fi.FullName, OrganizedFolder +
"\\Folders\\" + newFolderName);
}
else
{
FileRelatedFunctions.CopyDirectory(di,
new DirectoryInfo(OrganizedFolder +
"\\Folders\\" + newFolderName));
if (FileRelatedFunctions.CompareDirectories(di,
new DirectoryInfo(OrganizedFolder +
"\\Folders\\" + newFolderName)))
{
FileRelatedFunctions.WriteLog("File Sizes" +
" inside Folder Verification Sucess");
Directory.Delete(di.FullName, true);
}
}
FileRelatedFunctions.WriteLog(
"Move File Complete. Source = [" + di.FullName +
"] Dest = [" + OrganizedFolder +
"\\Folders\\" + newFolderName + "]");
}
else
{
FileRelatedFunctions.WriteLog("Same folder exists more than" +
Cap.ToString() + " times.");
}
}
}
catch (Exception ex)
{
FileRelatedFunctions.WriteLog(ex.ToString());
FileRelatedFunctions.WriteLog("Fail");
}
}
}
It is pretty long, but mostly dominated by conditional statements as I am doing a lot of checks. Moving the folder to the destination has a slightly additional functionality than the flowchart. It checks for the extension (if it is a file) and moves the file to the destination folder + into the folder name for the particular extension as mentioned in the setting file. I will explain this setting in a short while.
To log, I've used a simple text writer that writes to a log file. Obviously, the log should be in a location where the service (the user account) has read/write access. As you can see, the code heavily depends on FileInfo and FolderInfo to do its job. These are functions provided by the .NET Framework to perform file related operations. Cool, we have the core part explained. Let me round it off with other parts which complete the program.
Well, as I have mentioned before, the logical beginning of the program is the OnStart function. The program checks for the settings to be performed on startup. If any, do the organizing, else leave it for the shut down. If the job is not to be performed at Windows startup, then it has to be when the OS shuts down, and hence the function call in OnShutdown. Here are the three functions I have been mentioning.
The running sequence number is derived using a fairly simple logic. The program tries to find a non-existing file name with a running sequence number till a cap value mentioned in the settings. The default value is 99 which, of course, you can change. It means that there can be file names abc.txt, abx(01).txt, abc(02).txt, till abc(98).txt. So at a time, 99 copies of the files will be there. You can set this value till int.Maximum to get an unlimited run. Anyways, I preferred to keep the run to a manageable limit - 99, but you may change it as per your requirement.
protected override void OnStart(string[] args)
{
FileRelatedFunctions.WriteLog("-------STARTED----------");
if (OrganizerCore.Startup)
DoOrganize();
}
protected override void OnStop()
{
FileRelatedFunctions.WriteLog("-------STOPPED---------");
}
protected override void OnShutdown()
{
if (!OrganizerCore.Startup)
DoOrganize();
FileRelatedFunctions.WriteLog("-------SHUTDOWN---------");
}
The DoOrganize function completes the job.
private void DoOrganize()
{
String[] filesAndFoldersOnDesktop =
FileRelatedFunctions.GetAllFilesAndFolders();
OrganizerCore.StartOrganizing(filesAndFoldersOnDesktop);
}
CleanDesk Settings
The initialization is done in the constructor of the service class. It reads the services. The various settings possible are:
ExtenstionMap: This is the string which tells CleanDesk which extension goes where. The format is extension->FolderName. When CleanDesk tries to move the file/folder, it checks if the folder exists, else creates one and moves the file/folder. This is where you should be adding more extensions as per your requirement. For example, if you need to move all your zip files to a folder by the name "compressed files", then the syntax would be zip, compressed files.
ExclusionList: Some of the files on the desktop, like a reference Excel, should remain on the desktop, which the user wants to see on the desktop. Well, exclude these. Ideally, desktop.ini should also be excluded, which I have already added in the settings file.Log: Where the service should write the log. Please take care of the log very well; it is very, very important to track down what happens to the files/folders processed by CleanDesk.OrganizedFolder: The destination folder to which your files will be placed to. The new folders will be inside the destination. It will also have a folder by the name "folders" where all your folders will be.Schedule: The string "shutdown" says the organization should be performed when the OS is shutdown, which I have kept as default. Any other text means, do the job at Windows startup.Cap: is the upper limit of the running sequence number. For example, if Cap is 2, the running sequence numbers generated are (01),(02) ; if Cap is 3, the numbers would be (01),(02),(03).
I am also providing installation for the service. This is again done by the Visual Studio Setup and Deployment Wizard. Please refer here for a detailed explanation on doing this. No point repeating it here. Do note that the settings reside in the same folder as the executable and by the name of CleanDesk.exe.config.By default, I have pointed the log to d:\log.txt. Please change it as per your convenience.
Words of Caution
CleanDesk moves your files. You can see that I have done it in three steps as an additional precaution, instead of a one step move. Copy to destination->Verify destination->Delete source. I have been using CleanDesk for sometime now, and I have not lost any file. Still, I would suggest monitor for a few days when you install it first on your system just to add more precaution.
Why shouldn't you be installing a similar program (other than CleanDesk) if it exists and even if it is free from the internet? Simple, your are allowing access to your files and it's very, very risky. CleanDesk provides you full source code and I would suggest verifying the code once, compiling it yourself, and installing the compiled copy. The safest way to a clean desktop.
Conclusion
The code is very well commented, so there shouldn't be a problem understanding it. Any suggestions, enhancements regarding the program or the article are welcome. Thanks for your time.
Points of Interest
I have not used Test Driven Development here. I followed Test Assisted Development (if such a term exists) for one of my functions. But adding additional test cases for the file related functions should make it more affable.
I will try to do this, but if not, please consider trying it yourself: Sorting based on the file/folder name to a relevant folder, automatically. For instance, a folder containing a file by the extension .csproj should go into your programming->CSharp->ProjectName folder. Another example, a file by the name MyAccounts.xlsx should go to folder named "Finance", and so on. Well, it is AI. But not very complex, I guess. Basically, it is about identifying the context of the word and naming the folder accordingly.
A settings dialog and a tray bar icon is on the way.
History
- 09/May/2010 - Initial post.
- 11/May/2010 - Changes to fix issues with regard to the running sequence number generation logic. The value ahs been made configurable, and explanation added in the article.
He is a Microsoft technology enthusiast, who wish to create applications which others find useful.He loves making small tools and getting involved in architecting bigger systems.
He is currently working as a professional developer in a software development firm in .Net technologies.
He likes reading technical blogs, contributing to opensource and most importantly, enjoying life.
His ambition is to be an impressive software maker.


 General
  News
News  Suggestion
  Question
  Bug
Bug  Answer
  Joke
Joke  Praise
  Rant
Rant  Admin
Admin 


