Introduction
Tripous is an Open Source application framework, written in C#, for rapid implementation of WinForms data entry applications.
The official site can be found at http://tripous-net.com. The project page at SourceFourge can be found at http://sourceforge.net/projects/tripous.
To use Tripous, you need, at least, .NET 3.5 with Service Pack 1 and Visual Studio 2008.
This article is an introductory tutorial on how to code a basic Tripous application. You may use this sample application as a base for writing your own Tripous application with its own data and forms.
What Tripous offers
- Rapid application development.
- Unified data access; that is, database server neutral SQL statements and, the most important, database server neutral SQL parameters.
- A powerful and flexible business class, his majesty the Broker, fully declarative, or inheritable, or both.
- Base data entry form classes and its own user interface controls that can be used to accelerate user interface construction.
- User access control, easily (really) extensible to cover any type of object.
- Automatic logging and exception handling.
- XML serialization (Tripous does heavy use of XML).
- Automatic SQL statement generation.
- Unified access to application resources.
- Pluggable application options subsystem.
- Plug-ins.
- Designable reports (using an external report library of your choice).
- A TCP server and client that communicate using simple XML commands (poor man's SOAP), fully pluggable, and extensible.
- SQLite integration.
- PDA framework with all the goodies of the desktop framework (controls included).
- ...and more.
Tripous tutorials
I have already written some tutorials on how to use Tripous sub-systems and I plan to write more. You can find those tutorials at my profile page here in CodeProject.
What name is this?
Tripous is an ancient Greek word meaning a three-legged stand. Tripod is a synonym. Delphic Pythia was sitting on a tripous when she was making her oracles. Talking to a database server is similar to talking to an oracle. You issue a query, but you have no idea what you are going to get back as an answer. And since the Tripous framework is about data, I find Tripous is a suitable name.
Why a framework?
Tripous is a framework for rapid development of data entry applications.
A framework is a code base that provides services in building applications. .NET is such a framework. Most programming environments deserve that classification too. So why bother to build such a framework? Isn't .NET and all those .NET classes enough? Well, yes they are.
A framework is required:
- if you believe you have to hide the various database connection technologies behind a unified data access layer.
- if you're going to provide base business logic ancestor classes.
- if you think your data entry forms should have some level of uniformity.
Background
Tripous is a traditional system and has its own perspective regarding many aspects when building an application. Let's examine the most important areas.
P/Invoke
No P/Invoke. Tripous vanity is to be, some day, a drifter in the Mono world. And in the DotGNU continent. So it uses P/Invoke only when there is no other solution. For instance, it uses P/Invoke to call the Remote API (RAPI). P/Invoke marries the framework to a certain system. And that's not a good habit for a framework. A friendship is more than enough.
Tripous is not ORM
Tripous' main task is to handle data stored in relational databases. So we can say that Tripous is mainly a database application framework.
There are two types of database application frameworks: let's name them traditional frameworks, and the Object Relational Mapping Frameworks (ORM) or Object Persistent Frameworks (OPF).
In an ORM/OPF framework, database tables are mapped to classes. The user of such a framework has to do with objects and lists of objects. Not datasets or database tables. A class is built upon one or more database tables, and the properties of that class are mapped, more or less, to database fields. This is a simplistic description though. Anyway, this mapping technique has some limitations, especially when the underlying database schema is not going to remain unaltered for ever (in my country, schema alterations happen very frequently). If the schema changes, then a re-mapping of the objects and a re-compilation of the application is required.
Besides ORMs, some programming environments provide a so called typed dataset, that is a dataset-like object where field names of an underlying database table are already properties of a datatable. PowerBuilder and .NET are examples of such environments.
The whole idea of ORMs and typed-datasets is that programmers know classes and must handle just classes and objects. Nothing else. That religion also believes that any exposition to database tables and SQL statements such as SELECT, INSERT etc., may harm programmers' attitude and lead them to some kind of a disappointment.
So ORM frameworks, like a magician, build the illusion that data is local to the application and not in the database. And as Anders Hejlsberg says, "You may want to have the illusion that the data is not in a database. You can have that illusion, but it comes at a cost."
Tripous is not an ORM framework. (The truth is that, once upon a time, when Tripous was younger, it had a different tongue, Delphi Pascal namely, and it was an ORM-wanna-be. But that's history now.) Instead, Tripous is a "traditional" framework. And although it has a business object, the Broker class, it provides full access to database tables and fields. So Tripous gives you direct access to DataSet, DataTable, and DataRow objects. It does its best not to bother you, but sooner or later, you'll have to deal with those DataSomething creatures.
No N-tier
Sometimes there is a confusion of what a tier or a layer is. Let's make another hopeless attempt to clarify the issue.
A well designed database application owes to provide three distinct layers. Data Access, Business Logic, and Presentation or User Interface. Think of them as departments in an organization. They must have clearly defined objectives, whithout overlaps. In practice, that's tough though. Those layers are like kids fighting for the same toy: data.
In short:
- Data Access Layer hides the complexities of the various database types and provides uniformity in accessing database data by executing
SELECT, INSERT, UPDATE etc., statements coming from the Business Logic Layer. - The Business Logic Layer solves the business problem, and performs business operations, taking into account the so-called business rules ("no discount more than 10 percent for any new customer for the first three months, unless he is the boss' cousin"), and provides data to the Presentation Layer.
- The Presentation or User Interface Layer controls all those visual elements, such as windows, menus, and buttons the user uses in interacting with the application, presents data to the user, and returns any input to the Business Logic Layer.
A well designed application decouples business logic from presentation. Nevertheless, that layering is mostly a logical stratification. That is, in most cases, those three layers co-exist in the same physical executable.
Regarding physical layering, meaning different executable modules, there are two conflicting parties:
- the traditional client-server party
- and the modern multi-tier or n-tier party
In a client-server design, there are two physical layers: the application is the one. The database and the database server (MS SQL, Oracle etc.) is the other.
In a multi-tier design, sometimes called n-tier, there is another layer sitting between the application and the database: the Application Server, or AppServer for brevity. That application server serves client applications passing business objects (Customer, Supplier, Order, etc.) to them using a variety of technologies such as DCOM, CORBA, etc. In a multi-tier design, a client application talks to the application server and stays away from the database server.
Tripous is not a Swiss army knife. It is a modest system that knows its limits. It targets small to medium businesses with a small intranet or VPN. Under those conditions, a traditional client-server system is quite enough.
Table classification
Regarding business logic, a database application may logically be divided into business modules. Each module, say Customer or Store or Sales module, uses a set of correlated tables. For instance, an imaginary Sales module may use the CUSTOMER, MATERIAL, TRADE, and TRADE_LINES tables.
Tripous sees data tables in a certain way. A table may belong to one of the following categories in regard to the nature of data and the number of rows it may have: Master table, LookUp table, Transaction table, and Correlation table.
- Master is a table when there are other tables that have foreign keys to it. A master table usually has more than two or three fields and many thousand rows. A CUSTOMER or MATERIAL table is considered to be a master table. A master table may contain foreign keys to other master or lookup tables.
- Lookup is a table with a few fields and a few, at most hundred, rows. A lookup table is a literal provider to other tables that maintain a foreign key to it. It usually has ID, CODE, and NAME fields. An OCCUPATION or MEASURE_UNIT or COUNTRY table is considered to be a lookup table. A perfect lookup table contains no foreign keys to other tables.
- Transaction table is a table that records transactions of master tables. Sometimes they are called historical tables or even trade tables. A transaction table can easily have millions of rows. An ORDERS or TRADE table is considered to be a transaction table. Transaction data very often require two or even more tables in a master-detail relationship, forming a table tree. For instance, ORDERS and ORDER_LINES; where ORDERS, the master, contains information regarding the customer, the date of transaction etc., while ORDER_LINES, the detail, records information regarding goods, quantities, and prices, and an ID to ORDERS.
- Correlation table is a table that correlates two, or even more, Master tables. Usually, a correlation table records only IDs from those Master tables and nothing more. A Correlation table usually records many to many relationships. For instance, a CAR and a DRIVER Master table may require a CAR_DRIVER Correlation table. A driver may have many cars in his responsibility.
Regarding table classification and table tree composition, Tripous rely on you, the programmer. Tripous offers the Broker class that represents a business module. A Broker is the business object in Tripous. Internally, Broker uses a TableSet class that handles the table-tree.
The TableSet class handles the set of tables of a business module, discussed above. Each table is represented by a DataTable instance. The TableSet.TopTable property denotes the top DataTable. TopTable is the top DataTable in a tree of DataTable objects where a DataTable of a lower level is the master in a master-detail relationship to DataTables of the next greater level.
Normalization
Normalization is a term used in database programming to describe the techniques involved in designing tables in order to minimize duplication of information.
For instance, in a CUSTOMER table, it's not wise to have an OCCUPATION_NAME string field. Instead, you use an OCCUPATION_ID foreign key field pointing to the ID primary key field of the OCCUPATION table. The same stands true for an ORDER_LINES Transaction table and a MATERIAL Master table. The ORDER_LINES should have a MATERIAL_ID, not a MATERIAL_CODE or MATERIAL_NAME field.
In short, a bit of information is stored once and only once, and in a certain table. Any other table that wants access to that bit of information just maintains a reference to it. The process of arranging tables and fields the way just described is called normalization.
Normalization is not a panacea. It is used in so called "Production Databases", that is, databases used in the daily processing of transactions. Normalization is not used in a "Warehouse database" where the primary use is for "data mining" operations.
You may check the entries Database Normalization, Data Warehouse, and Data Mining at wikipedia. But regarding normalization, please, don't spend much time reading those texts, unless you are a student looking for reference material for the next semester. Conventional wisdom is quite enough. At least for the area Tripous tries to cover.
Primary keys
Here is a rule Tripous strictly follows: every table in a database should have a field named ID (OK, if you insist, feel free to give it any name you want). That field:
- is an Integer field or a GUID string field,
- it is the Primary Key, that is
- it uniquely identifies a row, and most importantly,
- it has no business meaning at all.
An application user almost never sees that field.
Those unique IDs are called OIDs, Object Identifiers. Some SQL Servers provide built-in mechanisms for the generation of those integer unique IDs. There are two forms: auto-increment fields and unique number generators. MS SQL Server and Informix fall in the first category while Interbase/Firebird and Oracle in the second.
Data entry forms
A database application mainly consists of data entry forms. But how should a data entry form look like? Well, there are a few hundred different opinions on that. There are just four things, and believe me no more, one can do with data: SELECT, INSERT, UPDATE, and DELETE. A very limited repertoire. (Let's admit it. Our job as database application programmers is not that hard, but better keep the secret among us.)
A Tripous data entry form has two parts:
- a browse (or list) part, and
- an edit (or item) part.
The data in the list part comes by issuing a "select * from TableName" statement (that's not accurate though since that SELECT would be as complex as it gets). The application user can configure an optional WHERE clause of that SELECT statement each time the statement is executed. The data of the list part is displayed in a read-only browser grid.
The data in the edit part, when editing, comes by executing a "select * from TableName where Id = x" statement. The Id value comes from the list part after a user selection. When inserting, the edit part displays just empty controls.
The above is a short description of a Tripous Master form. A Master form serves Master and Transaction tables.
The second kind of Tripous data entry form is the List form. The list form has no separate edit part. All data entry happens in the browser grid, and changes are committed all at once. A list form serves Lookup tables.
SELECTing data for a report or any other BI purpose is a totally different thing than SELECTing data for data entry purposes. So we can safely ignore it for now.
Stored Procedures
No Stored Procedures. Tripous is allergic to Stored Procedures. Stored Procedures tie an application to a certain database server. Tripous targets small to medium businesses. Some of them, the wealthier, may already have a commercial database server. Some of them, the wiser, may not, because they want to cut down the cost and use an Open Source server. So anything that ties an application to a certain database server is not a good choice.
There is a rumor though that Stored Procedures are executed in a fraction of time than normal SQL statements, and that's because the database server pre-compiles the Stored Procedure code. I'm not quite sure about that rumor, but I have to say that a decent database server should retain execution plans for all SQL statements in its internal cache, not just Stored Procedure execution plans. And if it doesn't, then I consider that as a major flaw. I admit though that my opinion lacks the proper validity.
The secret is to use parameterized SQL. This is what Tripous does. Something like "select * from CUSTOMER where ID = :ID". From a database server point of view, this statement looks much better than the usual "select * from CUSTOMER where ID = 1234".
Installing and setting up
This section provides information and instructions on how to install and setup Tripous.
Tripous sources
Tripous library source code comes as a compressed file that contains just a single Visual Studio solution.
The solution contains the following folders:
- Compact: Compact Framework (PDA) related assemblies.
- Desktop: Normal .NET Framework related assemblies.
- Plugins: A few plug-in assemblies Tripous already uses.
- Printing: A work in progress to create a reporting library.
The Compact folder contains:
- the TripousPPC5 project which is the Tripous library assembly for working with PDAs.
- the DevAppPPC5 project which is the template project for creating Compact Framework (PDA) applications with Tripous.
- the TripousPPC5.Design project which contains some designers for the TripousPPC5 assembly. Read the accompanying ReadMe.txt for further clarification.
- the TripousPPC5.DesignAttributesHack project which is actually the best hack I was able to find in overcoming a genasm.exe problem related to CF design-time functionality.
The Desktop folder contains:
- the Tripous project which is the Tripous library for working with PCs.
- the DevAppDesktop project which is the template project for creating desktop applications with Tripous.
The Plugins folder contains:
- the em_FastReport project which is a plug-in assembly (em_ stands for external module) for dynamically loading the excellent FastReport library.
- the em_ScriptNet project which is a plug-in assembly for the excellent ScriptDotNet scripting library.
- the em_SyntaxBox project which is a plug-in assembly for the excellent Puzzle.SyntaxBox.NET3.5 syntax highlighting editor.
(Tripous tries to follow a pluggable architecture with many code elements (i.e., forms and other classes) and not only with external module plug-ins. This means that you may provide your own code, overriding Tripous default solution, if any at all.)
The Printing folder contains a project which is going to be the Tripous Reporting Library, time permitting.
Installation and compilation
Just decompress the sources to a directory. There is no need to install anything in the GAC. Locate the solution file (TripousLib.sln) and double-click it. VS opens and loads the solution. Just rebuild the solution and everything should be ready. There is nothing more to say here except of an old wish I learned when I was a Jedi knight: "may the source be with you".
If you are going to do some Compact Framework development using Tripous, then you better read carefully the two ReadMe.txt files found in the TripousPPC5.Design and the TripousPPC5.DesignAttributesHack projects.
The compilation process produces the two assemblies you need to reference in any Tripous project:
- RootFolder\Compact\TripousPPC5\bin\Debug\TripousPPC5.dll, for Compact Framework applications.
- RootFolder\Lib\Desktop\Tripous\bin\Debug\Tripous.dll, for normal desktop applications.
Installing Tripous controls
- Close all MS VS instances.
- Reopen MS VS and create a solution with a Windows Forms Application project.
- Make
Form1 visible. - Go to Toolbox and create a new tab (right click and then Add tab).
- Name the new tab as "Tripous Desktop".
- Right click that tab and then "Choose items".
- In Choose ToolBox Items, click Browse and navigate to RootFolder\Lib\Desktop\Tripous\bin\Debug\Tripous.dll.
- Select all the controls the Tripous.dll assembly contains and click OK.
First Tripous Application
This section provides instructions on how to code your first Tripous application.
Create a new solution with a Windows Forms Application project. Name the project as DevAppDesktop. Rename the project's default namespace (Solution Explorer | right click on the project | Properties | Application | Default namespace) to Project. Add a reference to the Tripous.dll assembly.
Build (Shift + F6) the project.
MainForm
Rename Form1 to MainForm. Set its IsMdiContainer property to true. Your MainForm must inherit from Tripous.Forms.SysMainForm. Also, you have to add some using directives to the MainForm.cs file. Here it is:
using System;
using System.Collections.Generic;
using System.ComponentModel;
using System.Data;
using System.Drawing;
using System.Windows.Forms;
using System.Threading;
using System.IO;
using Tripous;
using Tripous.Forms;
using Tripous.Data;

namespace Project
{
    public partial class MainForm : SysMainForm
    {
        public MainForm()
        {
            InitializeComponent();
        }
    }
}
The SysMainForm class is a base class used in deriving main forms. We'll examine it in depth in a later tutorial.
ApplicationManager
Add a new code file to the project, and name it ApplicationManager.cs. Here is the code:
using System;
using System.Collections.Generic;
using System.Windows.Forms;
using System.Drawing;
using System.Data;
using Tripous;
using Tripous.Forms;
using Tripous.Data;
using Tripous.BusinessModel;
using Tripous.Sockets;
namespace Project
{
class ApplicationManager : ApplicationManagerDesktop
{
public ApplicationManager()
{
Db.ErrorsVisible = true;
Variables["User.Enabled"] = true;
Variables["CompanyId"] = 1;
}
}
}
The ApplicationManagerDesktop class inherits from the ApplicationManagerBase class. There must be one and only one application manager in any Tripous application. An application manager acts like a traffic policeman who wants to be a leader in a hard rock band. Authority and anarchy in the same package.
The Db class is the central class in the Tripous.Data namespace. Just a collection of helper static methods actually. The Tripous.Variables class is a collection of named variables that can be persisted to XML. Here, the ApplicationManager.Variables property is an instance of the Variables class and it maintains some useful settings.
The MainForm again
Go back to MainForm. Add a System.Windows.Forms.MenuStrip to MainForm and name it mnuMain. Add a System.Windows.Forms.ToolStrip to MainForm and name it ToolBar.
Add a System.Windows.Forms.StatusStrip to MainForm and name it StatusBar. Add seven System.Windows.Forms.ToolStripStatusLabel items to the StatusBar and name them as follows:
lblLightlblHintlblAppNamelblUserlblProfilelblDatelblTime
Add a Tripous.Forms.SideArea to MainForm and name it LeftSide. SideArea is a Tripous control with the secret ambition to resemble MS VS's ToolBox some day.
Here are the declarations of those objects in my MainForm.Designer.cs file:
private System.Windows.Forms.MenuStrip mnuMain;
private System.Windows.Forms.ToolStrip ToolBar;
private System.Windows.Forms.StatusStrip StatusBar;
private System.Windows.Forms.ToolStripStatusLabel lblHint;
private System.Windows.Forms.ToolStripStatusLabel lblLight;
private System.Windows.Forms.ToolStripStatusLabel lblUser;
private System.Windows.Forms.ToolStripStatusLabel lblAppName;
private System.Windows.Forms.ToolStripStatusLabel lblProfile;
private System.Windows.Forms.ToolStripStatusLabel lblDate;
private System.Windows.Forms.ToolStripStatusLabel lblTime;
private Tripous.Forms.SideArea LeftSide;
Here is the full IntializeComponent() method from my MainForm.Designer.cs file:
private void InitializeComponent()
{
this.mnuMain = new System.Windows.Forms.MenuStrip();
this.ToolBar = new System.Windows.Forms.ToolStrip();
this.StatusBar = new System.Windows.Forms.StatusStrip();
this.lblLight = new System.Windows.Forms.ToolStripStatusLabel();
this.lblHint = new System.Windows.Forms.ToolStripStatusLabel();
this.lblAppName = new System.Windows.Forms.ToolStripStatusLabel();
this.lblUser = new System.Windows.Forms.ToolStripStatusLabel();
this.lblProfile = new System.Windows.Forms.ToolStripStatusLabel();
this.lblDate = new System.Windows.Forms.ToolStripStatusLabel();
this.lblTime = new System.Windows.Forms.ToolStripStatusLabel();
this.LeftSide = new Tripous.Forms.SideArea();
this.StatusBar.SuspendLayout();
this.SuspendLayout();
this.mnuMain.Location = new System.Drawing.Point(0, 0);
this.mnuMain.Name = "mnuMain";
this.mnuMain.Size = new System.Drawing.Size(570, 24);
this.mnuMain.TabIndex = 0;
this.mnuMain.Text = "menuStrip1";
this.ToolBar.Location = new System.Drawing.Point(0, 24);
this.ToolBar.Name = "ToolBar";
this.ToolBar.Size = new System.Drawing.Size(570, 25);
this.ToolBar.TabIndex = 1;
this.ToolBar.Text = "toolStrip1";
this.StatusBar.Items.AddRange(new System.Windows.Forms.ToolStripItem[] {
this.lblLight,
this.lblHint,
this.lblAppName,
this.lblUser,
this.lblProfile,
this.lblDate,
this.lblTime});
this.StatusBar.Location = new System.Drawing.Point(0, 389);
this.StatusBar.Name = "StatusBar";
this.StatusBar.Size = new System.Drawing.Size(570, 22);
this.StatusBar.TabIndex = 0;
this.StatusBar.Text = "statusStrip1";
this.lblLight.AutoSize = false;
this.lblLight.BackColor = System.Drawing.Color.Green;
this.lblLight.BorderSides = ((System.Windows.Forms.ToolStripStatusLabelBorderSides)(
(((System.Windows.Forms.ToolStripStatusLabelBorderSides.Left |
System.Windows.Forms.ToolStripStatusLabelBorderSides.Top)
| System.Windows.Forms.ToolStripStatusLabelBorderSides.Right)
| System.Windows.Forms.ToolStripStatusLabelBorderSides.Bottom)));
this.lblLight.BorderStyle = System.Windows.Forms.Border3DStyle.Etched;
this.lblLight.DisplayStyle = System.Windows.Forms.ToolStripItemDisplayStyle.Text;
this.lblLight.Name = "lblLight";
this.lblLight.Size = new System.Drawing.Size(10, 17);
this.lblHint.AutoSize = false;
this.lblHint.Name = "lblHint";
this.lblHint.Size = new System.Drawing.Size(340, 17);
this.lblAppName.AutoSize = false;
this.lblAppName.Name = "lblAppName";
this.lblAppName.Size = new System.Drawing.Size(90, 17);
this.lblUser.AutoSize = false;
this.lblUser.Name = "lblUser";
this.lblUser.Size = new System.Drawing.Size(90, 17);
this.lblProfile.AutoSize = false;
this.lblProfile.Name = "lblProfile";
this.lblProfile.Size = new System.Drawing.Size(100, 17);
this.lblDate.AutoSize = false;
this.lblDate.Name = "lblDate";
this.lblDate.Size = new System.Drawing.Size(60, 17);
this.lblTime.AutoSize = false;
this.lblTime.Name = "lblTime";
this.lblTime.Size = new System.Drawing.Size(40, 17);
this.LeftSide.Body.Cursor = System.Windows.Forms.Cursors.Default;
this.LeftSide.Body.Dock = System.Windows.Forms.DockStyle.Fill;
this.LeftSide.Body.Location = new System.Drawing.Point(0, 0);
this.LeftSide.Body.Name = "Body";
this.LeftSide.Body.Size = new System.Drawing.Size(9, 502);
this.LeftSide.Body.TabIndex = 3;
this.LeftSide.Dock = System.Windows.Forms.DockStyle.Left;
this.LeftSide.IsExpanded = false;
this.LeftSide.Location = new System.Drawing.Point(0, 49);
this.LeftSide.Name = "LeftSide";
this.LeftSide.IsPinned = false;
this.LeftSide.Size = new System.Drawing.Size(14, 502);
this.LeftSide.TabIndex = 3;
this.LeftSide.Title = "Tools";
this.AutoScaleDimensions = new System.Drawing.SizeF(6F, 13F);
this.AutoScaleMode = System.Windows.Forms.AutoScaleMode.Font;
this.ClientSize = new System.Drawing.Size(570, 411);
this.Controls.Add(this.LeftSide);
this.Controls.Add(this.StatusBar);
this.Controls.Add(this.ToolBar);
this.Controls.Add(this.mnuMain);
this.IsMdiContainer = true;
this.Location = new System.Drawing.Point(0, 0);
this.MainMenuStrip = this.mnuMain;
this.Name = "MainForm";
this.Text = "MainForm";
this.StatusBar.ResumeLayout(false);
this.StatusBar.PerformLayout();
this.ResumeLayout(false);
this.PerformLayout();
}
The user interface of our MainForm is ready. So now we can go back to the MainForm.cs code file.
Add the Tripous.Forms.ICommandHost interface to the ancestor list of the <code>MainForm class and implement its properties.
public partial class MainForm : SysMainForm, ICommandHost
{

    #region ICommandHost Members

    MenuStrip ICommandHost.MenuStrip
    {
        get { return this.MainMenuStrip; }
    }

    ToolStrip ICommandHost.ToolBar
    {
        get { return this.ToolBar; }
    }

    SideArea ICommandHost.SideBar
    {
        get { return this.LeftSide; }
    }

    #endregion

    public MainForm()
    {
        InitializeComponent();
    }
}
The ICommandHost interface represents an object that can display commands and other information. Usually, this object is the main form. The ApplicationManager uses the ICommandHost object as the command displayer of the commands we add to it.
Add the following two private members to the MainForm class:
private void Application_Idle(object sender, EventArgs e)
{
if (!DesignMode)
{
lblDate.Text = DateTime.Today.ToString("yyyy-MM-dd");
lblTime.Text = DateTime.Now.ToString("HH:mm");
lblAppName.Text = Sys.ApplicationTitle;
lblUser.Text = User.UserName;
lblProfile.Text = !string.IsNullOrEmpty(Manager.Profiles.Active) ?
Manager.Profiles.Active : Sys.None;
}
}
private ApplicationManager Manager {
get { return ApplicationManager.Instance as ApplicationManager; } }
And then adjust the constructor to be as follows:
public MainForm()
{
    InitializeComponent();

    if (!DesignMode)
    {
        appManagerType = typeof(ApplicationManager);
        Application.Idle += new EventHandler(Application_Idle);
    }
}
The appManagerType is a protected field, of type System.Type, in the SysMainForm class. The appManagerType provides the type used in creating the actual application manager object. That application manager instance is created by the SysMainForm.ApplicationInitialize() virtual method. We override that method and two others: the ApplicationFinalize() and the HandleEvent(). Here is the full MainForm.cs source code:
using System;
using System.Collections.Generic;
using System.ComponentModel;
using System.Data;
using System.Drawing;
using System.Windows.Forms;
using System.Threading;
using System.IO;
using Tripous;
using Tripous.Forms;
using Tripous.Data;
namespace Project
{
public partial class MainForm : SysMainForm, ICommandHost
{
#region ICommandHost Members
MenuStrip ICommandHost.MenuStrip
{
get { return this.MainMenuStrip; }
}
ToolStrip ICommandHost.ToolBar
{
get { return this.ToolBar; }
}
LeftSide ICommandHost.SideBar
{
get { return this.LeftSide; }
}
#endregion
private void Application_Idle(object sender, EventArgs e)
{
if (!DesignMode)
{
lblDate.Text = DateTime.Today.ToString("yyyy-MM-dd");
lblTime.Text = DateTime.Now.ToString("HH:mm");
lblAppName.Text = Sys.ApplicationTitle;
lblUser.Text = User.UserName;
lblProfile.Text = !string.IsNullOrEmpty(Manager.Profiles.Active) ?
Manager.Profiles.Active : Sys.None;
}
}
private ApplicationManager Manager { get {
return ApplicationManager.Instance as ApplicationManager; } }
protected override void ApplicationInitialize()
{
base.ApplicationInitialize();
Ini Ini = new Ini();
ToolBar.Visible = Ini.ReadBool("ToolBar.Visible", false);
LeftSide.Visible = Ini.ReadBool("SideBar.Visible", false);
LeftSide.LastSize = Ini.ReadInteger("SideBar.LastSize", LeftSide.LastSize);
if (LeftSide.Visible)
{
LeftSide.IsExpanded = Ini.ReadBool("SideBar.IsExpanded", false);
if (LeftSide.IsExpanded)
LeftSide.IsPinned = Ini.ReadBool("SideBar.IsPinned", false);
if (LeftSide.IsExpanded || LeftSide.IsPinned)
LeftSide.Width = Ini.ReadInteger("SideBar.Width", LeftSide.Width);
}
}
protected override void ApplicationFinalize()
{
Ini Ini = new Ini();
Ini.WriteBool("SideBar.Visible", LeftSide.Visible);
Ini.WriteBool("SideBar.IsExpanded", LeftSide.IsExpanded);
Ini.WriteBool("SideBar.IsPinned", LeftSide.IsPinned);
Ini.WriteInteger("SideBar.Width", LeftSide.Width);
Ini.WriteInteger("SideBar.LastSize", LeftSide.LastSize);
Ini.WriteBool("ToolBar.Visible", ToolBar.Visible);
base.ApplicationFinalize();
}
protected override void HandleEvent(ArgList Args)
{
if (!DesignMode && !IsDisposed)
{
base.HandleEvent(Args);
switch (Args.ValueOf("EventName", string.Empty).ToString())
{
case "Application.Executing":
case "Application.Waiting":
if (Args.ValueOf("Value", false))
lblLight.BackColor = Color.Red;
else
lblLight.BackColor = Color.Green;
break;
}
}
}
public MainForm()
{
InitializeComponent();
if (!DesignMode)
{
appManagerType = typeof(ApplicationManager);
Application.Idle += new EventHandler(Application_Idle);
}
}
}
}
The Tripous.Ini class used in the <code>ApplicationInitialize() and ApplicationFinalize() methods simulates a classic Windows *.ini file using an XML file.
The overridden HandleEvent() method gets notifications sent by a Tripous.Broadcaster object. The Broadcaster class represents an object that sends event notifications to its subscribed listeners. The MainForm is such a listener since its base SysMainForm implements the Tripous.IListener interface. Any code can use a Broadcaster instance to send a notification to the subscribers of that Broadcaster.
Think of the Broadcaster as a mailing list. Someone sends a message to the list, and any list member gets a notification about that message. A receiver of such a message may take an action upon receiving the message or totally ignore it.
The Program class
Let's now concentrate on the Program.cs file. Here is the code:
using System;
using System.Collections.Generic;
using System.Linq;
using System.Windows.Forms;
using System.Threading;
using Tripous;
using Tripous.Forms;

namespace Project
{

    static class Program
    {
        private const string AppUniqueId = "{Put a Guid string here}";
        static private InstanceManager im;


        [STAThread]
        static void Main(string[] args)
        {
            Sys.SetApplicationCulture(args);

            using (im = new InstanceManager(AppUniqueId))
            {
                if (!im.IsSingleInstance)
                {
                    Sys.ErrorBox("This application is already running!");
                    Application.Exit();
                    return;
                }

                Res.Add(Project.Properties.Resources.ResourceManager);

                Application.EnableVisualStyles();
                Application.SetCompatibleTextRenderingDefault(false);
                Application.Run(new MainForm());
            }
        }


        static Program()
        {
            Application.ThreadException +=
              new System.Threading.ThreadExceptionEventHandler(Application_ThreadException);
            Application.SetUnhandledExceptionMode(UnhandledExceptionMode.CatchException);
            AppDomain.CurrentDomain.UnhandledException +=
              new UnhandledExceptionEventHandler(CurrentDomain_UnhandledException);
        }

        static void CurrentDomain_UnhandledException(object sender,
                    UnhandledExceptionEventArgs e)
        {
            if ((e.ExceptionObject is Exception) && !e.IsTerminating)
            {
                try
                {
                    Logger.Log(e.ExceptionObject as Exception);
                }
                catch
                {
                }
            }
        }

        static void Application_ThreadException(object sender,
                    ThreadExceptionEventArgs e)
        {
            try
            {
                Logger.Log(e.Exception);
            }
            catch
            {
            }
        }
    }
}
Let's start from the Main() and talk about the InstanceManager. Use the InstanceManager if no more than one instance of your application is allowed to be executed at the same time. InstanceManager ensures that only one instance of a certain application is running. To achieve that, it uses a unique string that uniquely identifies the application. This is the reason for the AppUniqueId private field. Assign a GUID to it just to be sure (menu Tools | Create GUID).
The Tripous.Res class is a static class. It provides access to the resources of any ResourceManager registered to it by calling its Add() method. Here, the local Project.Properties.Resources.ResourceManager is added to the Res class resource managers.
The static constructor of the Program class just links some events that allow us to centrally handle any unhandled exceptions. The code of both events here just uses the static Tripous.Logger class to log information regarding the thrown exception. The <code>Logger class is used to log any kind of information, not exceptions only. The Logger class also, in a way similar to Broadcaster, informs any subscribed listener for any log event. The Logger does not persist the log information on its own. This is a job for special log listeners. Tripous already provides a log listener that saves log information to a database table. There are other log listeners though that they just display the log information to the user.
Profiles
In Tripous, a profile file is a plain XML file initially found in the same folder where the application executable resides. It is always named as Profiles.XML. Copy this file to the ...\bin\Debug folder of your application and rename it to Profiles.XML. A Tripous application moves this file to the folder the Environment.SpecialFolder.CommonApplicationData designates. In Windows Vista, this is the C:\ProgramData\ folder.
A profiles file is a list of profile items. One of those profile items is the Active profile. The Active profile is denoted by the Active attribute of the root Profiles tag. A Tripous application, in the start up, asks the user to select the Active profile, if the Active profile is not defined. Also, if the user starts the application and keeps the Ctrl key pressed, Tripous displays the same "Select active profile" dialog box for the user to choose or create a new profile.
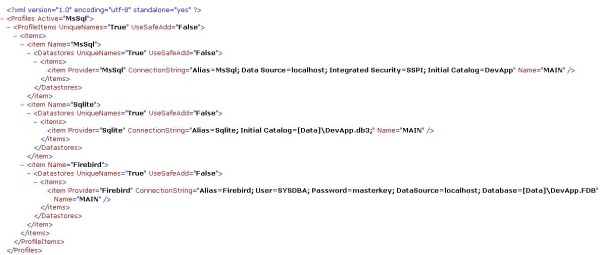
Each one of those profile items contains a list of Datastore items. A datastore item contains the connection settings to a database. A profile may contain many datastore connections because an application may use more than one database. The datastore item named as MAIN is considered the main database of the application. The main database is where Tripous system tables reside. Tripous uses a few database tables for its own needs. The naming of those tables follows the scheme SYS_TABLENAME.
Here is the content of a profile named as Sqlite from the profile file:
<item Provider="Sqlite" ConnectionString="Alias=Sqlite;
        Initial Catalog=[Data]\DevApp.db3;" Name="MAIN" />
The Provider attribute specifies the provider. Tripous has been using "providers" long before .NET 2 as a way to provide database server neutral access. After that comes the ConnectionString attribute. It is almost identical to a usual connection string used in ADO.NET. The Alias sub-attribute duplicates the Provider attribute. The [Data] literal is a placeholder. At runtime, Tripous replaces the placeholder with an actual path. SQLite and Firebird expect a file name. Not all servers do that, of course. The Name attribute specifies the value of the Name property of a data store object, which is a Tripous class. It is not the name of a database.
Here is the content of a profile named as MsSql from the same file:
<item Provider="MsSql" ConnectionString="Alias=MsSql;
   Data Source=localhost; Integrated Security=SSPI; Initial Catalog=DevApp" Name="MAIN" />
Don't bother to create those databases. Tripous knows how to create empty database files for all of those three servers specified in the Profiles.XML file.
ApplicationManager initialization and finalization
Adjust your ApplicationManager class code to be as follows:
class ApplicationManager : ApplicationManagerDesktop
{
private CommandSetsToolForm commandSetsToolForm;
protected override void RealizeCommandSets()
{
base.RealizeCommandSets();
if (commandSetsToolForm != null)
commandSetsToolForm.RefreshToolForm(commandSets);
}
protected override void DoInitialize()
{
base.DoInitialize();
if (SideBar != null)
{
commandSetsToolForm = new CommandSetsToolForm();
SideBar.AddForm(commandSetsToolForm);
commandSetsToolForm.RefreshToolForm(commandSets);
}
}
protected override void DoFinalize()
{
base.DoFinalize();
}
public ApplicationManager()
{
Db.ErrorsVisible = true;
Variables["User.Enabled"] = true;
Variables["CompanyId"] = 1;
}
}
As you may recall, the actual ApplicationManager instance is created by the initialization code of the SysMainForm, specifically by the SysMainForm.ApplicationInitialize() method. That method, after creating the manager, calls the application manager's ApplicationInitialize() method. ApplicationManager.DoInitialize() is called as a result of that call sequence.
DoInitialize() creates a tool form for the command sets. A command set is a set of commands. A CommandSetsToolForm instance is created, as a child form to the LeftSide control of the MainForm. The application manager instructs CommandSetsToolForm to display its commands. We'll talk about commands and the Command class in a minute.
DoFinalize() here does nothing. It's, for now, just for symmetry.
RealizeCommandSets() is called when initializing and when any of the command sets changes. In Tripous, an end user may create command sets using Command objects as members of those sets. The user gives a unique name to each of those command sets. The CommandSetsToolForm tool form is one way to display command sets to the user. Another way is the ToolBar of the MainForm.
Database schema registration and creation
Tripous gives you the ability to create versioned database schema on the fly. SchemaDatastores, SchemaDatastore, and SchemaExecutor are the relative classes all found in the Tripous.Data namespace.
You register a SchemaDatastore instance to the SchemaDatastores for any major schema alteration.
A SchemaDatastore has Name and Version properties. Initially, you create a SchemaDatastore under the Name MAIN and Version = 1 which, let's say, is the schema of version 1 of your application. After a year of successful sales of your application, a need arises to alter that initial schema. Then you create another SchemaDatastore under the same Name MAIN, but this time with Version 2. That's all you need to do.
Tripous does the same for its own system tables. Check the ApplicationManagerBase.RegisterSystemSchema() method and the SystemSchema class.
ApplicationManager.RegisterSchemas() is the place to register schemas for your data stores. Here is the code for that method for our sample application. Add the method below to the ApplicationManager class:
protected override void RegisterSchemas()
{
base.RegisterSchemas();
SchemaDatastore schema = schemaDatastores.FindForce(Sys.MAIN, 1);
SchemaTable Table;
string cCOMPANY =
@"
create table Company (
Id @PRIMARY_KEY
,Name varchar(56) not null
);
";
Table = schema.AddTable("Company", cCOMPANY);
string cTRADER =
@"
create table Trader (
Id @PRIMARY_KEY
,Code varchar(32) not null
,Name varchar(48) not null
,IsCustomer integer default 1 not null
,IsSupplier integer default 0 not null
,@COMPANY_ID integer default -1 not null
,constraint FK_Trader_00 foreign key (@COMPANY_ID) references Company (Id)
);
";
Table = schema.AddTable("Trader", cTRADER);
string cTRADE_ITEM =
@"
create table TradeItem (
Id @PRIMARY_KEY
,Code varchar(32) not null
,Name varchar(48) not null
,Price float default 0 not null
,@COMPANY_ID integer default -1 not null
,constraint FK_TradeItem_00 foreign key (@COMPANY_ID) references Company (Id)
);
";
Table = schema.AddTable("TradeItem", cTRADE_ITEM);
string cTRADE =
@"
create table Trade (
Id @PRIMARY_KEY
,Code varchar(32) not null
,TraderId integer not null
,TradeDate @DATE not null
,@COMPANY_ID integer default -1 not null
,constraint FK_Trade_00 foreign key (@COMPANY_ID) references Company (Id)
,constraint FK_Trade_01 foreign key (TraderId) references Trader (Id)
);
";
Table = schema.AddTable("Trade", cTRADE);
string cTRADE_LINES =
@"
create table TradeLines (
Id @PRIMARY_KEY
,TradeId integer not null
,TradeItemId integer not null
,Qty float default 1 not null
,Price float not null
,constraint FK_TradeLines_00 foreign key (TradeId) references Trade (Id)
,constraint FK_TradeLines_01 foreign key (TradeItemId) references TradeItem (Id)
);
";
Table = schema.AddTable("TradeLines", cTRADE_LINES);
}
Trader, TradeItem, and Trade are our master tables, in respect to Tripous terminology. TradeLines is a detail table to the Trade table.
@PRIMARY_KEY, @DATE, etc., are just place holders. Tripous replaces those placeholders with the actual data types used by the database server specified in the Profiles.XML file. That's all you need to do to have your schema automatically created. Future schema alterations of the same database are registered under the same Name and a greater Version. That way, it is not possible for your service and support personnel to forget (oh, tell me about that) to apply the required schema alterations when you ship the next version of your application.
When Tripous creates a schema like the above, it writes an entry to the SYS_INI system table in order to know the current version of the schema. The next time the application runs, it compares the two versions to decide what to do. If the schema registered to SchemaDatastores by the RegisterSchemas() method is older than the one existing in SYS_INI, it does nothing. So the above code is going to be executed once and only once, provided that either there is not a SYS_INI table yet, or the entry in the SYS_INI has a lesser or equal version than the one on the line:
SchemaDatastore schema = schemaDatastores.FindForce(Sys.MAIN, 1);
A business model Registry
The Tripous.BusinessModel.Registry class is the registry of the tripous business model. There is a whole bunch of descriptor classes that describe other classes and operations to the Tripous system. Most of those descriptors are registered to the <code>Registry class which is the central registry regarding business model classes.
Most of the RegisterXXXX() methods of the application manager concern the Registry class and its descriptors. The main descriptor classes are:
BrokerDescriptorFormDescriptorCommand, not a descriptor per seLocatorDescriptorCodeDescriptor
All those descriptors have unique names (Name property) among their group.
Broker registration
The Tripous.BusinessModel.Broker class is Tripous business object. It represents a business logic domain or business logic module.
A broker is actually a set of correlated tables, represented by DataTable objects, and code. A Broker can be defined in a declarative way using a registered BrokerDescriptor. A BrokerDescriptor class is a Tripous descriptor class that describes the structure and the properties of a Broker class. Later the system can create the actual Broker class instance using the description provided by the BrokerDescriptor as found in the Registry.
Here is the header of the BrokerDescriptors.Add() method:
public BrokerDescriptor Add(string DatastoreName, string Name, string MainTableName,
             string Title, string BrokerClassName, string CodeProducerName);
The ApplicationManager.RegisterBrokers() method is where the broker registration happens. Here is the code of that method for our tiny application. Add the method below to the ApplicationManager class:
protected override void RegisterBrokers()
{
base.RegisterBrokers();
BrokerDescriptor Broker;
TableDescriptor Table;
JoinTableDescriptor JoinTable;
Broker = Registry.Brokers.Add(Sys.MAIN, "Company", "Company",
"Company", "SqlBroker", string.Empty);
Broker = Registry.Brokers.Add(Sys.MAIN, "Trader", "Trader",
"Trader", "SqlBroker", "SIMPLE XXXXXX");
Table = Broker.Tables.Add("Trader", "Trader");
Table.Fields.Add("Id", SimpleType.Integer, 0, "Id", FieldFlags.None);
Table.Fields.Add("Code", SimpleType.String, 32, "Code",
FieldFlags.Visible | FieldFlags.Searchable |
FieldFlags.Required | FieldFlags.ReadOnlyUI);
Table.Fields.Add("Name", SimpleType.String, 48, "Name",
FieldFlags.Visible | FieldFlags.Searchable | FieldFlags.Required);
Table.Fields.Add("IsCustomer", SimpleType.Integer, 0, "Is customer",
FieldFlags.Visible | FieldFlags.Required |
FieldFlags.Boolean).DefaultValue = "1";
Table.Fields.Add("IsSupplier", SimpleType.Integer, 0, "Is supplier",
FieldFlags.Visible | FieldFlags.Required | FieldFlags.Boolean);
Table.Fields.Add(Sys.CompanyFieldName, SimpleType.Integer, 0,
"Company", FieldFlags.Required);
Broker = Registry.Brokers.Add(Sys.MAIN, "TradeItem", "TradeItem",
"TradeItem", "SqlBroker",
"SIMPLE XXX-XXX");
Table = Broker.Tables.Add("TradeItem", "TradeItem");
Table.Fields.Add("Id", SimpleType.Integer, 0, "Id", FieldFlags.None);
Table.Fields.Add("Code", SimpleType.String, 32, "Code",
FieldFlags.Visible | FieldFlags.Searchable |
FieldFlags.Required | FieldFlags.ReadOnlyUI);
Table.Fields.Add("Name", SimpleType.String, 48, "Name",
FieldFlags.Visible | FieldFlags.Searchable | FieldFlags.Required);
Table.Fields.Add("Price", SimpleType.Float, 0, "Price",
FieldFlags.Visible | FieldFlags.Required).DefaultValue = "0";
Table.Fields.Add(Sys.CompanyFieldName, SimpleType.Integer, 0,
"Company", FieldFlags.Required);
Broker = Registry.Brokers.Add(Sys.MAIN, "Trade", "Trade",
"Trade", "SqlBroker",
"SIMPLE XXX-XXX");
Broker.BrowserSql.Text =
@"
select
Trade.Id as Id
,Trade.Code as Code
,Trade.TradeDate as TradeDate
,Trader.Name as Trader__Name
from
Trade
left join Trader on Trader.Id = Trade.TraderId
";
Broker.BrowserSql.DisplayLabels.Add("Trader__Name=Trader");
Table = Broker.Tables.Add("Trade", "Trade");
Table.Fields.Add("Id", SimpleType.Integer, 0, "Id", FieldFlags.None);
Table.Fields.Add("Code", SimpleType.String, 32, "Code",
FieldFlags.Visible | FieldFlags.Searchable |
FieldFlags.Required | FieldFlags.ReadOnlyUI);
Table.Fields.Add("TraderId", SimpleType.Integer, 0,
"TraderId", FieldFlags.Required);
Table.Fields.Add("TradeDate", SimpleType.Date, 0, "Date",
FieldFlags.Visible | FieldFlags.Searchable |
FieldFlags.Required).DefaultValue = "AppDate";
Table.Fields.Add(Sys.CompanyFieldName, SimpleType.Integer, 0,
"Company", FieldFlags.Required);
Broker.LinesTableName = "TradeLines";
Table = Broker.Tables.Add(Broker.LinesTableName, Broker.LinesTableName);
Table.MasterTableName = "Trade";
Table.MasterKeyField = "Id";
Table.DetailKeyField = "TradeId";
Table.Fields.Add("Id", SimpleType.Integer, 0,
"Id", FieldFlags.None);
Table.Fields.Add("TradeId", SimpleType.Integer, 0,
"TradeId", FieldFlags.Required);
Table.Fields.Add("TradeItemId", SimpleType.Integer, 0,
"TradeItemId", FieldFlags.Required);
{
JoinTable = Table.JoinTables.Add("TradeItem", "TradeItemId");
JoinTable.Fields.Add("Id", SimpleType.Integer, 0, "Id", FieldFlags.None);
JoinTable.Fields.Add("Code", SimpleType.String, 32,
"Item Code", FieldFlags.Visible | FieldFlags.Searchable);
JoinTable.Fields.Add("Name", SimpleType.String, 48,
"Item", FieldFlags.Visible | FieldFlags.Searchable);
}
Table.Fields.Add("Qty", SimpleType.Float, 0, "Qty",
FieldFlags.Visible | FieldFlags.Required).DefaultValue = "1";
Table.Fields.Add("Price", SimpleType.Float, 0, "Price",
FieldFlags.Visible | FieldFlags.Required).DefaultValue = "0";
}
Some brokers are described in a great detail while others are not. It depends on the application needs and the business logic complexity. In any case, when an actual Broker instance is constructed, its description is checked by Tripous using database table information, and many corrections and completions may happen.
The BrokerClassName parameter of the Add() method corresponds to the BrokerDescriptor.TypeClassName property, and it is very important. The value of that parameter/property is used in obtaining the actual Broker class type.
All the above BrokerDescriptor items define the SqlBroker class as the BrokerClassName of the broker. Tripous.BusinessModel.SqlBroker is the base class of brokers that deal with database data. That SqlBroker class knows how to handle most of the common data entry scenarios, with information just provided by its descriptor. When the standard SqlBroker class is not enough, the programmer derives a new broker class from it, to serve its specific needs.
In the Tripous business model descriptor system, everything has its own descriptor class. The TableDescriptor describes tables of a BrokerDescriptor where the FieldDescriptor describes fields of a table. There is a JoinTableDescriptor that describes tables joined to another table, even in a recursive way. You see Tripous uses the information you provide when registering brokers in order to build SELECT, INSERT, UPDATE, and DELETE SQL statements for the "edit part" of the broker.
A BrokerDescriptor provides the BrokerDescriptor.BrowserSql property where you may define the SELECT statement of the "browser part" of a broker.
Master-detail relationships are easily defined as you can see by observing the Trade-TradeLines tables above. That same example contains a JoinTableDescriptor too.
Important: When a descriptor registration requires a class name, such as the SqlBroker above, you should provide the full name including the namespace, unless it is a Tripous class.
Locators? What are locators?
Locator is a Tripous notion, and it means a piece of code that knows how to locate a database record under certain WHERE criteria. There is a locator control (LocatorBox), a locator column for the DataGridView (LocatorColumn), a locator component (Locator) which incorporates the actual locator logic, and of course, a LocatorDescriptor.
The ApplicationManager.RegisterLocators() method is where the locator registration happens. Here is the code of that method. Add the method below to the ApplicationManager class.
protected override void RegisterLocators()
{
base.RegisterLocators();
LocatorDescriptor Locator;
Locator = Registry.Locators.Add("Customer", "TraderId",
"Trader", "Id");
Locator.Fields.Add(SimpleType.Integer, "TraderId", "Id", "Trader");
Locator.Fields.Add(SimpleType.String, "Trader__Code",
"Code", "Trader", "Customer Code");
Locator.Fields.Add(SimpleType.String, "Trader__Name",
"Name", "Trader", "Customer");
Locator.SelectSql.Text = @"select Id, Code, Name from Trader where IsCustomer = 1";
Locator = Registry.Locators.Add("TradeItem", "TradeItemId",
"TradeItem", "Id");
Locator.Fields.Add(SimpleType.Integer, "TradeItemId", "Id", "TradeItem");
Locator.Fields.Add(SimpleType.String, "TradeItem__Code",
"Code", "TradeItem", "TradeItem Code");
Locator.Fields.Add(SimpleType.String, "TradeItem__Name",
"Name", "TradeItem", "TradeItem");
Locator.Fields.Add(SimpleType.Float, "Price", "Price",
"TradeItem", "Price").Searchable = false;
}
Locators is a really advanced matter, and we'll forget it for now.
Command registration
A Command is analogous to a push button or menu. A Command has no visual representation at all though. Instead, it can be attached to a push button or menu item or something. Basically, a command represents something that the application executes. Either as a result of a user action, or as a request from some client code.
A Command, as with all registerable objects in Tripous, has a unique name. Commands form a tree in order to simulate menus, tree views, etc., that may be used to display commands. Commands are also used in putting together a CommandSet described above.
A Processor is a special command, it is the root of a command tree. As long as a Command has no Parent, it considers itself a Processor. A Command has a Kind, which indicates the type of command. There can be:
Container,Separator,Mdi,Modal, orProcedure.
The ApplicationManager.RegisterCommands() method is where command registration takes place. Here is the code of that method. Add the method below to the ApplicationManager class.
protected override void RegisterCommands()
{
base.RegisterCommands();
Command P = mainProcessor;
Command Container;
Container = Command.CreateContainer("ADMIN",
Res.GetString("Administration", "Administration"));
P.InsertAfter("FILE", Container);
Container.AddMdi("Trader",
Res.GetString("cmdTrader", "Traders"),
DataMode.Browse);
Container.AddMdi("TradeItem",
Res.GetString("cmdTradeItem", "Trade Items"),
DataMode.Browse);
Container.AddMdi("Trade",
Res.GetString("cmdTrade", "Trades"),
DataMode.Browse);
}
The application manager already has its own Command Processor defined. It actually is the Registry.MainProcessor object. The ApplicationManager.mainProcessor protected field returns Registry.MainProcessor. This is the processor Tripous itself uses to register its own system commands. The FILE command is one of those system commands.
Our RegisterCommands() method inserts a Container Command, named ADMIN, after the system's FILE command. Then it registers three MDI form command items. A command of Form type must create a Windows Form object when it is executed.
Tripous will use the commands found in the main processor, the Registry.MainProcessor, in order to create, on the fly, the MainForm's main menu items and other command representations. You do not create main menu items in Tripous. Just command items.
Form registration
When a Form command named "Trader" is executed, it tries to find a FormDescriptor with the same name. A FormDescriptor is a really simple descriptor, and it just provides the name of the Form class and a few other settings.
The ApplicationManager.RegisterForms() method is where the form registration is done. Here is the code of that method. Add the method below to the ApplicationManager class.
protected override void RegisterForms()
{
    base.RegisterForms();

    FormDescriptor FormDes;

    FormDes = Registry.Forms.Add("Trader", "Traders",
              "Project.TraderForm", "Trader", FormFlags.SingleInstance);
    FormDes = Registry.Forms.Add("TradeItem", "Trade Items",
              "Project.TradeItemForm", "TradeItem", FormFlags.SingleInstance);
    FormDes = Registry.Forms.Add("Trade", "Trades",
              "Project.TradeForm", "Trade", FormFlags.SingleInstance);
}
Tripous registers its own system forms with the same way.
As you can see, there are three form descriptor items named after the corresponding command items. Each FormDescriptor item defines its own Form class name: TraderForm, TradeItemForm, and TradeForm. Those form objects does not yet exist. Our next task is to create them.
Important: When a descriptor registration requires a class name, such as the TraderForm above, you should provide the full name including the namespace, Project.TradeForm, unless it is a Tripous class.
Creating Forms
We are going to create the TradeForm. Add a new form using the Visual Studio wizard (Solution Explorer | right click on the project | Add | Windows form).
Name the source code document TradeForm.cs and the form class TradeForm.
Be sure that the new form belongs to the Project namespace. Check both the TradeForm.cs and the TradeForm.designer.cs files just to be sure.
Build (Shift + F6) the project.
Go to TradeForm.cs and add a using to the Tripous.Forms namespace.
Change the TradeForm base class from Form to DataEntryBrokerForm. Here is the full code:
using System;
using System.Collections.Generic;
using System.ComponentModel;
using System.Data;
using System.Drawing;
using System.Linq;
using System.Text;
using System.Windows.Forms;
using Tripous.Forms;

namespace Project
{
    public partial class TradeForm : DataEntryBrokerForm
    {
        public TradeForm()
        {
            InitializeComponent();
        }
    }
}
Build (Shift + F6) the project. Now if you double click on TradeForm in the Solution Explorer, you will see the browse part of the form, that is something like the following:

Switch to the Data tab page.
Add a Panel and set its Dock property to Top.
From the Tripous tab of the Toolbox, add a DataGridViewEx and set its Dock property to Fill.
From the Tripous tab of the Toolbox, add two TextBoxEx text boxes and a LocatorBox to the panel. Add LabelEx labels in front of those three controls.
Tripous.Forms.TextBoxEx provides the extra properties: <code>DataField and DataSourceName. Those two properties are used in binding the control to database data. DataField is mandatory. So set one to Code and the other to TradeDate. These are fields of the Trade database table. Leave the DataSourceName empty. An empty DataSourceName property of a TextBoxEx text box instructs Tripous to bind the control to the Broker.tblItem DataTable that is to the top table of the Broker.
You may use the word Item as the DataSourceName which has the same effect as leaving it empty. And of course, you may explicitly set the DataSourceName to Trade, which is the name of the top table as it is defined in the BrokerDescriptor earlier.
Tripous.Forms.LabelEx has, by default, its <code>TextAlign property set to MiddleRight. And it also contains code and logic to retain its right-hand position when its text changes. Setting the TextAlign property of a LabelEx to XXXRight and leaving enough free space from its left side makes localization of the form easier.
Tripous.Forms.LocatorBox is a very special control. Some of its functionality is described earlier. Set its <code>DataField property to TraderId and its DescriptorName property to Customer. Setting the DescriptorName to something other than an empty string instructs Tripous to search the Registry for a LocatorDescriptor with that Name and provide its settings to the control. It is possible though to drop a LocatorDescriptor on the form and assign that local LocatorDescriptor name to the control. The logic of finding a locator descriptor can be found in the DataEntryForm.FindLocatorDescriptor() virtual method.
Let's setup the DataGridViewEx now.
Name it gridLines. Set its DataSourceName property to the word Lines. This instructs Tripous to bind the control to BrokerDescriptor.LinesTableName. This is useful when a master table has just a single detail table, as is our case here with the Trade and TradeLines tables.
Tripous.DataGridViewEx provides the Locators property, which is a collection. Click the button next to the Locators property, add an entry, and set its DescriptorName property to TradeItem and its DataField property to TradeItemId. You do not have to create columns for the grid manually. Tripous has enough information now to setup the grid. That information was given earlier in the BrokerDescriptor and the LocatorDescriptor.
The data entry part of the TradeForm should now look like the following:
Create the other two forms, the TraderForm and the TradeItemForm form, as described above for the TradeForm.
Running the application
The test application should be ready now. Hit F5 to run the application with the debugger.
If you hold down the Ctrl key, the "Select active profile" dialog appears.
The user may select the active profile or create a new one. If the database of the MAIN data store of the active profile does not exist, Tripous will try to create it.
Warning: If you select the profile named "Firebird" as your active profile, then you should copy FirebirdSql.Data.FirebirdClient.dll from the ThirdParty directory to your bin directory. And of course, you must have Firebird installed.
Next, the login form appears.
After that, you may login, without restarting the application, as a different user, but you can not select a different profile.
If the database of the MAIN data store of the selected profile does not exist, Tripous will try to create it.
There are three predefined and hard-coded user accounts in Tripous. The highest is the account with user name god and password knows. The other two are service-trustno1 and sys-admin.
Enter the password and hit OK. Tripous creates the database, if not exists, and then starts the application. It then displays the MainForm.
The MainForm creates the ApplicationManager, and then it calls its ApplicationManager.ApplicationInitialize(). Check the Tripous.Forms.SysMainForm.ApplicationInitialize() method to see the sequence. The application creates and displays the menu items in the MainForm. The application is ready now.
The second menu item in the menu bar, the one labeled as Administration, is the one that contains the menu items created after our own commands. It contains menu items that trigger command objects that end up creating and displaying the forms we have defined.
A form command, that is a Command with its Kind set to Mdi or Modal, is finally handled by the ExecuteFormCommand() and ExecuteStandardFormCommand() virtual methods of the Tripous.Forms.ApplicationManagerDesktop class, which is the base of the ApplicationManager class of this application. Here is the ExecuteStandardFormCommand():
protected virtual bool ExecuteStandardFormCommand(Command Command)
{
    if (IsFormCommand(Command))
    {
        LastFormCommand = Command;
        DataEntryForm.Show(Command);
        return true;
    }

    return false;
}
As you can see, it just calls the static method DataEntryForm.Show(), passing the Command object. DataEntryForm.Show() is a quite complex method that, in short, collects information from the Registry regarding the FormDescriptor and the BrokerDescriptor, creates the form instance and the broker instance, connects the two, and displays the form.
That's it. We have just created our first fully functional Tripous application.
I’m a (former) musician, programmer, wanna-be system administrator and grandpa, living in Thessaloniki, Greece.


 General
  News
News  Suggestion
  Question
  Bug
Bug  Answer
  Joke
Joke  Praise
  Rant
Rant  Admin
Admin 


