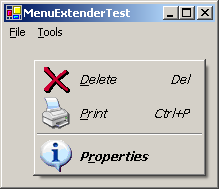
Figure 1.
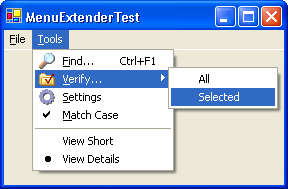
Figure 2.
Introduction
No need to say that many of us tried to decorate downcast appearance of standard menus. And so did I. First of all, I tried to find something suitable amongst already written code. And the best code that I've found belongs to Chris Beckett: Menu Images using C# and IExtenderProvider - a better mousetrap! published on The Code Project.
Then I tried to make the code a bit more flexible: enable owner drawing for some menu items, not all, allow to use custom fonts for menu text and make an ImageIndex selector for VS Designer. Although not all problems were solved - I'll write about it below - you can use this code and I hope to improve it.
Using the MenuExtender
Because this article has appeared as a remaking of Chris' MenuImageLib class, I refer you to his article if you wish to know how to extend standard class behavior with IExtenderProvider. He clearly demonstrates how to add owner drawn menus without overriding OnMeasureItem and OnDrawItem for every menu item.
My version of the MenuExtender provides the following properties to the MenuItem:
- Draw an icon of any size
- Draw a text with a custom Font or
SystemInformation.MenuFont - Enable/disable the extender for particular menu items
The MenuExtender is applicable for non-top menu items and context menus. In order to use it in your project, add it to your VS toolbox:
- Right-click on the "Windows Forms" tab in the Toolbox
- Choose "Add/Remove Items..."
- On the ".NET Framework Components", press the "Browse..." button and find a MenuExtender.dll
That will add a "MenuExtender" icon to the Windows Forms tab. Drag this icon to your form. By this action, you will add the MenuExtender component to your project:
private MenuExtender.MenuExtender menuExtender;
this.menuExtender = new MenuExtender.MenuExtender(this.components);
Now you should set some properties for the MenuExtender. Using the Properties window, set an ImageList (if you have one) with images for icons on your menu items:

Figure 3.
If SystemFont is true, it means that texts on your menus will be displayed with the SystemInformation.MenuFont. If you wish to use some other font - just select it for the Font property and set SystemFont to false. That will generate the following code:
this.menuExtender.Font = new System.Drawing.Font("Tahoma", 9.75F,
    System.Drawing.FontStyle.Regular,
    System.Drawing.GraphicsUnit.Point,
    ((System.Byte)(204)));
this.menuExtender.ImageList = this.imageList;
this.menuExtender.SystemFont = false;
But I don't advice to do it in the beginning of your application. If a user's computer doesn't have the specified font installed - you'll get an exception. You can write this piece of code somewhere in "Customize your application" class. If you have already set some font and wish to return to default settings - right-click on the "Font" field and select "Reset".
And, at last, we can tune our menu items. Select one and find the "Menu Extender" category in the Property window:

Figure 4.
If ExtEnable is true - the menu item will be drawn by the MenuExtender. The ImageIndex is the index of the image item in the ImageList associated with the MenuExtender. Pay attention to OwnerDraw property - it is set to true automatically. Final code for a menu item looks like the following:
this.menuExtender.SetExtEnable(this.menuItem4, true);
this.menuExtender.SetImageIndex(this.menuItem4, 2);
this.menuItem4.OwnerDraw = true;
Now it's time to start the engine! Compile the test project and run it.
Tips & Tricks
If you compare the menu separators on Figure 1 and Figure 2, you can see that the left separator has a custom 3D look. It's because the MenuExtender was not enabled for this separator. I think it's better than to track XP theme switching.
Known Problems
I've found one serious limitation - this class cannot be used in a MDI application. The reason lies out of my class - it's a common problem for the framework. You can easily ascertain that your owner drawn menu items in a MainMenu of a MDI parent form can disappear. Create a MDI child form with its own menus added/merged to the parent. Open a few child forms and close them. Look at your MainMenu with owner drawn items - they are blank. The similar problem with owner drawn menus attached to a NotifyIcon component is described in the Knowledge Base article 827043.
Acknowledgements
I used a great many sources for my work. But the first one was Menu Images using C# and IExtenderProvider - a better mousetrap! by Chris Beckett.
Another good resource is Dino Esposito's article in the MSDN Magazine - Cutting Edge: Owner-Drawing in .NET.
History
- February 23rd, 2004 - First release
License
This article has no explicit license attached to it but may contain usage terms in the article text or the download files themselves. If in doubt, please contact the author via the discussion board below.
A list of licenses authors might use can be found here.
Jevgenij lives in Riga, Latvia. He started his programmer's career in 1983 developing software for radio equipment CAD systems. Created computer graphics for TV. Developed Internet credit card processing systems for banks.
Now he is System Analyst in Accenture.


 General
  News
News  Suggestion
  Question
  Bug
Bug  Answer
  Joke
Joke  Praise
  Rant
Rant  Admin
Admin 


