Introduction
This article presents an example to upload and download files with SQL servers in ASP.Net.
Background
Compared with "MVC", ASP.Net is now considered "classical". But recently, one of my old colleagues was assigned a web project and his development environment is ASP.Net. He asked me to give him an example on uploading and downloading files with SQL servers in ASP.Net applications. Since I have been using "MVC" for a while, I do not have an example in ASP.Net on hand. I tried to "google" him a running example but I could not find one that he can simply download and run, so I created this example. By realizing that there are still a large portion of classical ASP.Net developers and not all the developers know how to upload and download files, I decided to post the example here to keep a record for myself, and hopefully it can help some people who are still interested in this topic.
The only focus of this example is to upload and download files, so I did not pay any attention on OO design, design patterns and coding standards. For simplicity, I did not even put exception handling in the code. I used in-line sql through "ADO.Net" to access the database, but you can definitely use more advanced techniques, such as "Entity Framework", "Hibernate", and "Stored Procedures" to take advantages on whatever advantages that these techniques can provide you. Again for simplicity, no Javascript is used in this example, so we can simply focus on how to upload and download files with SQL servers in ASP.Net for the interested audience.
The example application is developed in Visual Studio 2010 and the SQL server used is 2008. If you are using earlier versions of Visual Studio and SQL server, you may not be able to open the attached solution. Although I did not test it myself since I do not have earlier versions myself, I feel that you can simply copy and paste the code in your application in earlier versions. I made my effort not to use the "new" features coming with the Visual Studio 2010 and SQL server 2008.
The attached Visual Studio 2010 solution is shown in the following picture:
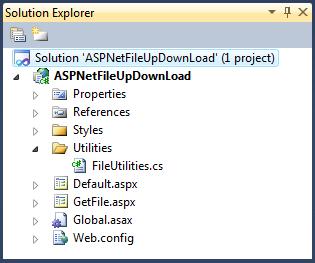
- The "Default.aspx" page is the main user interface of this application. It has the control to let us browse and upload files. If there are files saved in the database, it will display the list of the files. It also provides a hyperlink for each of the files so we can download it.
- The "GetFile.aspx" file is an empty "ASPX" page. When we click a download hyperlink in the "Default.aspx" page, the code-behind file of the "GetFile.aspx" page will load the correct file saved in the database and send it to the web browser.
- The "Utilities/FileUtilities.cs" file implements the database access methods to save and retrieve the files from the database.
- The database connection string is configured in the "Web.config" file.
In this article, I will first introduce you how to create the SQL server database for this application and then show you how to upload and download files in this ASP.Net application.
Create the database
To create the database, you need to have "administrative" permission to a SQL server. In my environment, I have a SQL server 2008 installed on my local computer. You can run the following script to create the database:
USE [master]
GO
IF EXISTS (SELECT name FROM sys.databases WHERE name = N'AFileStorageDB')
BEGIN
ALTER DATABASE [AFileStorageDB] SET SINGLE_USER WITH ROLLBACK IMMEDIATE
DROP DATABASE [AFileStorageDB]
END
GO
CREATE DATABASE [AFileStorageDB]
GO
IF EXISTS (SELECT * FROM sys.server_principals WHERE name = N'FileLoader')
DROP LOGIN [FileLoader]
GO
EXEC sp_addlogin @loginame = 'FileLoader', @passwd = 'Pd123456';
GO
USE [AFileStorageDB]
GO
CREATE TABLE [dbo].[Files](
[ID] [int] IDENTITY(1,1) NOT NULL,
[Name] [nvarchar](100) NOT NULL,
[ContentType] [varchar](50) NOT NULL,
[Size] [bigint] NOT NULL,
[Data] [varbinary](max) NOT NULL,
CONSTRAINT [PK_Files] PRIMARY KEY CLUSTERED
(
[ID] ASC
)WITH (PAD_INDEX = OFF, STATISTICS_NORECOMPUTE = OFF,
IGNORE_DUP_KEY = OFF, ALLOW_ROW_LOCKS = ON,
ALLOW_PAGE_LOCKS = ON) ON [PRIMARY]
) ON [PRIMARY]
GO
sp_grantdbaccess 'FileLoader'
GO
sp_addrolemember 'db_datareader', 'FileLoader'
GO
sp_addrolemember 'db_datawriter', 'FileLoader'
GO
ALTER DATABASE [AFileStorageDB] SET MULTI_USER
GO
This sql script adds the following to your SQL server:
- A database named "AFileStorageDB";
- A table named "Files" in the "AFileStorageDB" database;
- A SQL server login named "FileLoader", its password is "Pd123456";
- The script also grants the login "FileLoader" "db_datareader" and "db_datawriter" access to the "AFileStorageDB" database.
The above script is "safe". But before you run it, please double check if your server accidentally already has a database named "AFileStorageDB". If so, the script will drop your database and creates the new one and you may risk losing all your data. The database table "Files" created by the script is shown in the following picture:

The connection string to the "AFileStorageDB" database is saved in the "Web.config" file in the ASP.Net application:
="1.0"
<configuration>
<system.web>
<compilation debug="true" targetFramework="4.0" />
<httpRuntime executionTimeout="240" maxRequestLength="20480" />
</system.web>
<system.webServer>
<modules runAllManagedModulesForAllRequests="true"/>
</system.webServer>
<appSettings>
<add key="DBConnectionString"
value="Data Source=localhost;Initial Catalog=AFileStorageDB;
User Id=FileLoader;Password=Pd123456;pooling=false"/>
</appSettings>
</configuration>
The database access utility
The "Utilities/FileUtilities.cs" file implements the database access utility class:
using System;
using System.Configuration;
using System.Data.SqlClient;
using System.Data;
namespace ASPNetFileUpDownLoad.Utilities
{
public class FileUtilities
{
private static string GetConnectionString()
{
return ConfigurationManager.AppSettings["DBConnectionString"];
}
private static void OpenConnection(SqlConnection connection)
{
connection.ConnectionString = GetConnectionString();
connection.Open();
}
public static DataTable GetFileList()
{
DataTable fileList = new DataTable();
using (SqlConnection connection = new SqlConnection())
{
OpenConnection(connection);
SqlCommand cmd = new SqlCommand();
cmd.Connection = connection;
cmd.CommandTimeout = 0;
cmd.CommandText = "SELECT ID, Name, ContentType, Size FROM Files";
cmd.CommandType = CommandType.Text;
SqlDataAdapter adapter = new SqlDataAdapter();
adapter.SelectCommand = cmd;
adapter.Fill(fileList);
connection.Close();
}
return fileList;
}
public static void SaveFile(string name, string contentType,
int size, byte[] data)
{
using (SqlConnection connection = new SqlConnection())
{
OpenConnection(connection);
SqlCommand cmd = new SqlCommand();
cmd.Connection = connection;
cmd.CommandTimeout = 0;
string commandText = "INSERT INTO Files VALUES(@Name, @ContentType, ";
commandText = commandText + "@Size, @Data)";
cmd.CommandText = commandText;
cmd.CommandType = CommandType.Text;
cmd.Parameters.Add("@Name", SqlDbType.NVarChar, 100);
cmd.Parameters.Add("@ContentType", SqlDbType.VarChar, 50);
cmd.Parameters.Add("@size", SqlDbType.Int);
cmd.Parameters.Add("@Data", SqlDbType.VarBinary);
cmd.Parameters["@Name"].Value = name;
cmd.Parameters["@ContentType"].Value = contentType;
cmd.Parameters["@size"].Value = size;
cmd.Parameters["@Data"].Value = data;
cmd.ExecuteNonQuery();
connection.Close();
}
}
public static DataTable GetAFile(int id)
{
DataTable file = new DataTable();
using (SqlConnection connection = new SqlConnection())
{
OpenConnection(connection);
SqlCommand cmd = new SqlCommand();
cmd.Connection = connection;
cmd.CommandTimeout = 0;
cmd.CommandText = "SELECT ID, Name, ContentType, Size, Data FROM Files "
+ "WHERE <a href="mailto:ID=@ID">ID=@ID</a>";
cmd.CommandType = CommandType.Text;
SqlDataAdapter adapter = new SqlDataAdapter();
cmd.Parameters.Add("@ID", SqlDbType.Int);
cmd.Parameters["@ID"].Value = id;
adapter.SelectCommand = cmd;
adapter.Fill(file);
connection.Close();
}
return file;
}
}
}
This class implements three public static methods:
- The method "GetFileList" retrieves the list of the files saved in the database;
- The method "SaveFile" saves a file into the database;
- The method "GetAFile" retrieves a single file including the binary file data from the database.
These methods are implemented by plain "ADO.Net". They will be used by the application to list, upload and download the files. When you retrieve the list of all the files, please make sure that you do not select the binary file data, which will significantly slow down your application.
The "Default.aspx" page
The main user interface of the example application is implemented in the "Default.aspx" file:
<%@ Page Language="C#" AutoEventWireup="true" CodeBehind="Default.aspx.cs"
    Inherits="ASPNetFileUpDownLoad.Default" %>

<!DOCTYPE html PUBLIC "-//W3C//DTD XHTML 1.0 Transitional//EN"
    "http://www.w3.org/TR/xhtml1/DTD/xhtml1-transitional.dtd">

<html xmlns="http://www.w3.org/1999/xhtml">
<head runat="server">
    <title>ASP.Net Up & Download Files</title>
    <link href="Styles/Site.css" rel="stylesheet" type="text/css" />
</head>
<body>
<form id="frmDefault" enctype="multipart/form-data" runat="server">
<div style="width: 400px">
    <div style="clear: both; width: 100%">
        <input type="file" name="fileInput" />
        <asp:Button ID="btnUpload" Text="Upload File" runat="server"
            onclick="btnUpload_Click" />
    </div>
    <div style="margin-top: 5px; clear: both">
        <asp:GridView ID="gvFiles" CssClass="GridViewStyle"
            AutoGenerateColumns="true" runat="server">
            <FooterStyle CssClass="GridViewFooterStyle" />
            <RowStyle CssClass="GridViewRowStyle" />
            <SelectedRowStyle CssClass="GridViewSelectedRowStyle" />
            <PagerStyle CssClass="GridViewPagerStyle" />
            <AlternatingRowStyle CssClass="GridViewAlternatingRowStyle" />
            <HeaderStyle CssClass="GridViewHeaderStyle" />
            <Columns>
                <asp:TemplateField>
                    <ItemTemplate>
                        <asp:HyperLink runat="server"
                            NavigateUrl='<%# Eval("ID", "GetFile.aspx?ID={0}") %>'
                            Text="Download"></asp:HyperLink>
                    </ItemTemplate>
                </asp:TemplateField>
            </Columns>
        </asp:GridView>
    </div>
</div>
</form>
</body>
</html>
In this "ASPX" page, we have the following components:
- An html "<input />" of type "file". It is used to browse the file to be uploaded;
- An "ASP.Net" button. When the users click this button, the selected file will be uploaded to the server;
- An "ASP.Net" "GridView". It is used to display the list of all the files that have been uploaded and saved in the database.
In the "GridView", I added an "HyperLink" column. The urls of the hyperlinks point to the "GetFile.aspx" page with the correct file id to download the corresponding file.
The code-behind file of the "Default.aspx" page is implemented as the following:
using System;
using System.Web;
using System.Web.UI;
using System.Web.UI.WebControls;
using System.Data;
using ASPNetFileUpDownLoad.Utilities;
namespace ASPNetFileUpDownLoad
{
public partial class Default : System.Web.UI.Page
{
protected void Page_Load(object sender, EventArgs e)
{
if (! IsPostBack)
{
DataTable fileList = FileUtilities.GetFileList();
gvFiles.DataSource = fileList;
gvFiles.DataBind();
}
}
protected void btnUpload_Click(object sender, EventArgs e)
{
HttpFileCollection files = Request.Files;
foreach (string fileTagName in files)
{
HttpPostedFile file = Request.Files[fileTagName];
if (file.ContentLength > 0)
{
int size = file.ContentLength;
string name = file.FileName;
int position = name.LastIndexOf("\\");
name = name.Substring(position + 1);
string contentType = file.ContentType;
byte[] fileData = new byte[size];
file.InputStream.Read(fileData, 0, size);
FileUtilities.SaveFile(name, contentType, size, fileData);
}
}
DataTable fileList = FileUtilities.GetFileList();
gvFiles.DataSource = fileList;
gvFiles.DataBind();
}
}
}
- In the "Page_Load" event, if it is not a postback, the list of all the files are retrieved from the database and bound to the "GridView";
- In the "btnUpload_Click" event, if a file is uploaded, the content of the file is obtained by "Request.Files" and saved to the database. After the file is saved, the list of the saved files is refreshed to the "GridView".
The "GetFile.aspx" page
When the list of the files is displayed in the "Default.aspx" page, each file has a corresponding hyperlink to download the file. The hyperlink points to the "GetFile.aspx" page with the correct file id. The "GetFile.aspx" page itself is an empty "ASPX" page:
<%@ Page Language="C#" AutoEventWireup="true" CodeBehind="GetFile.aspx.cs"
    Inherits="ASPNetFileUpDownLoad.GetFile" %>
The trick that the "GetFile.aspx" page can send the files to the browser lies in the code-behind file:
using System;
using System.Web;
using System.Web.UI;
using System.Web.UI.WebControls;
using System.Data;
using ASPNetFileUpDownLoad.Utilities;
namespace ASPNetFileUpDownLoad
{
public partial class GetFile : System.Web.UI.Page
{
protected void Page_Load(object sender, EventArgs e)
{
int id = Convert.ToInt16(Request.QueryString["ID"]);
DataTable file = FileUtilities.GetAFile(id);
DataRow row = file.Rows[0];
string name = (string)row["Name"];
string contentType = (string)row["ContentType"];
Byte[] data = (Byte[])row["Data"];
Response.AddHeader("Content-type", contentType);
Response.AddHeader("Content-Disposition", "attachment; filename=" + name);
Response.BinaryWrite(data);
Response.Flush();
Response.End();
}
}
}
In the "Page_Load" event, the file id is obtained through the "QueryString". The file data is then retrieved from the database using the "GetAFile" method in the "FileUtilities" class. The file data is sent to the browser by "Response.BinaryWrite". After the file is sent, the "Response.End" is called, which immediately terminates the server response. This leaves the "GetFile.aspx" page simply a placeholder that enables the browser to access the file downloading capability implemented in the code-behind file.
Run the application
Now we finish this example application and we can test it. Set the "Default.aspx" page as the start page, we can start the application. When the "Default.aspx" page is first loaded, we can see the file "Browse" control and the "Upload File" button in the browser.
We can then browse some files and upload them to the server. The uploaded files will be shown in a "GridView". Each file in the list has a hyperlink to download the file.
The following picture shows the "Tiger.jpg" file downloaded from the server.
Points of Interest
- This article presented an example to upload and download files with SQL servers in ASP.Net.
- Compared with "MVC", "ASP.Net" is now considered as "classical", but there are still a large portion of developers who still use "ASP.Net".
- File uploading techniques in web applications have improved significantly these years. There are many utilities that we can use to achieve much better user experience. The method shown here is a very simple and rudimentary method. It is intended for the interested audience to get started in the "ASP.Net" environment.
- When I first learned to upload and download files with SQL servers some years ago, I found the same method from a web site by "google". But I am unable to find the same link anymore. It may be because the site is very old or the site is no longer active. I hope this example application can help some people who are still interested in this subject.
- Although this example uses a SQL server, the same method can be applied to any database engines that support binary data. What you need to do is simply changing the data access methods to fit the specific database engine.
- One of the advantages of the method shown in the example is that no file is ever saved on the web server, so there is no special permission required on the web server for this application to run.
- I hope you like my postings and I hope this article can help you one way or the other.
History
First revision - 01/01/2012.
I have been working in the IT industry for some time. It is still exciting and I am still learning. I am a happy and honest person, and I want to be your friend.


