Introduction
This
article demonstrates the first Windows RT based radiation counter, which is
directly connected to ARM processor (i.e may be built
into Windows RT tablet and not using
any transport layer, such as not using any of I2C, USB, SPI or serial). Both
Windows RT device driver and sample test applications are described.
Some time
in the past I had a research project where prototype Windows RT platform (similar
to Raspberry Pi) was under investigation regarding how fast it can handle GPIO interrupts.
Later on I have decided to give some practical use to the results of that
research project and here came a radiation counter for Windows RT project.
Important Note
This is experimental hardware and software mix engineering
project, which eventually may deal with measuring radioactivity. In no case
this project shall be used for real life application.
Background
You have certainly heard about radiation detectors,
they are typically stand-alone microcontroller based small portable devices
with battery power, typically capable of measuring β and γ ionizing radiation with a
primitive digital display and maybe also with some communication to PC to send
results to for later processing, nice graphs and other ways to share its data.
Usually radiation detectors are communicating with PC
or smart phone over some transport layer, which may be implemented as serial,
USB, I2C, SPI or other communication method. PC or smart phone then runs some
software application such as Windows Radiation Logger, MacOS Geiger Bot
and so on to get data from radiation detector. Typically it means CPM value from
radiation detector firmware is sent to PC or smartphone every several seconds
or so.
Unlike those, my prototype product does not use any
transport layer between Geiger counter hardware and Windows RT – no serial, no
USB, no I2C. It is a simple direct wire
connection from load resistor of Geiger counter to GPIO pin of ARM processor.
Therefore, every single particle detected by Geiger counter generates an
interrupt on ARM processor in real time. Since Windows RT runs on the same ARM
processor, we now got a possibility to have radiation counter built into
Windows RT platform directly.
Here is a hardware diagram showing components layout. A
Windows RT development tablet platform was used to carry out this project.
The Geiger counter gets its high voltage from tiny power supply fed by the same
tablet Li-ion battery. A LND712 Geiger tube was used as a test, it is too big to
fit inside of retail sized tablet, but using small form factor Geiger tube one could
have it built into retail Windows RT tablet case.
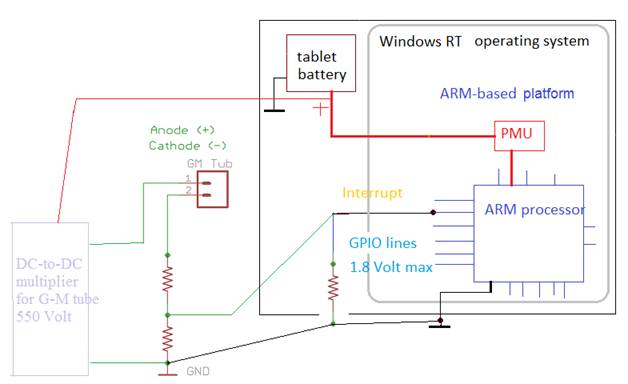
To use existing hardware I took advantage of partially
populated Geiger
DIY kit from brhogan, leaving
out microcontroller and using only HV power supply part of the kit.
So we have got all hardware in place now. What is left
is the software to write. Luckily Windows RT development tablet platform made
available to me was unlocked so I can achieve what I need without hurdles both
at device driver and at application levels.
We
need three parts – first new counter ACPI resources, then a Windows RT device
driver to service GPIO interrupts, and lastly Windows RT application using our
driver to test radiation counter.
Part 1 Windows RT
radiation counter ACPI resources
First we need to tell Windows RT that we have new hardware
resource, so it can then let us load Windows device driver for it. I have done
it through ACPI table, by adding this section to system ACPI table. Our
radiation counter resource is really simple – we only need one resource, interrupt
that is. To tell ACPI which GPIO pin is ours we set it explicitly (GPIO pin 142
in my example). We also specify that it is must be active-high, i.e. zero Volts
is no interrupt, and anything higher than 1.8 Volts is an interrupt. To
complete new device ACPI section properly some device names have to be supplied
per ACPI rules, so our radiation counter device driver should appear as a
device with a name GMCT0001.
Device(GMC1)
{
Name(_ADR, 0)
Name(_HID, "GMCT0001")
Name(_CID, "GMCT0001")
Name(_UID, 1)
Method(_CRS, 0x0, NotSerialized)
{
Name(RBUF, ResourceTemplate()
{
GpioInt(Edge, ActiveHigh, Shared, PullDown, 0, "\\_SB.GPI2", 0, ResourceConsumer,, RawDataBuffer() {0x15}) {142}
})
Return (RBUF)
}
Method(_STA, 0x0, NotSerialized)
{
Return(0xf)
}
}
To make the changes described above to take effect one
needs to insert this code fragment to platform ACPI table, rebuild ACPI binary,
and then update platform tablet firmware with your new ACPI. Then reboot
Windows RT to verify that you now see new unknown device in Windows RT device
manager. If we want to ensure that it is really our radiation counter device,
then inspect this unknown device details in device manager, the interrupt
number should match ours as well as the ACPI device name - GMCT0001.
Part 2 Windows RT radiation counter
KMDF device driver
Developing Windows RT device drivers may be tricky at
times, but this one is easy.
First our radiation counter Windows device driver .inf file should have resource description matching what we
have previously put into ACPI section. Below is a snippet from .inf file where a comment reminds to have matching ACPI
device name
[Standard.NT$ARCH$]
%GM_counter_Driver1.DeviceDesc%=GM_counter_Driver1_Device, ACPI\GMCT0001 ; in ACPI table described as GMCT0001
In terms of functionality all we need to do in our Windows
RT device driver is react to each and every interrupt generated by Geiger
counter pulse on GPIO 142, and service such interrupt. Since our device driver
will run in kernel mode we cannot block or perform any lengthy tasks. We can,
however, compute CPM by counting pulses within 60 seconds interval and then
expose this information to user program. But we can do a lot more (compared to
radiation logging software running over transport layer on PC and smart
phones) - we can notify Windows RT (say
in task bar icon) as well as any user program (if it runs, since device driver
runs always) about each and every pulse we get from Geiger counter, in real
time. That is to have not just CPM, but time stamps for every radiation
particle detected with 100 nanosecond accuracy.
Next we need a way for our radiation counter Windows
device driver to notify user application upon every particle arrival.
Such interaction between kernel mode Windows device
driver and user program can be done in different ways.
The recommended way is to implement DeviceIOControl blocking call from user program into our device
driver: this way, user program makes a call into device driver and it sits
there until Geiger counter detects a particle, device driver will handle GPIO
interrupt, and then that previously blocked call from user application into DeviceIOControl would immediately return and user program
would resume its run, thus providing fast response to actual Geiger pulse. User application is then counts this particle
and is ready for the next call to wait for another particle arrival to be told
about.
It is my understanding that this is the
recommended way of doing things per Microsoft Windows device driver development
guidelines. To implement it properly takes a bit of work and I only had limited
time to spend on this project, so I undertook another, simpler approach.
Please note that the way I did it is
different and is considered architecturally incorrect and is not recommended.
Nevertheless it works just fine on Windows RT in my test for the purposes of
this demonstration.
The simple way I wrote this device driver
is based on sharing Windows event handle: user application, when it starts,
will create event handle and then tell Windows driver about it. From that point
on Windows device driver will signal on that event handle every time a particle
is detected; it is up to a user application to wait on this event handle and to
react on event signal as often as they wish. Prior to exiting user application
unregisters its event handle from our device driver.
Therefore, our radiation counter Windows
device driver will have just two Device I\O control codes: one to supply device
driver with event handle from user program and another one to tell the driver
we no longer need that event handle.
#define IOCTL_GM_CNTR_SET_EVTHNDL CTL_CODE(FILE_DEVICE_UNKNOWN, IOCTL_INDEX+1, \
METHOD_BUFFERED, \
FILE_ANY_ACCESS)
#define IOCTL_GM_CNTR_RELEASE_EVTHNDL CTL_CODE(FILE_DEVICE_UNKNOWN, IOCTL_INDEX+2, \
METHOD_BUFFERED, \
FILE_ANY_ACCESS)
Here is code snippet where event handle
from user application is accepted by a driver. Note handle conversion is to be
made since user application supplies user mode handle whereas our radiation counter
device driver is KMDF driver and hence needs kernel mode handle
…..
case IOCTL_GM_CNTR_SET_EVTHNDL:
length=sizeof(pDevContext->hUserEvent1particle);
status = WdfRequestRetrieveInputBuffer(Request, length, &ioBuffer, &bufLength);
if(!NT_SUCCESS(status))
{
TraceEvents(TRACE_LEVEL_ERROR, TRACE_QUEUE, "GM_cnt_DevIoCtrl(ERR!) WdfRequestRetrieveInputBuffer2 failed=%Xh\r\n", status);
length=0;
status = STATUS_BUFFER_TOO_SMALL;
pDevContext->hUserEvent1particle=NULL; }
else
{
RtlCopyMemory(&pDevContext->hUserEvent1particle, ioBuffer, length);
TraceEvents(TRACE_LEVEL_ERROR, TRACE_QUEUE, " GM_cnt_DevIoCtrl() UserEvtHnd=%ph\r\n", (PVOID)(pDevContext->hUserEvent1particle));
status=ObReferenceObjectByHandle(pDevContext->hUserEvent1particle, DELETE | SYNCHRONIZE, *ExEventObjectType, UserMode, &pDevContext->pkevtOneParticle, NULL);
if(!NT_SUCCESS(status))
{
TraceEvents(TRACE_LEVEL_ERROR, TRACE_QUEUE, " GM_cnt_DevIoCtrl(ERR=%Xh) UserEvtHnd to KEvt failed! \r\n", status);
}
else
{
TraceEvents(TRACE_LEVEL_INFORMATION, TRACE_QUEUE, " GM_cnt_DevIoCtrl() PKEvt=%ph\r\n", pDevContext->pkevtOneParticle);
};
status = STATUS_SUCCESS;
};
The amount of work to be done in KMDF
Windows device driver’s ISR shall be kept to a minimum, since such driver runs
in kernel mode at high priority, therefore in our ISR all we do is acknowledge
an interrupt and then schedule a DPC where we do some more work.
A simplified version of radiation counter Windows
device driver ISR code is shown below.
BOOLEAN GMcntDrvIsr(_In_ WDFINTERRUPT Interrupt, _In_ ULONG MessageID) {
PDEVICE_CONTEXT pDeviceContext=NULL;
BOOLEAN bResult=FALSE;
UNREFERENCED_PARAMETER(Interrupt);
UNREFERENCED_PARAMETER(MessageID);
pDeviceContext = DeviceGetContext(WdfInterruptGetDevice(Interrupt));
if(NULL!=pDeviceContext)
{
pDeviceContext->ulCountInterrupts+=1;
bResult=WdfInterruptQueueDpcForIsr(Interrupt);
if(FALSE==bResult)
{
TraceEvents(TRACE_LEVEL_ERROR, TRACE_DRIVER, "GMcntDrvIsr(ERR) cannot schedule DPC !\r\n");
};
}
else
{
TraceEvents(TRACE_LEVEL_ERROR, TRACE_DRIVER, "GMcntDrvIsr(ERR) pDeviceContext is Null\r\n");
};
bResult=TRUE;
return bResult;
}
In device driver .inf
file I have assigned this radiation counter device class to "Sensors." This is
arbitrary, and Windows RT already has its own "Sensors" device class, but my
device driver does not conform to their Sensor model, so to avoid confusion of
Windows RT regarding my radiation counter device I gave it different class
GUID, and it appears in Device Manager under "Sensors" but separately, not in
Microsoft Sensors group. Section of radiation counter device driver .inf file shown below demonstrates this:
; GM_counter_Driver1.inf
;
[Version]
Signature="$WINDOWS NT$"
Class=System
ClassGuid={78A1C341-4539-11d3-B88D-00C04FAD5171} ;
….
[Strings]
SPSVCINST_ASSOCSERVICE= 0x00000002
ManufacturerName="SergeiR" ;
ClassName="Sensors" ;
The radiation counter Windows RT
device driver VS2012 project can be downloaded separately in here. Please note that
is shall only be built for ARM, not for Win32 or X64.
Testing Device Driver
only (on Windows RT)
First we ensure our Windows device
driver loads properly and starts without any trouble. To assist us in this step
Windows Device Manager can be used first. In the screenshot below Windows Device
Manager shows our radiation counter as properly working device.

Next, in order to get
more detailed insight into our driver loading and operations the TraceView
utility can be used: a number or trace debug statements are placed throughout
the radiation counter driver C code, so by running TraceView
utility the output from our device driver can be conveniently inspected at run
time without the need for Windows kernel debugger.
A screen shot below demonstrates sample
trace debug output from our driver at run time. To verify we do get each and
every Geiger counter particle detected I have used pulse generator first to
ensure that each pulse generates and interrupt and further that each such
interrupt is handled in our device driver.
This is what we have accomplished so
far is looking like
How high can we go? With particular Windows
RT prototype platform I was working on my device driver can operate reliably up
to a rate of approx. 400 interrupts per second. Please note that in practice
Geiger counter when used as radiation counter in typical situations usually
would generate less interrupts, since having 400
interrupts/sec equates to 400 counts/sec which then is equivalent to
dangerously high radiation count of 24000 CPM.
Finally, I disconnected pulse generator from
GPIO pin and connected actual Geiger counter load resistor as shown on diagram
in above. Within seconds my device driver started to dump every particle event
of background radiation to TraceView.
So, our radiation counter Windows device
driver on Windows RT so far is working well and is even suitable for practical
applications in the future: possible dynamic range 0 to 24000 CPM and right
inside of Windows RT operating system.
Part 3 Windows RT radiation counter
application
While user application can be quite fancy, let’s start with a simple one, and then step by step demonstrate
more advance features which can be utilized with our radiation counter Windows
device driver.
Simple console test
program on Windows RT
Now we can make a simple, minimalistic C
console user application to verify interaction with our driver. Also, since our
user application is being notified on every radiation particle event, it is our
user application which will compute CPM (not device driver) and print it to
screen (and to log file if we choose).
Architecturally our simple console test
application with device driver looks like this
User application can open our radiation
counter in two ways – by its DOS device name or by its fully qualified name,
determined by device driver class GUID. Either way works fine with our
radiation counter device driver.
Our simplest C test program would look
like this (error checking omitted for clarity)
#define DOS_DEV_NAMEW L"\\\\.\\G-McntDevice" // our radiation counter Windows device driver DOS name
const TCHAR* cszParticleEventName=_T("Global\\GMCntPartEvent");
int _cdecl main(_In_ int argc, _In_reads_(argc) char *argv[])
{
int iret=0;
HANDLE hGMCntDev=NULL;
HANDLE hEvtParticle=NULL;
BOOL bResult=FALSE;
LPSECURITY_ATTRIBUTES psaEvent=NULL;
hGMCntDev=CreateFile(DOS_DEV_NAMEW, GENERIC_WRITE | GENERIC_READ,
FILE_SHARE_WRITE | FILE_SHARE_READ, NULL, OPEN_EXISTING, 0, NULL);
SetUp_ParticleEventAllAccess(psaEvent);
hEvtParticle=CreateEvent(psaEvent, FALSE, FALSE, cszParticleEventName);
bResult=DeviceIoControl(hGMCntDev,
IOCTL_GM_CNTR_SET_EVTHNDL,
&hEvtParticle, sizeof(hEvtParticle), NULL, NULL, (PULONG)(&nBytes), NULL);
for(int i=0; i<3; i++)
{
dwRet=WaitForSingleObject(hEvtParticle, 10000);
if(WAIT_OBJECT_0==dwRet)
{
printf(" Particle event %d!\r\n", i);
iret+=1;
}
else if(WAIT_TIMEOUT==dwRet)
{
printf(" Particle event %d timed out\r\n", i);
}
};
bResult=DeviceIoControl(hGMCntDev,
IOCTL_GM_CNTR_RELEASE_EVTHNDL,
&hEvtParticle, sizeof(hEvtParticle), NULL, NULL, (PULONG)(&nBytes), NULL);
CloseHandle(hGMCntDev);
return iret;
}
Here is sample output of radiation
counter simple console test program run on Windows RT, where the first three
particle events were expected, however, only two were received within 10
seconds. The background radiation in the area I was working is about 18 CPM, which
on a long statistical average is equivalent to about 1 particle event in 3
seconds, we got one interval much longer but that how random they are.
C:\GM_cnt_drv>GM_cnt_testapp.exe
Particle event 0!
 Particle event 1!
 Particle event 2 timed out
C:\GM_cnt_drv>...
The project for console simple
test applications can be downloaded separately in here. While you can build this test application for any Windows
platform (Win32, X64 or ARM), it will properly run only on Windows RT, since
the device driver it will look for can only run on Windows RT.
Win32 and .Net Radiation
counter applications (Windows RT)
Since
our radiation counter C test console program is working fine but not very
interactive, let’s move one step forward and make another, more advanced test
program with UI, still keeping C as programming language. A simple radiation counter
C test Win32 program with CPM calculation, CPM numeric and analog meter-like
display is the next step to test (and to stress) our device driver on Windows
RT. In addition, let’s also include interrupt rate on our UI, which is
calculated anyway when this test program increments radiation particle counter.
Two
threads will be needed – one to wait for events to signal from radiation
counter device driver, and another to update UI every several seconds when CPM
is low or faster if CPM is high. The details of Win32 programming aren’t much
relevant these days, so I will just include a screen shot. Interaction with
radiation counter device driver is exactly the same as in console test program.
Last
thing with our Win32 test program will be a stress. As I have found device
driver can handle up to 28000 CPM without much affecting Windows RT
performance, so why not to give Win32 real stress test and see if interaction
between KMDF driver and user program is reliable and will we will not lose any
particle events.
The pulse
generator is the only way to test our setup without involving any real hot
radioactive materials. With the pulse generator, over 16000 CPM equivalent rate was
easily detected and displayed without a problem, here is a screen shot:
The Win32 radiation counter
project can be downloaded separately from here. It can
be built for any Windows 8 platform (ARM, Win32 or X64).
As
primitive looking UI as Win32 old style program is, it would be nice to
have something more modern. C# would be naturally a programming language
of choice, since it will offer rich graphical UI and also .NET programs will
run on Windows RT as well.
.NET
will have to utilize P/invoke mechanism to call into our device driver. However,
C# doesn’t have an easy way to deal with native Windows objects, namely event
handles to pass to our driver. So C# has to use a call back
mechanism instead. We thus come to a point when a common middle layer
written in C will be most useful – then all the test programs will work through
it in the same uniformed way, rather than doing different access from C and
from C#.
A side
benefit from it is such that radiation counter middle layer can be made
multiplatform – on ARM it will work through actual radiation counter Windows
device driver, whereas on Win32 and on X64 it will do simulation of radiation
counter device driver generated events.
Radiation counter middle
layer library for managed applications (all Windows platforms)
With
this in mind here is what the final architecture of our tests would look like:
Here
are some notes to explain the layout:
- Console
test programs and Win32 test program link statically to middle layer static lib
- .NET test program loads dynamically middle layer DLL
- .NET test program uses P/Invoke with common, standard data types to call C functions
in middle layer
- Java
test program uses JNI mechanism with common, standard data types to call C
functions in middle layer
Now
it is the middle layer which creates user mode event handle and registers it
with radiation counter device driver (on Windows RT) or starts a simulator
thread (on Win32 or X64). Thus the same .NET test application can run on
ARM, Win32 or X64 with the only difference that on ARM there are real radiation
counter events and on Win32 and X64 they are simulated.
Further,
since middle layer deals with device driver interaction, it nicely shares a
single user mode event handle with all applications using this middle layer:
for example, the Win32 test program can run simultaneously with the .NET test program
and count the same radiation particles. The screenshot below demonstrates this
situation, however, please note that due to the nature of C# virtual machine there
are arbitrary delays in the C# program. Therefore, CPM displayed by the Win32 test
program may not be equal to CPM displayed in C# test program, especially at
higher rates.
Here
is a screenshot of C# test program, running on Windows RT. The dials control
used here is from NextUI gauge library.
Finally, another screenshot demonstrating how two test
programs run simultaneously using single instance of our Windows radiation
counter driver.
A test program launched first creates and registers event handle and passes it
to device driver. Second (and all subsequent) test programs just re-uses event
handle created by first launch of test program.
This
is full screen copy so you can see some Windows RT information in the right
corner to ensure software described in this article designed for Windows RT in
fact does run well on Windows RT. The discrepancy in CPM between C test program
and C# test program is due to .NET run time delays interfering with program
run.
Source
code for these projects can be downloaded separately
- Radiation
counter Static library (all Windows 8 platforms,
auto switched to Geiger simulator mode on Win32 and X64)
- Radiation
counter DLL (all Windows 8 platforms, auto
switched to Geiger simulator mode on Win32 and X64)
- Radiation
counter C# test application (all
Windows 8 platforms)
- Radiation
counter Java test application (Win32 and
X64, Geiger simulator mode only)
Pre-built binaries only are available as
well in case if you want to get a feel of it – to run on Win32 or X64 version
of Windows (I doubt you will have access to unlocked Windows RT development
platform, but ARM binaries are available too), however, CodeProject
does not allow binaries with the article, so I may come with alternative way if
there is considerable interest in binaries.
Points of Interest
This
project demonstrated a few things on Windows RT which are experimental and some
are architecturally incorrect but fully working.
A
prototype of radiation counter built into Windows RT helped me in some
unrelated tests to fine tune some other components of Windows RT, when
operating system is servicing GPIO interrupts at a high rate.
Even
in prototype version this radiation counter has a quite dynamic range of potentially 0 to 24000 counts/minute without losing any
single particle event and may lead to other interesting applications based on
Windows RT platform.
Revision History
Originally
developed for Windows RT. Then tested and works on Windows RT 8.1 as well. In
Geiger simulator mode described test programs work also on Windows 7 and
Windows 8 Win32 or X64.
This member has not yet provided a Biography. Assume it's interesting and varied, and probably something to do with programming.


 General
  News
News  Suggestion
  Question
  Bug
Bug  Answer
  Joke
Joke  Praise
  Rant
Rant  Admin
Admin 


