
Reading digits from a 12 segment LED display
Developing a display reader for raspberry pi

Introduction
This article describes the software I wrote to detect numbers from a 12 segment led display on a tool setter
Background
Our company is running production cnc machines. When they are set up we need to enter the dimensions of each tool we want to use. To measure those dimensions we use an old tool setter device from a german company called Zoller. The dimensions are presented on a led display on the tool setter. Previously we have written these dimensions on a piece of paper and then entered them in the different machines.
This process was slow and tedious and also prone to error. I wanted something that could automate this process and I got the idea to use a raspberry pi with a camera module. It is small enough that I can put it in front of the display to be able to read in the numbers. The hardest part of this project is of course the software to analyze the pictures. I have put some effort in this and thought that it would be a good idea to share.
Using the code
The most important part of the code is the ZollerImage class where all the analysis takes place. To develop this class I made a simple gui in which I could load an image, set a few values, and show intermediate results. I did it all in netbeans and the source code is downloadable above. This project consists of two packages. The displayAnalyzer package which contains the image analysis parts and the gui package which contains the gui parts. It also contains a few test images, also in the download links.
To use it just run it from netbeans or your favorite IDE, hit File-Open and then choose one of the sample files in the "Testimages" folder. The image should be displayed in a javaFX ImageView in the left part of the window. Press Analyze and the result of the reading is sent to system.out and shown in the two result labels. The text field to the right selects a digit position in the upper row. The image that contains this digit is shown in an ImageView to the right. I used the right imageview during my debugging. I wanted to try the eventbus in googles guava library so I have implemented an ImageEvent class that is used to send image from the analysis part to the gui part. Here is the ImageEvent class:
package se.mecona.zollerDisplayAnalyzer.gui;

import java.awt.image.BufferedImage;

/**
 * Class for image event used to send intermediate images from the analysis
 * to display them in the left or right views in the gui.
 * @author Mats
 */
public class ImageEvent {

    /**
     * The view to show the image in. LEFT or RIGHT
     */
    public enum selectedImageView {

        /**
         * Selects the LEFT view for the image
         */
        LEFT,

        /**
         * Selects the RIGHT view for the image
         */
        RIGHT };
    private final selectedImageView selectedView;
    private final BufferedImage image;

    /**
     * Constructor for the ImageEvent class. Takes the view to show the image in
     * and the image as parameters.
     * @param selectedView  The view to show the image in. LEFT or RIGHT
     * @param image         The image to show
     */
    public ImageEvent(selectedImageView selectedView, BufferedImage image) {
        this.selectedView = selectedView;
        this.image = image;
    }

    /**
     *
     * @return the selected image view, LEFT or RIGHT
     */
    public selectedImageView getSelectedView() {
        return selectedView;
    }

    /**
     *
     * @return the image
     */
    public BufferedImage getImage() {
        return image;
    }
}
It is then easy to send any image from anywhere in the code by doing like this:
Globals.getEventBus().post( new ImageEvent(ImageEvent.imageType.RIGHT, image));
where the image is of type BufferedImage. The Globals class is a singleton containing only the eventBus. This is the only thing that googles guava is used for. It is easy to remove it from the displayAnalyzer package by just removing any references to the Globals class and the ImageEvent class.
Analysis steps
The analysis is done in a few steps I am trying to explain here.
First the image is loaded from disk into an object of the imageTester class created by the gui.
The analysis process is started with the press of the "Analyze" button. The threshold value is set from the slider in the ui. The digit to show in the ui is also set up from the text field.
A call to imageTester.analyze starts the analysis. The imageTester object then creates a new object of class ZollerImage which does the real work.
    /**
     * Analyzes the image contained in this object, if it exists.
     * Stores the result internally
     */
    public void analyze() {
        if (image != null) {
            ZollerImage zollerImage = new ZollerImage(image);
            zollerImage.setThreshold(threshold);
            zollerImage.setDigitToShow(digitToShow);

            zollerImage.analyze(ZollerImage.AnalyzeRow.BOTH);

            upperDigits = zollerImage.getDigits(AnalyzeRow.UPPER);
            System.out.println("Upper digits = " + upperDigits);

            lowerDigits = zollerImage.getDigits(AnalyzeRow.LOWER);
            System.out.println("Lower digits = " + lowerDigits);
        }
    }
The zollerImage objects firsts prepares the image by applying a threshold operation to clean up the image. It is only done in the green channel since the display is mostly green.
Then a check is made wich part of the image should be analyzed. I've done this to save time if only one of the two numbers is needed. The analysis is made on half of the image at a time in the method AnalyzeDigitRow
In the original image the digits are leaning a little. A shearing operation is done so they are straightened.
Now the image is cropped so the black area around the digits is removed. This is an important part of the process. I have to consider the space between the digits. We need to save a little part to the left and right that is equal to half the space width. If we don't do this and divide the remaining image in nine parts (one for each digit) We won't get the digits in the middle of each of the nine sub images. To fix this I use a constant PADDING_DIVISOR. I take the width of the bright area, divide it with PADDING_DIVISOR and then get the number of pixel columns that should be added to the left and right.
If, for example, the bright area is 644 pixels wide and PADDING_DIVISOR is 50, we add 644/50 = 12 pixels to the right and left.
Since the first position always has a letter in it (X or Z in the test images) and the last position always has a digit we know that these positions is always bright. This makes it easier since we always know how many digit (or symbols really) positions are in the image.
There is one additional problem however. The last digit could be a "1". Since this display has 12 segments the segments for the digit "1" is not the rightmost segments but in the middle. We have to consider this and thus we have an extra check for this in the method checkIfLastDigitIsOne. In this method we check the width of the bright part in this digit position. If it is less than a third of the total width then we decide that this must be a "1" and the image is recropped with a little more area to the right. This extra width is set with the PADDING_FRACTION_FOR_LAST_DIGIT_1 constant.
All this is handled in the method getNonEmptyPart.
    /**
     * Method that returns the non empty part of the image.
     * @param image             The original image
     * @param paddingFraction   The fraction of the image width that is used as spacing between the digits
     * @param addExtraFraction  The fraction of the image width that is used for extra padding if last digit is a "1"
     * @return a new image that contains the part of the image that has digits.
     */
    public static BufferedImage getNonEmptyPart(BufferedImage image, int paddingFraction, int addExtraFraction) {
        // Get first non empty column
        int startCol = getNonEmptyCol(image, 0, 1);

        int width = getNonEmptyCol(image, image.getWidth() - 1, -1) - startCol;
        int padding;
        if (paddingFraction == 0) {
            padding = 0;
        } else {
            padding = width / paddingFraction;
        }

        int addExtraFractionPadding;
        if (addExtraFraction == 0) {
            addExtraFractionPadding = 0;
        } else {
            addExtraFractionPadding = width / addExtraFraction;
        }

        if (startCol < padding) {
            throw new IllegalArgumentException("padding too big for image left");
        }
        if (startCol + padding + addExtraFractionPadding + width > image.getWidth()) {
            throw new IllegalArgumentException("padding too big for image right");
        }

        image = image.getSubimage(startCol - padding, 0, width + 2 * padding + addExtraFractionPadding, image.getHeight());

        int startRow = getNonEmptyRow(image, 0, 1);

        int height = getNonEmptyRow(image, image.getHeight() - 1, -1) - startRow;

        image = image.getSubimage(0, startRow, image.getWidth(), height);
        //Globals.getEventBus().post( new ImageEvent(ImageEvent.imageType.RIGHT, image));
        return image;
    }
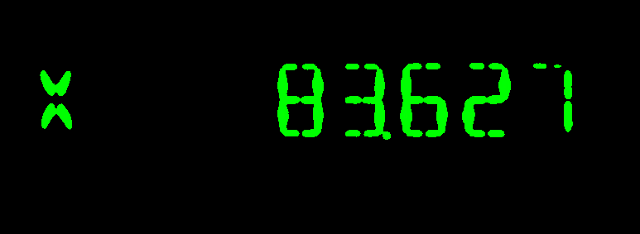
Now we have an image looking like this:

Now that we have got the digit area we can start to analyze each digit position. This is made in the analyzeDigitImage method. There are som special positions in this display. The first position is always a letter containing the measuring axis. We don't care about this one so we just ignore it and store the NO_DIGIT constant.
The next position is always the sign position. For this we only need to see if the digit area has any bright pixels in it since there is no plus sign. Only minus if it is a negative number.
The position containing the decimal point is always position no 5. For this, we set the area containg the point to black so it don't interfer with the segment analysis. I divided the width into four parts and the height in eight parts and sets the lowest rightmost 1/4 by 1/8 to black.
Finally it's time to look at the different segments of each digit. First we remove the black empty part around the digit. We can then look at the width of the remaining part. If it is narrow, the digit is a "1". This check is made in the method isOne. Otherwise we carry on and look at the segments.
If we number the segments like this:
     -- 2 -- -- 7 --
    |       |       |
    |       |       |
    0       5      10
    |       |       |
    |       |       |
     -- 3 -- -- 8 --
    |       |       |
    |       |       |
    1       6      11
    |       |       |
    |       |       |
     -- 4 -- -- 9 --
and do a bit of thinking we get the following unique patterns for the different digits.
    1 - already detected
    2 - 0 and 11 empty
    3 - 0 and 1 empty
    4 - 1 and 2-7 empty
    5 - 1 and 10 empty
    6 - 10 empty
    7 - 0, 1 and 3-8 empty
    8 - none empty
    9 - 1 empty
    0 - 3-8 empty
It turns out that we only need to look at 6 different segments.To do this we split the digit image in eight parts vertically and tree parts horisontally.
                colStart    colEnd     rowStart     rowEnd
    Area 0      0          1/3         1/8         3/8
    Area 1      0          1/3         5/8         7/8
    Area 10     2/3        3/3         1/8         3/8
    Area 11     2/3        3/3         5/8         7/8
    Area 2-7    1/3        2/3         0           2/8
    Area 3-8    1/3        2/3         3/8         5/8
This is done in the method analyzeSegments.
    /**
     * Performs an analysis of the bright parts of an image containing just one
     * digit.
     * @param digitImage The digit image to analyze
     * @return an int representing the image found.
     */
    private int analyzeSegments(BufferedImage digitImage) {
        // First remove black space around the image.

        digitImage = ImageAnalyzer.getNonEmptyPart(digitImage, 0,0);

        /*
        These are the segments for the different digits.
        Possible digits:
        1 - already detected
        2 - 0 and 11 empty
        3 - 0 and 1 empty
        4 - 1 and 2-7 empty
        5 - 1 and 10 empty
        6 - 10 empty
        7 - 0, 1 and 3-8 empty
        8 - none empty
        9 - 1 empty
        0 - 3-8 empty
         -- 2 -- -- 7 --
        |       |       |
        |       |       |
        0       5      10
        |       |       |
        |       |       |
         -- 3 -- -- 8 --
        |       |       |
        |       |       |
        1       6      11
        |       |       |
        |       |       |
         -- 4 -- -- 9 --

        6 areas to analyze.
        We split the digit image in eight parts vertically and tree parts horisontally.
                    colStart    colEnd     rowStart     rowEnd
        Area 0      0          1/3         1/8         3/8
        Area 1      0          1/3         5/8         7/8
        Area 10     2/3        3/3         1/8         3/8
        Area 11     2/3        3/3         5/8         7/8
        Area 2-7    1/3        2/3         0           2/8
        Area 3-8    1/3        2/3         3/8         5/8
         */
        //             Areas   :   0  1  10 11 27 38
        final boolean[][] areas = {{true, true, true, true, true, false}, // digit 0
        {false, false, false, false, true, true}, // 1
        {false, true, true, false, true, true}, // 2
        {false, false, true, true, true, true}, // 3
        {true, false, true, true, false, true}, // 4
        {true, false, false, true, true, true}, // 5
        {true, true, false, true, true, true}, // 6
        {false, false, true, true, true, false}, // 7
        {true, true, true, true, true, true}, // 8
        {true, false, true, true, true, true}};// 9
        final int[] colStart = {0, 0, 2, 2, 1, 1}; // Start column for area
        final int[] rowStart = {1, 5, 1, 5, 0, 3}; // Start row for area


        boolean[] filledArea = new boolean[6];
        for (int i = 0; i < 6; i++) {
            filledArea[i] = scanArea(colStart[i], rowStart[i], digitImage );
        }

        // Now scan the filled areas to find out which digit it is.
        int thisDigit = NO_DIGIT;
        for (int i = 0; i <= 9; i++) {
            if (isThisDigit(areas[i], filledArea)) {
                thisDigit = i;
                break;
            }
        }
        return thisDigit;
    }
After this we hopefully get the correct digit. This is the second version of my analysis algorithm. With the first, I got some wrong readings. I haven't done any statistics but it is much less than 1% error. With this version I have added a way of reporting errors in the reading but so far after several weeks of usage I am not aware of a single error. Hopefully this continues but previously I noticed that it is a little different lighting in building depending of the time of the year so I have adjusted the exposure a little bit a few times.
The main difference in this second version is that I take advantage of the digit positions. The sign and decimal point is always in the same place which seem to make the algorithm more secure.
Raspberry Pi notes
In the gui there is a button "Run Tests" that runs the analyzer code for a collection of test images to make sure that any changes don't break the detection. A lot of this code contains hard coded directories and other bad habits. The displayAnalyzer package should be cleaner. This is the part that is used in the raspberry pi application. The only thing I did was removing the eventbus stuff (see above). The raspberry pi application contains the code for taking a picture of the display, analyzing the digits and then builds code files that can be transferred to our different cnc machines. It also has a button for reporting a bad reading. It stores the troublesome image so I can refine the algorithm if needed.
I developed almost all of the code on a windows machine with netbeans. The only part that was made on the raspberry was the code for using the camera which is mostly a bash script. The .jar file built with the windows machine is just copied into the raspberry and executed as it is.
Acknowledgement:
The IOResult class is taken from Almas Baimagambetov excellent youtube channel about JavaFX programming. I learned a lot from him.