
Automate Publishing a WebSite into IIS using MSDeploy and NAnt Scripts
4.50/5 (3 votes)
Describes processes of publishing a site into IIS using MSDeploy, .NET 4, Nant and Cruise Control
Introduction
I was searching for a way to automate my build process where a web application will be automatically deployed in my staging server so that QA can test after clicking force build. In .NET 4, it becomes easy to deploy web application in IIS using MSDeploy.
Background
In the installation of VS 2010, also install MSDeploy.exe in your machine Program file under x:\Program Files\IIS\Microsoft Web Deploy folder. When you open a web application in VS 2010, you will see in build menu "Publish <web application name> option. And after clicking, it will open a window like this:
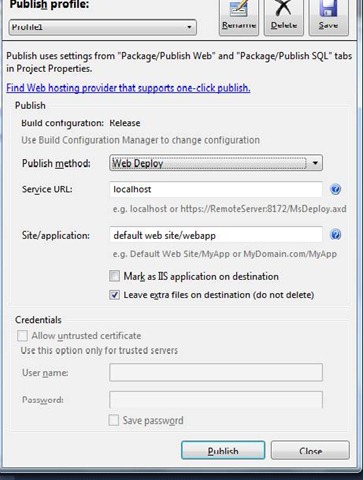
If you click "Publish", it will deploy the web application in IIS. In the background, it uses MSDeploy for deploying site in IIS. Here, I will discuss how to automate this publish using Nant and MSDeploy.
Implementation
This article contains automation steps and scripts which are described well in my previous article Work Flow of Build Automation (buildautomation.aspx). So please see my previous article to understand these steps and code segments.
You will get major features of Web Deployment from this MSDN link. .NET framework v4.0 has introduced a new command in MSBuild /target:package. This creates a .zip file of Web application with all IIS Settings, Web Contents and other various artifacts like Security Certificates, GAC components, Registry, etc. The command for creating package of web application project webApp.csproj is:
C:\..\MSBuild.exe X:\WebApp.csproj /target:Package
This command creates a .zip file according to configuration. If configuration is debug, it will create a package folder under debug folder, but you can specify your build configuration and location where this package will be created:
C:\..\MSBuild.exe X:\WebApp.csproj /t:Package
	/p:Configuration=Release /p:PackageLocation=x:\WepApp\WebApp.zip
This creates WebApp.zip file under WebApplication. It also contains other files as follows:
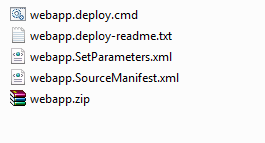
You can see here that it contains a deploy.cmd file, readme.txt, SetParameter.xml, Manifest.xml and that zip file mentioned in my msbuild command.
Readme.txt file will tell you how to run deploy.cmd file. deploy.cmd file actually runs MSDeploy with proper command. SetParameters.xml lets you change IIS deployment parameters like application name, connection string.
<parameters>
  <setParameter name="IIS Web Application Name" value="Default Web Site/WebApp_deploy" />
  <setParameter name="ApplicationServices-Web.config Connection String"
	value="data source=.\SQLEXPRESS;Integrated Security=SSPI;
	AttachDBFilename=|DataDirectory|\aspnetdb.mdf;User Instance=true" />
</parameters>
After installing MSdeploy, in IIS7, you will get an option for importing .zip file manually with changing these settings.
In this articles, I will show you an automated process of deploying web application with all these features and also maintain the version of web application so that we can understand this published web application related to which SVN revision and which CCNet build.
Now let's see the processes of automate Build using NAnt and Cruise Control. These are the same as my previous article (Work Flow of Build Automation) but the only change is that here I am not creating a setup file. Here, I am directly publishing the web application into IIS. So the processes are:
- Copy the entire source from
SNVFoldertoBuildFolder. - Get the SVN Revision Number and CCNet level for creating version number. version number as <CCNetLevel>.<SVN Revision>
- Change GlobalAssembly.cs with version number and other settings and also change web.config with release configuration.
- Run MSBuild with all configuration to rebuild solution.
- Run Unit Test if your project contains Unit Test.
- Run NCoverage (optional)
- You can also run FxCop and other tools for analyzing your build. This step is also optional.
- Create Package of Web application by MSbuild under a version folder of deployment folder.
- Change IIS parameters by changing values in Setparameters.xml file.
- Publish the web application from this version folder in local or remote server my MSDeploy.
My previous article on Work Flow of Build Automation describes steps 1 to 4. Here, I only discuss about the last 8 and 9 processes.
If you see my previous article's Nant script, it calls "BuildSetup" when "Forcebuild" condition is true.
Here instead of creating a setup file, we will deploy this site into IIS. So here "Run" target will call "BuildDeploy" like this:
<target name="Run">
	<property value="" name="CCNetBuildCondition" overwrite="false"/>
	<call target="BuildPublish" unless="${CCNetBuildCondition=='ForceBuild'}">
	<call target="BuildDeploy" if="${CCNetBuildCondition=='ForceBuild'}"/>
</target>
Now let's see what this "BuildDeploy" target contains (Step 10).
<property name="publish.dir" value="${ResultDir}\${CCNetLabel}.${RevisionNumber}" />
  <target name="BuildDeploy" depends="BuildPublish">
    <call target="CreatePackage"/>
    <call target="SetParameters"/>

    <exec program="${$publish.dir}\${ProjectName}.deploy.cmd">
      <arg value="/Y" />
    </exec>

  </target>
Here it depends on "BuildPublish" target which is described well in my previous article. Then it calls "CreatePackage" target which is Step 8. It then calls another target "SetParameters" which is Step 9. And after that, it calls deploy.cmd with /Y command. The commands supported by deploy.cmd are mentioned in readme.txt file. Here it creates IIS site in local machine. For creating site in remote machine, the command is :
C:\..\webapp.deploy.cmd /Y /M:192.168.1.12 /U:milton /P:xx
But for deploying in remote machine, you need to have web deployment agent service running remote machine. For that, you need to install web deployment agent service feature of web deployment tool from here. After installing web deployment agent service, you need to run this service. You can check web deployment agent service is running in that machine by browsing in that machine as http://localhost:80/msdeployagentservice.
Now let's see what "CreatePackage" target contains.
<target name="CreatePackage">

    <exec program="${MSBuildPath}">
      <arg value="${BuildDir}\${WebProject}" />
      <arg value="/property:Configuration=release" />
      <arg value="/property:PackageLocation=${publish.dir}\${ProjectName}.zip" />
      <arg value="/t:Package" />
    </exec>
  </target>
Here it creates a package with /target:package as described before. Suppose our CCNetLavel value is "1.2.4" and SVN Revision is 1234, so it creates a folder like x:Deployment\1.2.4.1234\WebApp.zip. So by watching folder name, we can understand which SVN revision and which CCNet build is associated with this package.
Now let's see the "SetParameters" target (Step 9):
<target name ="SetParameters">
    <xmlpoke
         file="${$publish.dir}\${ProjectName}.SetParameters.xml"
         xpath="/parameters/setParameter[@name = 'IIS Web Application Name']/@value"
         value="Default Web Site/WebApp${RevisionNumber}" />
  </target>
Here it changes the Web Application Name in IIS by changing SetParameters. If SVN revision number is 1234, then Web application name will be "WebApp1234". You can also change your deploy database connection string with this <xmlpoke> before deploying the web application. When you run deploy.cmd, it actually calls SetParameters.xml file to get these values. You can see the command output after running Nant.build file.

Deploy.cmd calls msdeploy.exe internally with all settings and also sets this Parameter from SetParameters.xml file.
Conclusion
Here, I did not include the whole NAnt and CCnet.config as these are the same as my previous article. The whole scripts are included in my previous article and you only need to change the above mentioned code segments.