
Strategized Locking Pattern
3.20/5 (3 votes)
The Strategized Locking design pattern parameterized synchronization mechanisms protect a component’s critical section from concurrent access.
Introduction
The Strategized Locking design pattern parameterized synchronization mechanisms protect a component’s critical section from concurrent access. In other words, when an object requires data which is created within a different thread, it is necessary to lock the critical sections for data access. Just imagine the result of a data when an object within a thread is writing the shared data, and simultaneously a different object is reading this data from a different thread. You never know the result…
A critical section can be locked for example by creating and using a Mutex. There are different ways to create, take and release a Mutex. However, it is of utmost importance to follow these three steps carefully to prevent lock failures and/or deadlocks. This pattern holds the responsibility for these three actions. Moreover, it wraps the Windows Mutex methods within a dedicated object.
Detailed Information
Detailed information can be found in this book: Pattern-Oriented Software Architecture (Volume 2).
When to Use this Pattern?
Use this pattern if:
- You want to guard a critical section
- You want to be consistent with using
mutex - You want a more readable code
- You don’t want to implement a
mutexover and over again - You don’t want to create a deadlock
Using the Strategized Locking Pattern
This pattern exists of three parts:
- Part 1: Wrapper around the Windows
Mutexmethods - Part 2: The responsibility for creating, taking and releasing the
Mutex - Part 3: The interface for objects which are lockable
UML Class Diagram
The Sensor class is used as an example.
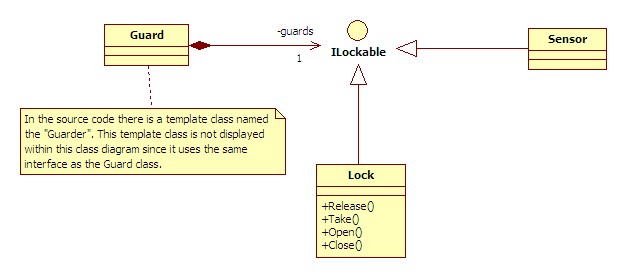
Lock: The wrapper for the WindowsMutexcallsGuard: Responsible for taking and releasing theMutexILockable: Responsible for providing the interface for locking shared data within lockable objects
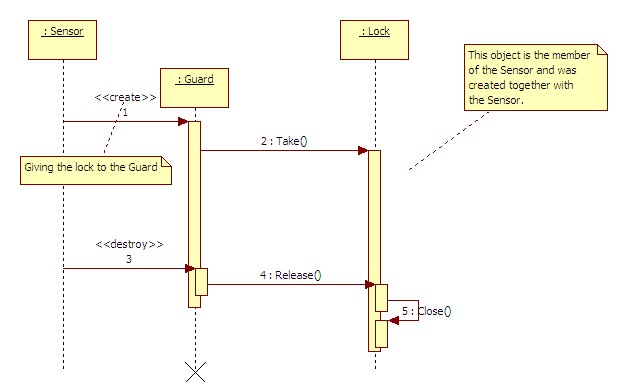
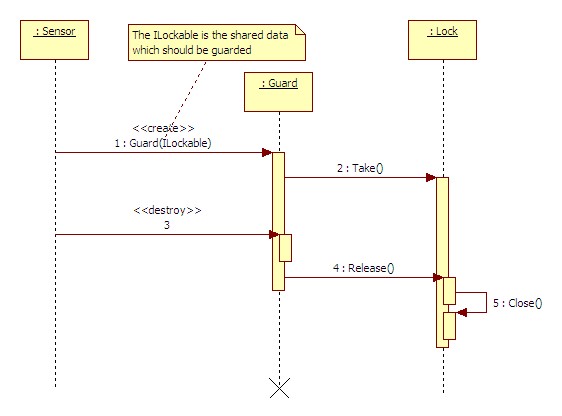
Sequence Diagram
There are 3 ways to use this pattern:
Usage 1

Usage 2
Usage 3
How to Use the Code
Usage 1
Create a Mutex, take it, and release it.
The header file *.h:
private:
       Lock m_lock;
       unsigned int m_count;
The implementation file *.cpp:
m_lock.Take( );
m_count++; // critical section
m_lock.Release( ); // make sure you release it!
Usage 2 (Polymorphism)
In this approach, pass a polymorphic lock object to the guard's constructor and define an instance of this lock object as a private data member.
The header file *.h:
private:
    Lock m_lock;
    unsigned int m_count;
The implementation file *.cpp:
Guard guard( m_lock );	// no release is needed
m_count++; // critical section
Usage 3 (Parameterized)
In this approach, define a template guard class that is parameterized by the type of lock that will be acquired and released automatically. Inherit your object from the ILockable interface.
class Sensor : public ILockable
{
public:
    // constructor
    Sensor( );
Implement the ILockable methods:
private:
    /**
    * @see ILockable::Take().
    *
    * @since    <30 01 2009 >
    */
    virtual void Take( );

    /**
    * ILockable::Release().
    *
    * @since    <30 01 2009 >
    */
    virtual void Release( );
I have selected to lock the Sensor object as an example.
The implementation file *.cpp:
Guarder< ILockable > guarder( *this ) ;
or the header file *.h:
private:
    Lock m_lock;
The implementation file *.cpp:
Guarder< Lock > guarder( m_lock ) ;
History
- 9th February, 2009: Initial post