
gInstall & Mr Skinner
2.58/5 (6 votes)
Demonstrates how to create a skinned setup application using gInstall.
This file only contains the installation script itself and is meant as an example only and will not build.
Introduction
I decided that it was about time that I bought a proper installation tool, after some deliberation, I went for the excellent Ghost Install application from gInstall Corporation of Germany. It has many benefits over Wise and InstallShield, both of which I have used, some of these are:- Costs a lot less than either of the two main industry standard installers.
- Can create fully skinable setup applications.
This article shows how to create a skinned setup application using the sample skin supplied with gInstall.
Compiling the skin
The sample skin provided with gInstall can be found in the following folder, assuming of course that you installed it in the default location:c:\Program Files\gInstall\Ghost Installer\Plugins\Skinner\
Skin samples\StdUI
The first thing you need to do is compile the StdGUI.sml file to produce another file called, StdUI.gis, but to do this you need to copy the sml2gis.exe utility into the same folder, or refer to it using a relative path. At a command (DOS) prompt, type the following:
sml2gis StdGUI.sml
This produces the StdUI.gis file which is quite large in size (9 Mb), don't worry about that, it gets compressed down, a lot.
Creating the setup kit
If I am creating a setup kit for an application, I would normally put it within a subfolder of the actual project, called something like Setup. Copy the newly created file "StdUI.gis" into this folder and start gInstall Studio. Create a new project and save it in the same location, i.e. the Setup folder. Before we begin modifing the script to work with a particular skin, you must create the rest of the installation steps, i.e. which dialogs to display, etc, this is easy to do using the gInstall Studio interface.Once this is done, test that your installation works with the standard user interface plugin.
Adding skin support
Firstly, we need to modify a setting within our setup, to enable the Mr Skinner plug in, as shown below.
We now need to tell the setup script that we wish to use the MrSkinner plugin, so from the Project menu, select the View Source option.
You need to modify the script in two places, first add the following code to the <plugins> section of the xml script file.
<plugin id="GSkinner"/>
This section should now look something like this:
<plugins>
    <plugin id="StdUI">
        <config>
            // Code ommitted for brevity
        </config>
    </plugin>
    <plugin id="GSkinner"/>
</plugins>
Finally, we need to add a presetup section that tells gInstall which skin to use, so add the following code:
<presetup>
    <file src="StdUI.gis"/> // Include the path (full or relative)
                            // to the "StdUI.gis" file
</presetup>
Your script should now look something like this:
<plugins>
    <plugin id="StdUI">
        <config>
            // Code ommitted for brevity
        </config>
    </plugin>
    <plugin id="GSkinner"/>
</plugins>
<presetup>
    <file src="StdUI.gis"/> // Include the path
              // (full or relative) to the "StdUI.gis" file
</presetup>
The hard parts are done now, simple isn't it.
The final touches
When I got this far, things were not as expected, as you can see in the following screenshot.
Not quite right... there is a missing banner and the title text is too far over to the left.
This is easy to fix though, first add the banner which is the BANNER.bmp file in the sample skin folder.

and finally move the title text over by 30 pixels.

All Done
Thats it you can now build it, here is a picture of the first page of the skinned setup.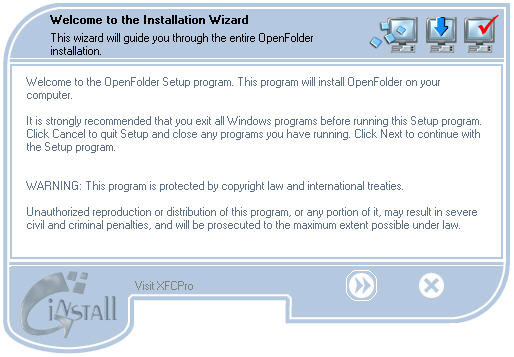
History
- 1.00 - First public release.