
Building Microsoft Teams Apps with Serverless Python Part 1: Building a Personal Tab Teams App with Python and Azure Functions
5.00/5 (5 votes)
In this article we demonstrate how to create a serverless Azure Functions web app in Python.
Enterprises increasingly trust the popular Python language to handle a variety of workloads. However, building enterprise apps using Python doesn’t mean using old-school monolithic frameworks. We’ll build Teams apps in this three-part series by writing serverless Azure Functions in Python.
In this first article, we’ll create a Microsoft Teams app and place it in a Personal tab. Personal Tabs present the current user with a page featuring their information. This type of Teams app enables users to organize their personal calendars, to-do lists, sticky notes, and more.

We base this first app on an existing C# sample that illustrates implementing a Personal tab with single sign-on (SSO) authentication. We’re not trying to reinvent the wheel. Instead, we’re making Teams development accessible to cloud-native Python developers.
Along the way, we’ll highlight the entire ecosystem of tools Microsoft provides to make it easy to build and deploy Python apps: Visual Studio Code (VS Code) with the Python extension, Azure Functions extension, and Microsoft Authentication Library for Python (MSAL).
Using this article as a tutorial, you can implement the whole application step-by-step from scratch. Alternatively, you can download the source code from GitHub and jump to the configuration steps to quickly get it up and running. You should know Python and have a free Azure account to follow this tutorial, and we’ll show you how to work with Azure Functions, Teams, and other Microsoft solutions.
Implementing SSO in a Teams Application
Our Teams app uses Flask, a Python-based micro web framework that renders HTML content using the Jinja web template engine.

When the serverless functions first load, they read an HTML template from disk and cache it in a variable to quickly render the web page HTML.
We’re building an app with Python and Flask to render HTML content, but instead of creating a server-side back end, we’re building a serverless app. Serverless means that we’re not relying on traditional web servers. Instead, we’re using HTTP Trigger functions to execute Python code with Flask and Jinja. These functions take in static HTML and JavaScript and provide a client-side Teams Tab with the HTTP responses containing web pages and tokens.

This application consists of only four Azure Functions: get-user-access-token, index, auth-start, and auth-end. Azure Functions are great for small apps like the Teams Personal tab we’re building. Serverless functions offer you simplified code, greater scalability, and quicker release time with reduced costs compared to traditional server-centric infrastructure.
Creating the Application Using Visual Studio Code
This section will guide you through constructing a basic project running Azure Functions on top of a Python project.
First, download and install Visual Studio Code. Then, create a new local directory structure like below:
\PythonTeamsApps
     +-- \PersonalTabSSO
Next, type code. in your terminal to open the selected folder in Visual Studio Code:
\PersonalTabSSO>code .

Then, click the Extensions tab to search for and install “Azure Functions”:

The Azure Functions extension enables you to quickly create, debug, manage, and deploy serverless apps directly from VS Code. These tools provide seamless integration with your Azure account, allowing rapid development and straightforward deployment.
Now, search for and install the Python extension:

Microsoft’s Python extension for VS Code provides rich support for the language, including IntelliSense, debugging, code navigation and formatting, and refactoring.
Now it’s time to create our first Azure functions. Select the Azure tab and click the Create Function icon within the Functions section:

But wait, we still have no function project on Azure. We’re creating it locally now to upload it to the cloud later. When the popup asks if you would like to create a new project, click Yes.

As you can see from the list that appears, Azure functions support many programming languages, including Python, JavaScript, TypeScript, C#, PowerShell, and Java. Choose Python:

Then, select the latest Python interpreter version (at the time of writing, 3.9.7).

Now we choose the template for our function project. Azure Functions triggers come in many forms to suit various scenarios, depending on when the functions should run. For example, you might want a function to run once a day at 10 PM. Or you might want it to run whenever a message queue processes an item or when someone uploads a new image to the Blob storage.
In our app, we want HTTP triggers, which will respond to HTTP requests from the Teams tab:

Now we name the Azure function: az-function-index.

Then, we provide the authorization level. We make it public by choosing Anonymous:

That’s it! We now have our first Azure function:

We now repeat this process until we have four HTTP trigger functions:
az-function-get-user-access-tokenaz-function-indexaz-function-auth-startaz-function-auth-end

Now, we select the Functions group and click the Deploy to the Function App button:

We still have no Function App in Azure, so we create it by clicking the first option, + Create new Function App in Azure.

We name the project personal-tab-sso-function-app:

Observe how VS Code now displays a new folder, where you can conveniently browse data from your Function App stored in the Azure cloud, including files, logs, and settings:

Click the Explorer tab to see your source code. Note that (1) each Azure Function is a different Python module, (2) the host.json metadata file contains configuration for all Functions in a Function App instance, and (3) the local.settings.json file provides the settings when the app is running locally.

Now, press F5 to run the function app:
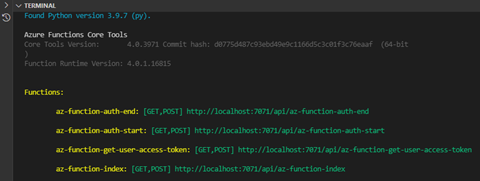
As the screenshot shows, all four HTTP triggers are running locally at the 7071 port:
az-function-auth-end: [GET,POST] http://localhost:7071/api/az-function-auth-endaz-function-auth-start: [GET,POST] http://localhost:7071/api/az-function-auth-startaz-function-get-user-access-token: [GET,POST] http://localhost:7071/api/az-function-get-user-access-tokenaz-function-index: [GET,POST] http://localhost:7071/api/az-function-index
You can test any of the HTTP triggers by opening them in a browser:

Observe how the HTTP response is just plain text. Later, we’ll explore making the Azure Functions respond with full HTML content rendering inside a Microsoft Teams tab.
Registering the Application on Azure
Before sending an access request to Teams, we must register a new application in the Azure Active Directory (AAD) App Registrations portal and create a secret that the app uses to authenticate to Azure. Follow the steps below to set up your new app registration.
First, install ngrok. Ngrok is a reverse proxy that creates a secure “tunnel” from a public endpoint to local web services. Microsoft Teams doesn’t allow local URLs for tabs, but we can overcome this limitation by using ngrok and exposing our HTTP trigger Azure Functions running locally.
So, we run the following command in our terminal:
\ngrok.exe http -host-header=rewrite 7071

Every time you run ngrok, it generates random URLs. In this example, the 7071 port from localhost tunnels to an ngrok public URL:
https://6081-2804-14c-bf2f-a532-f10d-9764-5d93-b171.ngrok.io to
http://localhost:7071
Continue the rest of this tutorial without closing the ngrok window.
This registration must also give Teams access to return data to an application endpoint. Using the ngrok URL above and replacing the 3978 port with the 7071 port, follow the instruction steps for this process in the Teams Tab SSO Authentication README. You can use the same steps to register your Teams Python application with Azure AD.
If everything goes smoothly, your App Registration in the Azure portal will show the Redirect URI link pointing to the ngrok URI, with the Implicit grant and hybrid flows check-marked:

Also, ensure that the App ID URI points to the ngrok URI in the Expose an API tab.
 Testing the Application in Teams
Let’s now upload our basic Python app to Microsoft Teams.
First, download the files from the original C# project appPackage folder. Then, create an appPackage folder in your project root. Move the downloaded files there.

Next, open the manifest.json file. Below are the configurations needed, so Microsoft Teams knows how to integrate with our Python app. Replace the missing information with the data from the app you registered in Azure:
{
  "$schema": "https://developer.microsoft.com/json-schemas/teams/v1.5/MicrosoftTeams.schema.json",
  "manifestVersion": "1.5",
  "version": "1.0.0",
  "id": "<<MICROSOFT-APP-ID>>",
  "packageName": "com.contoso.teamsauthsso",
    "developer": {
    "name": "Microsoft",
    "websiteUrl": "https://www.microsoft.com",
    "privacyUrl": "https://www.microsoft.com/privacy",
    "termsOfUseUrl": "https://www.microsoft.com/termsofuse"
    },
    "name": {
      "short": "Python Personal Tab SSO",
      "full": "Python Personal Tab SSO"
    },
    "description": {
      "short": "Python Personal Tab SSO",
      "full": "Python Personal Tab SSO"
    },
  "icons": {
    "outline": "outline.png",
    "color": "color.png"
  },
    "accentColor": "#FFFFFF",
    "staticTabs": [
        {
            "entityId": "index",
            "name": "Personal Tab",
            "contentUrl": "https://****-****-***-****-****-****-****-****-****.ngrok.io/api/az-function-index",
              "scopes": [
                "personal"
            ]
        }
    ],
    "permissions": [
        "identity",
        "messageTeamMembers"
    ],
    "validDomains": [
        "*.ngrok.io",
        "<<AZURE-FUNCTION-APP>>.azurewebsites.net"
    ],
    "webApplicationInfo": {
        "id": "<<MICROSOFT-APP-ID>>",
        "resource": "api://****-****-***-****-****-****-****-****-****.ngrok.io/<<MICROSOFT-APP-ID>>"
    }
}
Next, zip the three files. Alternatively, you can customize the color.png and outline.png images to identify your app better.

Now, open Microsoft Teams and select the Apps tab. Click Upload a custom app:

Then, select the .zip file you’ve just created:

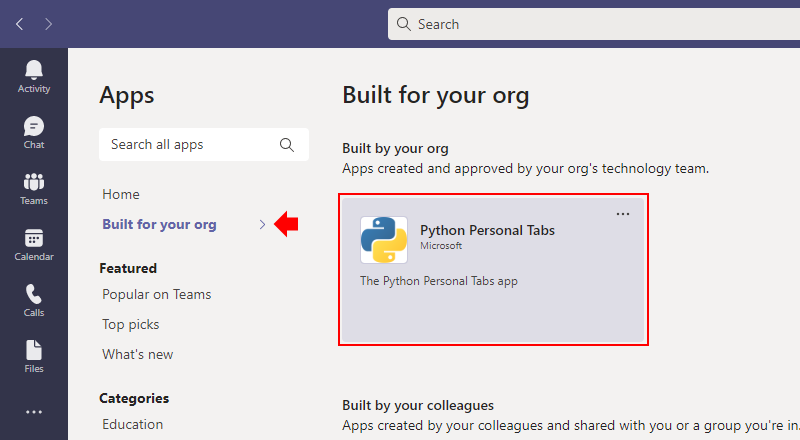
Select the new Python Personal Tabs app within the Built for your org section:
Next, open the app:

Notice how Teams displays the specific contents of your custom Python app:
 Preparing the Python Code
We created this app from Microsoft’s C# sample of the Teams Tab SSO Authentication app. Let’s examine how we ported the C# app controller actions to HTTP trigger functions in our new Python app:
| C# App Controller Action | Python App HTTP Trigger Function | Result |
| HomeController/Index | az-function-index | HTML content |
| HomeController/GetUserAccessToken | az-function-get-user-access-token | Token string |
| AuthController/Start | az-function-auth-start | HTML content |
| AuthController/End | az-function-auth-end | HTML content |
As we stated at the beginning of the article, the Python and Flask code that the HTTP trigger functions execute will serve HTML content. Depending on whether the cache setting is enabled, the Flask code serves static content from the files or directly from the cache.
Caching
To implement the caching functionality, create a cacheHelper.py file with the following contents:
from flask import render_template
import os

class CacheHelper:
    function_directory = ''
    cache = dict()
    cacheDisabled = False
    def __init__(self, function_directory):
        self.cacheDisabled = (os.environ.get("CacheEnabled") == "false")
        self.function_directory = function_directory

    def get_file(self, file):
        base_path = os.path.dirname(f"{self.function_directory}function.json")
        file_path = f"{base_path}{file}"
        with open(file_path, 'r') as f:
            return f.read()

    def render_cached_page(self, app, template):
        if self.cacheDisabled or template not in self.cache:
            app.root_path = os.path.dirname(app.root_path)
            auth_js = self.get_file("/static/js/auth.js")
            self.cache[template] = render_template(template, context = { "AzureClientId": os.environ.get("ClientId"), "auth_js": auth_js })
        return self.cache[template]
As we can see above, if the CacheEnabled setting is true, the code tries to bypass the file system and serve content from the cache.
Installing Flask and Adding Static Files
The Flask render engine requires some static files to render them as web pages inside Teams tabs.
So, first, install Flask:
pip install Flask
Then, download and copy the auth.js JavaScript file from GitHub to the [project root]\static\js\auth.js path. We had adapted this file from the C# sample app’s original auth.js file.
Next, download and copy the templates folder from GitHub and paste them to the project root.
Ensure your local project now contains these static files:
PersonalTabSSO
    +-- static
          +-- js
            +-- auth.js
    +-- templates
          |-- base.html
          |-- index.html
          |-- auth_start.html
          +-- auth_end.html
Implementing Flask-Based Azure Functions
Now, replace the contents of the \az-function-index\__init__.py file with the following code:
import azure.functions as func
from flask import Flask
import sys
from cacheHelper import CacheHelper

app = Flask(__name__)

this = sys.modules[__name__]
this.cacheHelper = None

def main(req: func.HttpRequest, context: func.Context) -> func.HttpResponse:
    if this.cacheHelper is None:
        this.cacheHelper = CacheHelper(context.function_directory)
    return func.WsgiMiddleware(app).handle(req, context)

@app.route("/api/az-function-index")
def index():
    return this.cacheHelper.render_cached_page(app, "index.html")
What does this code do? As we can see, the main function is the entry point that handles the calls to the HTTP trigger. The main function then delegates control to the Flask app route, which gathers the HTML and JavaScript strings and renders them into a final string to deliver as HttpResponse.
Next, replace the contents of the \az-function-auth-start\__init__.py file with the following code:
import azure.functions as func
from flask import Flask, render_template_string
import sys
import os
from cacheHelper import CacheHelper

app = Flask(__name__)

this = sys.modules[__name__]
this.cacheHelper = None

def main(req: func.HttpRequest, context: func.Context) -> func.HttpResponse:
    if this.cacheHelper is None:
        this.cacheHelper = CacheHelper(context.function_directory)
    return func.WsgiMiddleware(app).handle(req, context)

@app.route("/api/az-function-auth-start")
def auth_start():
    return this.cacheHelper.render_cached_page(app, "auth_start.html")
Then, replace the contents of the \az-function-auth-end\__init__.py file with the following code:
import azure.functions as func
from flask import Flask
import sys
from cacheHelper import CacheHelper

app = Flask(__name__)

this = sys.modules[__name__]
this.cacheHelper = None

def main(req: func.HttpRequest, context: func.Context) -> func.HttpResponse:
    if this.cacheHelper is None:
        this.cacheHelper = CacheHelper(context.function_directory)
    return func.WsgiMiddleware(app).handle(req, context)

@app.route("/api/az-function-auth-end")
def index():
    return this.cacheHelper.render_cached_page(app, "auth_end.html")
Implementing the az-function-get-user-access-token Function
Now we replace the contents of the \az-function-get-user-access-token\__init__.py file with the following code:
from flask import Flask
import azure.functions as func
from flask import Flask
import sys
from ssoAuthHelper import GetAccessTokenOnBehalfUser

app = Flask(__name__)
this = sys.modules[__name__]
this.function_directory = None

def main(req: func.HttpRequest, context: func.Context) -> func.HttpResponse:
    this.function_directory = context.function_directory
    return func.WsgiMiddleware(app).handle(req, context)

@app.route("/api/az-function-get-user-access-token")
def GetUserAccessToken():
    return GetAccessTokenOnBehalfUser()
Then create a new Python file at ssoAuthHelper.py:
from flask import request
import msal
import os

app = msal.ConfidentialClientApplication(
    client_id=os.environ.get("ClientId"),
    authority="https://login.microsoftonline.com/" + os.environ.get("TenantId"),
    client_credential=os.environ.get("AppSecret"))

class AuthError(Exception):
    def __init__(self, error, status_code):
        self.error = error
        self.status_code = status_code

def GetAccessTokenOnBehalfUser():
    idToken = get_token_auth_header()
    dic = app.acquire_token_on_behalf_of(user_assertion=idToken,
        scopes=["https://graph.microsoft.com/User.Read"])
    if "error" in dic.keys():
        return json.dumps(dic)
    else:
        return dic["access_token"]

def get_token_auth_header():
  """Obtains the Access Token from the Authorization Header
  """
  auth = request.headers.get("Authorization", None)
  if not auth:
      raise AuthError({"code": "authorization_header_missing",
                        "description":
                        "Authorization header is expected"}, 401)

  parts = auth.split()

  if parts[0].lower() != "bearer":
      raise AuthError({"code": "invalid_header",
                        "description":
                        "Authorization header must start with"
                        " Bearer"}, 401)
  elif len(parts) == 1:
      raise AuthError({"code": "invalid_header",
                        "description": "Token not found"}, 401)
  elif len(parts) > 2:
      raise AuthError({"code": "invalid_header",
                        "description":
                        "Authorization header must be"
                        " Bearer token"}, 401)

  token = parts[1]
  return token
Deploying the Python Application to Microsoft Teams
Our coding is already in place, and we’re just a few steps away from testing the app. Follow the next instructions to provide the appropriate configuration for integrating the app with your Azure account and running it inside Microsoft Teams.
First, open the local.appsettings.json file.

Then, click the Azure tab and choose Download Remote Settings. This action will fill the local.settings.json file with the configurations stored in your Azure functions app.

Next, include the following configurations in the local.settings.json file: Instance, TenantId, ClientId, AppSecret, AuthUrl, and CacheEnabled:
{
  "IsEncrypted": false,
  "Values": {
    "AzureWebJobsStorage": "DefaultEndpointsProtocol=https;AccountName=personaltabssofunctionap;AccountKey=*************************************;EndpointSuffix=core.windows.net",
    "FUNCTIONS_WORKER_RUNTIME": "python",
    "FUNCTIONS_EXTENSION_VERSION": "~4",
    "WEBSITE_CONTENTAZUREFILECONNECTIONSTRING": "DefaultEndpointsProtocol=https;AccountName=personaltabssofunctionap;AccountKey=********************************************;EndpointSuffix=core.windows.net",
    "WEBSITE_CONTENTSHARE": "personal-tab-sso-function-app45e3c0",
    "APPINSIGHTS_INSTRUMENTATIONKEY": "********-****-****-****-************",
    "Instance": "https://login.microsoftonline.com/",
    "TenantId": "********-****-****-****-************",
    "ClientId": "********-****-****-****-************",
    "AppSecret": "***************************************************************",
    "AuthUrl": "/oauth2/v2.0/token",
    "CacheEnabled": "false"
  }
}
Then, upload the local settings to the cloud:


Now your Python app can access environment variables containing your Azure app registration, as well as the CacheEnabled configuration to enable or disable caching HTML content.
Back in Teams, open or refresh your custom app to see how the az-function-index HTTP trigger function renders the start page inside your Personal tab:
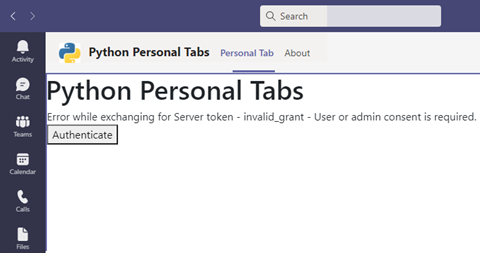
As the screenshot shows, Teams may present an Authenticate button. If so, click the button to proceed with the login dialog:

This dialog invokes the az-function-auth-start and az-function-auth-end HTTP trigger functions to complete the authentication that the SSO flow requires.
Confirm your permission consent next. Now the JavaScript code in the auth.js file renders your personal data inside the Personal Tabs app:

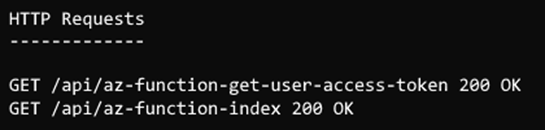
Now open the terminal to see how the ngrok is responding to the HTTP requests from the Teams tab app:
Teams Tab Authentication Explained
You may be wondering how we provided SSO for our Microsoft Teams app.
This app uses the web-based Azure AD authentication approach to get Graph scopes, which involves displaying an Azure AD consent dialog box. Let’s explore this approach’s steps, illustrated with some code snippets.
The Teams tab invokes the app's /api/az-function-index HTTP trigger Azure function endpoint configured in the manifest.json file:
"staticTabs": [
    {
        "entityId": "index",
        "name": "Personal Tab",
        "contentUrl": "https://*********/api/az-function-index",
        "scopes": [
            "personal"
        ]
    }
In the tab, the getClientSideToken function in auth.js invokes the microsoftTeams.authentication.getAuthToken method:
function getClientSideToken() {
  // some code
  microsoftTeams.authentication.getAuthToken({
  // some code
}
The getAuthToken function tells Teams to obtain a client access token for the tab application.
Teams requests the HTTP Trigger Azure function endpoint at /api/az-function-get-user-access-token, which in turn delegates control to the Flask function at GetUserAccessToken using a Web Server Gateway Interface (WSGI) Middleware:
def main(req: func.HttpRequest, context: func.Context) -> func.HttpResponse:
    this.function_directory = context.function_directory

    return func.WsgiMiddleware(app).handle(req, context)

@app.route("/api/az-function-get-user-access-token")
def GetUserAccessToken():
    return GetAccessTokenOnBehalfUser()
The GetUserAccessToken function calls the ssoAuthHelper to exchange the client token with the server-side token using Azure Active Directory (AAD) on-behalf-of flow to access the Microsoft Graph APIs at graph.microsoft.com:
app = msal.ConfidentialClientApplication(
    client_id=os.environ.get("ClientId"),
    authority="https://login.microsoftonline.com/" + os.environ.get("TenantId"),
    client_credential=os.environ.get("AppSecret"))

def GetAccessTokenOnBehalfUser():
    idToken = get_token_auth_header()
    dic = app.acquire_token_on_behalf_of(user_assertion=idToken,
        scopes=["https://graph.microsoft.com/User.Read"])
    if "error" in dic.keys():
        return json.dumps(dic)
    else:
        return dic["access_token"]
Suppose the exchange fails (for example, the current user uses your tab application for the first time). In that case, the /api/az-function-index displays an Authenticate button that triggers an AAD consent dialog box using our AAD authentication API. This dialog box invokes the /api/az-function-auth-start and the /api/az-function-auth-end HTTP trigger Azure Functions to request user consent.
function requestConsent() {
  getToken()
    .then(data => {
    $("#consent").hide();
    $("#divError").hide();
    accessToken = data.accessToken;
    microsoftTeams.getContext((context) => {
      getUserInfo(context.userPrincipalName);
      getPhotoAsync(accessToken);
    });
  });
}

function getToken() {
  return new Promise((resolve, reject) => {
    microsoftTeams.authentication.authenticate({
      url: window.location.origin + "/api/az-function-auth-start",
      //some code here
If the grant is valid, AAD sends the tab access token to the Teams application.
Then, Teams sends the tab access token as part of the result object that the getAuthToken() call returns.
The auth.js running in the tab application parses the server-side response. If the response contains an error, the grant is not valid and the code prompts the user to give the app consent. Otherwise, the JavaScript code extracts the token to parse user information, including picture, first name, name, and email address:
.then((response) => {
    if (response.ok) {
        return response.text();
    } else {
        reject(response.error);
    }
})
.then((responseJson) => {
    if (IsValidJSONString(responseJson)) {
        if (JSON.parse(responseJson).error)
            reject(JSON.parse(responseJson).error);
    } else if (responseJson) {
        accessToken = responseJson;
        console.log("Exchanged token: " + accessToken);
        getUserInfo(context.userPrincipalName);
        getPhotoAsync(accessToken);
    }
});
Moving the Teams App to the Cloud
Your fabulous Teams app is up and running, but you still can’t share it with other people in your organization. Follow the instructions below to make adjustments and move your app to the cloud.
First, in VS Code, open the requirements.txt file and include Flask and Requests dependencies:
azure-functions
flask==2.0.2
requests==2.25.0
Then, click the Azure tab and find the Local Project folder under the Functions section. Click the Deploy to Function App icon to start uploading your Function App to Azure:


Then, go to your App Registrations Blade, open your app, and edit the Redirect URI to match your Function App URI:
Replace:
https://****-****-***-****-****-****-****-****-****.ngrok.io/api/az-function-auth-end
With:
https://<<YOUR-FUNCTION-APP>>.azurewebsites.net/api/az-function-auth-end

Next, open the Expose an API tab and edit the Application ID URI as follows:
Replace:
api://****-****-***-****-****-****-****-****-****.ngrok.io/<<YOUR-APP-CLIENT-ID>>
With: https://<<YOUR-FUNCTION-APP>>.azurewebsites.net/api/az-function-auth-end

Now, open the manifest.json file. Next, increment the version from “1.0.0” to “2.0.0”, for example. Then, edit the staticTabs > contentUrl value as follows:
Replace:
https://****-****-***-****-****-****-****-****-****.ngrok.io/api/az-function-index
With:
https://<<YOUR-FUNCTION-APP>>.azurewebsites.net/api/az-function-index
Next, edit the webApplicationInfo > resource value as follows:
Replace:
api://****-****-***-****-****-****-****-****-****.ngrok.io
With:
api://<<YOUR-FUNCTION-APP>>.azurewebsites.net
Now, zip the appPackage directory’s contents into a manifest.zip file.
In Teams, click the ... button on your app card. Click Update to replace the app with the new version.

Now, choose the manifest.zip file you’ve just created. Then, open your Python Personal Tab SSO. Now your app is hosted on Azure cloud instead of your local project, and you can share it with other people in your organization.
Next Steps
We've just experienced how well the Visual Studio Code, Azure Serverless Functions, and Microsoft Teams app stack supports Python developers.
As a programming IDE, Visual Studio Code provides a series of facilities for Python coding. The Python extension offers rich support for the language, including IntelliSense, debugging, code navigation and formatting, and refactoring. The Azure Functions extension lets you quickly create, debug, manage, and deploy serverless apps directly from VS Code. These tools provide seamless integration with your Azure account, enabling rapid development and straightforward deployment.
In this series’ following two articles, we'll explore how to build Channel and Group Tabs and Tabs with Adaptive Cards using Python and Azure Functions.
Sign up for a free trial of Azure and discover how easy it is to create and run Python-based Teams apps on Azure serverless functions or continue to part two.
To learn more about how to build apps for an individual, your team, your organization, or for all Microsoft Teams users everywhere, check out Develop apps for Microsoft Teams.