Introduction
Oracle is a well know IT company which is continuously giving cutting edge technologies to their customers. Result is, it also create opportunities for developers to start work on latest technology. Few years back, Oracle has introduced a hybrid framework called Oracle ADF Mobile, that is, develop once and deploy on many.
In this article, I will demonstrate how to start working on new platform. I have seen many developers stuck on very basics. I will try my best to demonstrate the Hello World tutorial so that any naive person can start development and may benefit with this new framework.
NOTE: I have pasted images for elaboration, so this article may seems lengthy but it is easy to implement.
Background
There are few links posted below that may help you to understand what is Oracle ADF Mobile as I will be start developing immediately. So you these links might help you to establish development environment.
- What is Oracle JDeveloper
- What is Oracle ADF Mobile
- Develop ADF Mobile Environment
Please go through these links and setup development environment. If there is any issue, please let me know.
Using the code
I assume that you have configured the development environment.
Followings are the steps for beginners to start work on ADF Mobile.
In this section, we will create an
app that will display a simple text Hello
World on button click.
<o:p>
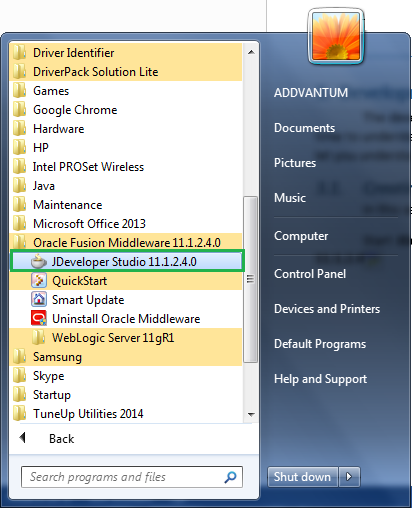
Start JDeveloper
Studio. Go to Start->All
Programs->Oracle Fusion Middleware 11.1.2.40->JDeveloper Studio 11.1.2.40.
If
it prompts for Select Role, the
select Studio Developer (All Features)
which is default, click OK.

From
top Menu, select Application and then New…
A
dialog will open showing different types of project options. Select the Mobile Application (ADF) and click OK.
A
new dialog will open with heading Name
your application, in Application
Name: enter your any application name that you are going to develop. I have
named it MyFirstApp, and in Application Package Prefix: enter any
application package prefix. Common practice is to name your package with small
letters. I have named it myapp. After
setting application and package prefix, click Next.
In
the Project 1 name page, enter
project name or keep going with default name, i.e. ApplicationController. We will be using default name. You can
change the directory or keep going with default. After setting values, click Next.
In Project 1 Java Settings page, keep
going with default value, i.e. myapp.application
the click Next.
In Project 2 Name page, keep going with
default settings and click Next.
In Project 2 Java Settings page, keep the
default package name and click Finish.
As
soon as you click on Finish, ADF
creates two projects for you, you can see those projects in Project pane at left side of IDE. And
it also opens adfmf-feature.xml page.
It is a page where you can add different features. More on this in succeeding
sections.
While
adfmf-feature.xml page opened, if no
then expand ViewController->Application
Sources->META-INF->adfmf-features.xml, In Features: section click on button to add new feature to your application.
Feature is a component or module of your application. It can
be a page (html or asmx), or a flow task. We will elaborate it as soon as we
keep developing apps and explore different scenarios. <o:p>
Clicking
on will open a dialog box that will prompt for feature
name. You can add any feature name. As we are going to have only one mobile
screen, so we name it FirstPage. After
that click OK.
It
will add the feature FirstPage in xml
feature file (adfmf-feature.xml) that was opened by default.
Just
below the Features tab, you can see
the General tab, go to the Content tab, you can see that Id and Type: is automatically added. Note that, type of the feature is ADF Mobile AMX, you can change it from
drop down menu but here we will go with default option. After that, click on against File
section.
When
you click on button against File: section, it will show two options, ADF Mobile AMX Page… and Task
Flow, go for first option.
A
dialog will open, add File Name, and
in Page Facets section, check all
and click OK.
Now
you can see the first.amx page. It
is where you design UI of your app. This is only one screen. From bottom right
corner of first.amx page, drag it to
left and in right pane, click Preview.
Here you can see the preview of your UI and any changes that you make in xml
file will reflect here.
Now
from Component Palette, drag an Output Text from Text and Selection section and drop it on first.amx page.
It
will show OutputText1 as default
value. Note that you have to drag and drop control on xml source file, not on
preview.
Now
selecting amx:outputText, go to Property Inspector pane located at
bottom right corner below Component
Palette. We will change its Value
using Expression Builder.
In
the same Property Inspector window, got to the drop down arrow and click on Expression Builder….
It
will open Expression Builder dialog. In the expression field, add an
expression, #{viewScope.actionevent}
and click OK. More on viewScope will be discussed later in
coming sections.
Note
that as soon as you have changed the value of output text to an expression, it
is also visible on preview window.
Now
drag a Button from Component Palette
and drop it on first.amx page just
like we did for OutputText. Drop it
below amx:outputText.
Now we need to add button’s event handler. When a button is
clicked, we will change output text value to Hello World. We will be doing this using Java Managed
Beans
classes.<o:p>
Now,
keep selecting the amx:commandButton
or just take the blinking cursor on the command button, it will show the
property inspector window just like it was previously showing for amx:outputText control. Go to the Button Action section in Property
Inspector window and click on drop down button against Action Listener: and then Edit….
It
will open a dialog box where you need to specify the Bean class. As we haven’t
created yet any java bean class, click on New
to create the new one.
It
will prompt for required fields, enter them and click OK.
After
we have added bean class, we need to specify the method that we will be invoked
whenever a button is clicked. Click on the New…
to add the new method.
Enter
method name and click OK.
After
you have specified both, the class and method, click OK view the generated class. It is located in ViewController->Application
Sources->myapp.mobile->EventHandler.java.
Double
click on it to see the class. It is a class with default constructor and an
event handler method that we added in the previous steps.
Now,
in OnClick method, add the following
lines of code.
<p><img src="764190/dev-hello-34.png" width="488" height="69" /></p><p />
<p style="text-align: left;">Note that it needs two imports:</p><p class="MsoNormal"><o:p /></p><p class="MsoListParagraphCxSpFirst" style="text-align: left; margin-removed 1.25in; text-indent: -0.25in;"><span style="font-family: Symbol;">·<span style="font-size: 7pt; font-family: 'Times New Roman';">
</span> </span><span style="font-family: 'Courier New';">javax.el.ValueExpression</span>
<o:p /></p><p class="MsoListParagraphCxSpLast" style="text-align: left; margin-removed 1.25in; text-indent: -0.25in;"><span style="font-family: Symbol;">·<span style="font-size: 7pt; font-family: 'Times New Roman';">
</span> </span><span style="font-family: 'Courier New';">oracle.adfmf.framework.api.AdfmfJavaUtilities.
</span><o:p /></p><p style="text-align: left;"><span style="font-size: 11pt; line-height: 107%; font-family: Calibri, sans-serif;">Now
we have done. It is time to deploy our app on Android Emulator.</span> </p>
Deployment
To create an Android Emulator, go
to the android sdk directory where you have installed it and go to the tools directory. Like in my case, I
have following directory:
<o:p>
D:\AndroidSDK\adt-bundle-windows-x86_64-20140321\sdk\tools<o:p>
In
tools directory, run android windows batch file. An SDK
Manager window will open. From menu bar select tools and then click on Manage
AVDs….
It will show Android Virtual Device Manager window
that shows all available devices if exists. In my case, I have already created
an android virtual device that I will use to run my app on it. Click Start to run the Android Emulator.<o:p>
NOTE: Make sure that you select or create an emulator
with Google APIs.
Wait
for a while for emulator to show the home screen. Now in JDeveloper studio, go
to the Applications… from menu bar
and select Deploy and then New Deployment Profile…. Note that you
can also use existing one.
From
Profile Type: select ADF Mobile for Android and in Deployment Profile Name enter any name
and click OK.
It
will show Properties window.
In Application Images you can specify your
app icon. We will go with default icon. Click OK to create deployment profile. Now android emulator is running
and now we need to deploy our app on emulator.
In
JDeveloper Studio, go to Applications->Deploy
and then select Emulator…. This is
the same profile that we had created just now.
A
deployment window Deploy Emulator
will be shown. Select Deploy application
to Emulator and click Next.
An
application summary will be shown to you with Application Bundle Id, File
and Deployment Mode.
Now
click Finish to start the deployment
process. You can see the deployment process details in Deployment tab below in Deployment
Log.
When
it completes deploying app, it gives you deployment summary at the end. Deployment
process make take few minutes, so be patient.
Now
the deployment in complete, in android emulator, click on Menu button and find
the MyFirstApp and click on it to
run.
An
Oracle based splash screen will open, wait a while for automatically dismissal
of splash screen. Click on commandButton1
to show hello world text.
Output
Hello World.
Here we have done with creating and deploying our first Hello World app. I hope this tutorial will help you all.
I always open to Bugs, feedback. Please let me know.
Thanks!
Points of Interest
We have learnt how we can use ADF Mobile to build out apps. This is a starter. It might seems that it take more time to develop an app than native Android/iOS development. But the fact is, ADF Mobile enhances your development. It is just like, write once and run any where. As soon as you start developing apps on this you will notice significant difference in development process.
Thank You!
History
None
This member has not yet provided a Biography. Assume it's interesting and varied, and probably something to do with programming.


 General
  News
News  Suggestion
  Question
  Bug
Bug  Answer
  Joke
Joke  Praise
  Rant
Rant  Admin
Admin 


