Introduction
This article presents an MFC implementation of the list-based data input form found on the Windows Mobile Pocket Outlook applications.
Background
Data input on a Windows Mobile device tends to be one of the pain points, both for the user and the developer. While the user requires that the input be clear and easily accessible, the developer requires easy development and maintenance of the input code. I first met this challenge in the 2002-2003 time frame, when developing database applications for the Pocket PC 2002 meant using C++ with MFC and the now defunct ADOCE 3.1 for database access. Application data input was essentially achieved through dialogs, and the design tool was the limited eVC3 / eVC4 dialog editor. Using MFC's dialog data exchange somewhat helped in the dialog development, but this is a two-part process: developing the dialog template, and adding the control code. Things would get hairy when the maintenance cycles started, especially when you needed to add an extra field to an already crowded dialog.
Back then, I found two ways to give some extra room to a dialog: I could either convert it to a property sheet with multiple pages, or implement scrollbars (these were not yet supported by the shell). The property sheet approach wasn't very well suited to extend a dialog because you needed to find a logical way to split the dialog into pages, and the final result was sometimes not very intuitive to use. Also, it required the user to flip through the sometimes numerous pages to get to the data he or she wanted. My approach to a scrollable dialog box was not very convincing due to the visible screen flicker when scrolling. Also, this approach required that all dialog child controls be created at the same time, which was a slowing factor for MFC-based applications which keep all the managed window handles in a map.
Interestingly, Microsoft had solved this problem using a list-based form control on the Pocket Outlook applications for data input. This type of control had the big advantage of being intuitive and easy to use, but the big disadvantage of not having a published API. After a somewhat flawed first attempt, I wrote the set of classes that I present here to implement the CFormListCtrl MFC control. This code was originally developed on the eVC3 compiler in 2004, and was adapted for Visual Studio 2005 for this article. Among the adaptations I wrote are screen resolution and orientation awareness, keyboard support, and the item selection mode.
Implemented user interface
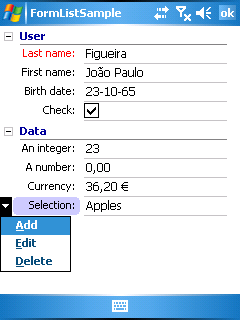
The control user interface is organized in rows, each containing an item. Row items come in two types: groups and data items. A group item is identified by a tree-like plus / minus button that is used to expand and collapse all the contained items. Note that this implementation does not support recursive groups (a group cannot contain another group). The other type of row item is the data item. Each data item contains a text label, and a data area that will display the data to be edited, and the control to edit that data. A string data item displays the string value in the data area, and an edit control when the item is in edit mode.
Only one item can be in edit mode at any time. An item enters the edit mode when the user clicks it, or when the item is selected using the keyboard (up and down arrow) and the user presses the Enter key. Exiting edit mode will depend on the displayed edit control. In the sample code, all numeric values are edited through a calculator-like dialog, and exiting the edit mode on these items requires that the user either clicks the OK or the Cancel buttons. On the other hand, string items leave exit mode when the user navigates away from the item using the navigation up or down keys.
Group items are used the same way as a regular edit item. The user can navigate to a group item using the up and down arrow keys, and the group can be expanded or collapsed by pressing the Enter key. Clicking a group item has the same effect.
Data item captions can be resized with the keyboard or the stylus. The left and right navigation keys will resize the caption size two pixels to the left or to the right for each key press. The user can also click the area between the caption and the data to resize the caption. When a vertical gray line is shown, the user can drag it left or right to set the new caption width.
Data items can have an Options setting that is generally implemented as a context menu on the caption. Items with options are graphically identified with a down arrowhead at the left of the caption text. This feature is activated by the user by clicking the caption.
Using the code
I designed the code to have a very simple usage pattern. First, you must decide where the list control will be hosted. This can either be a dialog or a property sheet. You can create the container either from the dialog editor, or use the enclosed CDialogTemplate class to create a dynamic in-memory dialog template, so you can actually use this code as a component, without any resources involved. When using this technique, make sure you create the list control template with the following styles: LVS_REPORT | LVS_SINGLESEL | LVS_ALIGNLEFT | LVS_NOCOLUMNHEADER | WS_TABSTOP.
Before we create our first form, a brief description of the involved classes is required:
| Class | Description |
|---|
CBaseListCtrl | Base class for the form list control. Handles a few of MFC's idiosyncrasies. |
CFormListCtrl | The form list control. Derive your forms from this class. |
CFormItem | Base class for all data items. Use it as a base class for your custom data items. |
CFormItemGroup | Groups CFormItem objects in a collapsible container. |
CFormItemCheck | Displays a check box. |
CFormItemCombo | Displays a combo box to select from a set of strings. |
CFormItemDateTime | Displays a date or time picker control. Allows to edit date or time, but not both. |
CFormItemNumber | Numeric data item supporting integer, general number, and currency formats. Values are edited using a calculator-like dialog. |
CFormItemString | General purpose string editor. |
The CFormListCtrl class derives from MFC's CListCtrl via CBaseListCtrl. Each item in the form is a CFormItem-derived class. The base class implements the common custom draw logic, leaving to the derived classes the specialized custom drawing implementations as well as managing the input control.
Creating a specialized form
The first step to create a new form is to derive a new class from CFormListCtrl. This will be your specialized form, and all the data items will be declared within it:
class CDemoForm : public CFormListCtrl
{
public:
CDemoForm(void);
virtual ~CDemoForm(void);
CFormItemGroup m_groupUser,
m_groupData;
CFormItemString m_itemFirstName,
m_itemLastName;
CFormItemDateTime m_itemBirthDate;
CFormItemNumber m_itemInteger,
m_itemNumber,
m_itemCurrency;
CFormItemCombo m_itemCombo;
CFormItemCheck m_itemCheck;
virtual BOOL Initialize();
virtual void ItemOptions(CFormItem* pItem);
private:
CMenu m_menuCombo;
};
Initializing the items
Each item is static so you don't have to worry about memory management. Declaring these objects is the first step; the next step in creating the form is to initialize these on the form constructor:
m_groupUser.Init(_T("User"));
m_groupData.Init(_T("Data"));

m_itemLastName .Init(_T("Last name:"), FIF_NORMAL | FIF_MANDATORY);
m_itemFirstName.Init(_T("First name:"));
m_itemBirthDate.Init(_T("Birth date:"));
m_itemCheck    .Init(_T("Check:"));

m_itemInteger .Init(_T("An integer:"), fmtInteger);
m_itemNumber  .Init(_T("A number:"),   fmtNumber);
m_itemCurrency.Init(_T("Currency:"),   fmtCurrency);

m_itemCombo.Init(_T("Selection:"), FIF_NORMAL | FIF_HASOPTIONS);
m_itemCombo.AddString(_T("Apples"),  1);
m_itemCombo.AddString(_T("Oranges"), 2);
m_itemCombo.AddString(_T("Grapes"),  3);
m_itemCombo.SetSel(0);
Item initialization entails setting a caption string and a few other optional parameters. Depending on the item type, the Init parameter list will vary, but one of the most important parameters that is common to all is the flag bitmask:
#define FIF_LINE        0x00000001    // Draw a line at the bottom

#define FIF_VISIBLE     0x00000002    // Item is visible

#define FIF_ENABLED     0x00000004    // Item is enabled

#define FIF_MANDATORY   0x00000008    // Data for the item must be filled in by the user

#define FIF_UNDERLINE   0x00000010    // Underline the caption text

#define FIF_HASOPTIONS  0x00000020    // The item has a context menu (on the caption)

#define FIF_DRAWOPTIONS 0x00000040    // Internal flag

#define FIF_SELECTED    0x00000080    // The item is selected

#define FIF_NORMAL      (FIF_LINE|FIF_VISIBLE|FIF_ENABLED)
By default, all items are created with the FIF_NORMAL flag set. In this sample, I am using two special flags on the first and last data items: FIF_MANDATORY and FIF_HASOPTIONS. The first flag tells the item that data must be filled in before the form is dismissed. Graphically, the item will be displayed with a red caption and a yellow background on the data. The FIF_HASOPTIONS flag marks the item as displaying custom options that are handled by the ItemOptions virtual method.
Before the form is displayed, you can set the items' initial values. Each item has a set of Get and Set functions to transfer the data to and from the item. Please note that the item data is cached, so setting the data after the form is displayed requires that the item be repainted. You can do this with a regular call to CFormListCtrl::RedrawItems, inherited from MFC's CListCtrl.
Form initialization
Form initialization is handled by the virtual Initialize method. This method is inherited from the base class where some initialization does occur (like creating the default fonts and adding the two invisible header columns). Your code must call the base class initialization method before doing its own stuff:
BOOL CDemoForm::Initialize()
{
    if(CFormListCtrl::Initialize())
    {
        EnableEdit(TRUE);

        m_groupUser.AddItem(&m_itemLastName);
        m_groupUser.AddItem(&m_itemFirstName);
        m_groupUser.AddItem(&m_itemBirthDate);
        m_groupUser.AddItem(&m_itemCheck);

        m_groupData.AddItem(&m_itemInteger);
        m_groupData.AddItem(&m_itemNumber);
        m_groupData.AddItem(&m_itemCurrency);
        m_groupData.AddItem(&m_itemCombo);

        AddItem(&m_groupUser);
        AddItem(&m_groupData);

        return TRUE;
    }
    return FALSE;
}
The first line marks this form as editable, while the others create the structure for the form by setting the data items in groups. Note that only the group items are added to the form. This is not mandatory - you can add data items directly to the form, not only to group items. What you cannot do is nest groups.
Item options
Item options allow you to add extra functionality to an item. As I showed above, you must mark an item with options with a flag, and when the user clicks its caption, your form's ItemOptions virtual method will be called with a pointer to the item. Here is how this sample implements this method:
void CDemoForm::ItemOptions(CFormItem *pItem)
{
if(pItem == &m_itemCombo)
{
int iItem;
iItem = FindFormItem(pItem);
if(iItem != -1)
{
CRect rc;
if(GetItemRect(iItem, &rc, LVIR_BOUNDS))
{
CPoint pt(rc.left, rc.bottom);
int nCmd;
ClientToScreen(&pt);
nCmd = m_menuCombo.TrackPopupMenu(TPM_LEFTALIGN |
TPM_RETURNCMD, pt.x, pt.y, this);
switch(nCmd)
{
case ID_COMBO_ADD:
MessageBox(_T("Add new item"), _T("Option"));
break;
case ID_COMBO_EDIT:
MessageBox(_T("Edit item"), _T("Option"));
break;
case ID_COMBO_DELETE:
MessageBox(_T("Delete item"), _T("Option"));
break;
}
}
}
}
}
Here, I am just displaying a context menu right below the Options arrow, but you could implement whatever feature you want, like displaying another dialog. If you want to display a context menu like this sample, please reuse the above code as it correctly positions the context menu below the item caption.
Points of interest
The code I present here is a bit old (2003-2004 time frame), and it required some adaptations for the modern Windows Mobile devices. Back when this code was written, there was only one display resolution and no keyboards on Windows Mobile devices. Now, you have all sorts of devices with and without keyboards or thumb pads, and the display resolutions and screen orientations will vary.
Interestingly, the code was easily adapted using Microsoft's own "device resolution aware" header file (DeviceResolutionAware.h). This file has some very interesting programming techniques that are worth looking at.
Credits
Some of the code in this article was adapted or inspired from the following sources:
I have also used adapted versions of code I previously posted:
History
- 2007-10-19: Code updated to handle a few subtle different behaviors of WM 2003.
- 2007-10-18: Published.
I work on R&D for Frotcom International, a company that develops web-based fleet management solutions.


 General
  News
News  Suggestion
  Question
  Bug
Bug  Answer
  Joke
Joke  Praise
  Rant
Rant  Admin
Admin 


