
How to Setup and Configure Selenium Webdriver With Eclipse and Java
Setup and configure Selenium Webdriver With Eclipse and Java
Introduction
In this tip, we will learn how to setup and configure Selenium Webdriver using Eclipse IDE and Java & run your first test script.
Step 1
In the first step, download and install JDK (Java Development Kit) in your system.
For downloading Java, you need to visit the following link:

Step 2
In the second step, download and install Eclipse from the link below:

Step 3
Download the Selenium Java Client Driver from:

Click on the download link for Java language, you will get a ZIP file named “selenium-2.43.0.zip”. Then extract the contents of this ZIP file on any location say “D:\selenium-2.43.0\”. The unzipped folder contains the ‘libs’ folder, 2 jar files and Change Log.
Step 4
Configure Eclipse to work with Webdriver:
- Double click on ‘Eclipse.exe’ to launch eclipse
- When asked to select for a workspace, just accept the default location. Or, you can change the location.

- Create a new project through File ? New ? Java Project. Name the project as “
MyProject”. - Right-click on the newly created project and select New > Package, and name that package as “
MyPackage”. - Create a new Java class under
MyPackageby right-clicking on it and then selecting New > Class, and then name it as “MyClass”. Your Eclipse IDE should look like the image below:


Step 5
Add Jar Files to the Library:
- Right-click on
MyProjectand select “Build Path” and then “Configure Build Path”.
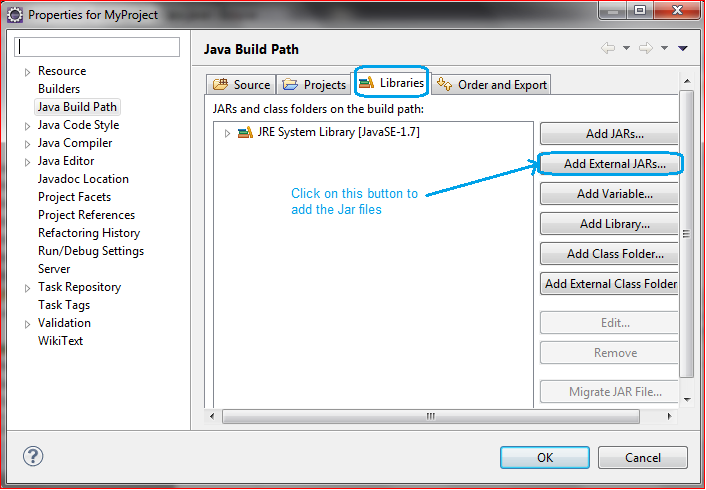
- This will open the Libraries tab in Properties dialog. Then on click “Add External JARs...”
- Navigate to D:\selenium-2.43.0\ (or any other location where you saved the extracted contents of “selenium-2.43.0.zip”).
- Add all the JAR files inside and outside the “libs” folder.
These are the Jar files present outside the Libs folder:

These are the Jar files present inside the Libs folder:
- Then your Properties dialog should look similar to the image below:

- Finally, click on the OK button and we are done with importing Selenium libraries into our project. Now, we are ready to write our test script in Eclipse and run it in WebDriver.


I will give one simple example of creating a webdriver script with explanation in the form of comments.
For this, we need to write the following code into Eclipse:
package MyPackage;
import org.openqa.selenium.WebDriver;
import org.openqa.selenium.firefox.FirefoxDriver;

public class MyClass {

    public static void main(String[] args) {

       //Create a new instance of Firefox Browser
       WebDriver driver = new FirefoxDriver();

       //Open the URL in firefox browser
       driver.get("https://www.google.co.in/");

       //Maximize the Browser window
       driver.manage().window().maximize();

       //Get the current page URL and store the value in variable 'str'
       String str = driver.getCurrentUrl();

       //Print the value of variable in the console
       System.out.println("The current URL is " + str);
   }
}
Now, click on the Run Menu of the Eclipse window to execute the script.
As an output, it will open the Firefox browser, maximize the browser window, get the current page URL and print the value in the console.