Introduction
This post talks about how to enable/disable controls within a column in a grid when a dropdown value changes in another column using KnockoutJs library. The assumption is the reader is aware of the basics of KnockoutJS.
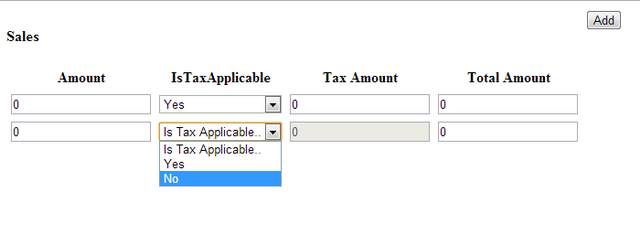
The snapshot above shows what we are trying to achieve. There is a column called "IsTaxApplicable", which when selected to "Yes", will make the Tax Amount enabled, so that the user can go ahead and fill in some information. Similarly, when the user selects "No" in the "IsTaxApplicable" column, the Tax Amount becomes disabled. Also, the Total Amount would be a computed column, which is nothing but the Amount Column + Tax Amount.
Background
Basic Introduction about KnockoutJS:
KnockoutJS is a client side JavaScript library which implements the MVVM pattern. There is an excellent article written on MVVM pattern - http://www.codeproject.com/Articles/100175/Model-View-ViewModel-MVVM-Explained
KnockoutJS is built on three core features:
- Observables and Dependency Tracking
- Declarative Bindings
- Templating
Observables are special JavaScript that notify subscribers about changes and can automatically detect dependencies. Declarative Bindings are to link View Model to the View.
For more information regarding KnockOutJs, check out http://knockoutjs.com/.
There is an excellent Plural Sight Course as well at http://www.pluralsight.com/courses/knockout-mvvm.
Let’s Begin
This sample is created using ASP.NET MVC application, you can create this in any web application.
Open Visual Studio and create an ASP.NET MVC Empty Application. Create a Home Controller within the Controller Folder. Create a folder inside "View" folder named "Home". Right Click and create a view "index.cshtml"
Open Package Manager Console and run the following command to install the KnockoutJS library.
PM> Install-Package knockoutjs
This will bring the KnockoutJS library inside the Scripts folder.
Open the Layout.cshtml and remove all the references for the @scripts and place the following code:
<!DOCTYPE html>
<html>
<head>
    <meta charset="utf-8" />
    <meta name="viewport" content="width=device-width" />
    <title>KnockoutJs Sandbox</title>
    <script src="~/Scripts/jquery-1.7.1.min.js"></script>
    <script src="~/Scripts/knockout-3.3.0.js"></script>
</head>
<body>
    @RenderBody()
</body>
</html>
Let us a create a simple table inside the index.cshtml, which has 4 columns Amount, IsTaxAppicable which will have the options (Yes, No), TaxAmount (which needs to be disabled, when the TaxApplicable is chosen as No), Total Amount (which needs to be computed -> which is Amount + TaxAmount).
<table style="width: 50%">
    <thead>
        <tr>
            <th>Amount</th>
            <th>IsTaxApplicable</th>
            <th>Tax Amount</th>
            <th>Total Amount</th>
        </tr>
    </thead>
    <tbody>
        <tr>
            <td>
                <input type="text" /></td>
            <td>
                <select></select></td>
            <td>
                <input type="text" /></td>
            <td>
                <input type="text"/></td>
        </tr>
    </tbody>
</table>
Once this is done, we need to create a View Model. The following are the variables (observables) that need to be created.
- Amount Observable
- Tax Amount Observable
- Tax Options List (Yes, No) Observable
- Event to handle the Dropdown Change Observable
- Enable / Disable Observable
<script type="text/javascript">
$(function () {
var TaxOptionsList = [{ "Code": "Y", "Value": "Yes" },
{ "Code": "N", "Value": "No" }];
var Sale = function () {
var self = this;
self.Amount = ko.observable(0);
self.TaxAmount = ko.observable(0);
self.isTaxEnabled = ko.observable(false);
self.TaxOptions = ko.observableArray(TaxOptionsList);
self.OptionSelected = ko.observable();
self.TaxOptionSelect = ko.computed({
read: function () { return self.OptionSelected },
write: function (OptionSelected) {
if (OptionSelected == "Y") {
self.isTaxEnabled(true);
}
else if (OptionSelected == "N") {
self.isTaxEnabled(false);
}
}
});
self.TotalAmount = ko.computed(function () {
return Number(self.Amount()) + Number(self.TaxAmount());
});
};
var viewModel = function () {
var self = this;
self.SaleCollection = ko.observableArray([new Sale()]);
self.Addclick = function () {
self.SaleCollection.push(new Sale());
};
};
ko.applyBindings(new viewModel());
});
</script>
TaxOptionSelect is the event which handles the Dropdown Change event, on write event, the OptionSelected is checked to see if the code is "Y", then the isTaxEnabled -> observable is set to true, else it is set to false. In order to hold the selected values, a observable OptionSelected is created.
Total Amount is the computed observable, which is simply just add Amount and Tax Amount. The other code is self-explanatory.
Now let us wire the View Model to the view.
<!--
<button data-bind="click:Addclick">Add</button>
<table style="width: 50%">
<thead>
<tr>
<th>Amount</th>
<th>IsTaxApplicable</th>
<th>Tax Amount</th>
<th>Total Amount</th>
</tr>
</thead>
<!—Iterate through the saleCollection so that whenever a record gets added
it gets shown on to the table -->
<tbody data-bind="foreach:SaleCollection">
<tr>
<td>
<input type="text" data-bind="value:Amount" /></td>
<td>
<!--
<select data-bind="options: TaxOptions, optionsCaption: 'Is Tax Applicable..',
optionsValue: function(item) { return item.Code; }, optionsText: function(item)
{ return item.Value; }, value:TaxOptionSelect,
valueUpdate:'change'"></select></td>
<td>
<!--
<input type="text" data-bind="enable:isTaxEnabled, value:TaxAmount" /></td>
<td>
<input type="text" data-bind="value:TotalAmount" /></td>
</tr>
</tbody>
</table>
This should do and we would get the result as shown in the figure.

This member has not yet provided a Biography. Assume it's interesting and varied, and probably something to do with programming.


