
Understanding App Bar and Command Bar in UWP
0/5 (0 vote)
Understanding app bar and command bar in UWP
In this article, we will discuss how we can understand the App Bar and Command Bar in UWP. We can easily implement App Bar and Command Bar with a sample app in UWP. As you all know AppBar, CommandBar are default classes on Windows.UI.Xaml.Controls package in Windows Runtime APIs. We can use the AppBar only when we are developing universal Windows 8 apps in Windows 8. If you are going to develop new apps in Windows 10, it is highly recommend that you use the CommandBar control instead of AppBar in UWP.
Universal Windows Platform Series
Background
CommandBar is a UI component and its lightweight control that can used in complex content such as images or text blocks as well as simplecommand such as AppBarButton, AppBarToggleButton and AppBarSeparator controls. It can be used with any navigation pattern and three main properties such as PrimaryCommands, SecondaryCommands and Content.
How to Implement AppBar and CommandBar and Run UWP App
We are going to discuss how to implement AppBar and CommadBar with sample apps on UWP and show the demo in multiple devices. We will see the step by step guidelines for the UWP AppBar and CommandBar app creation here.
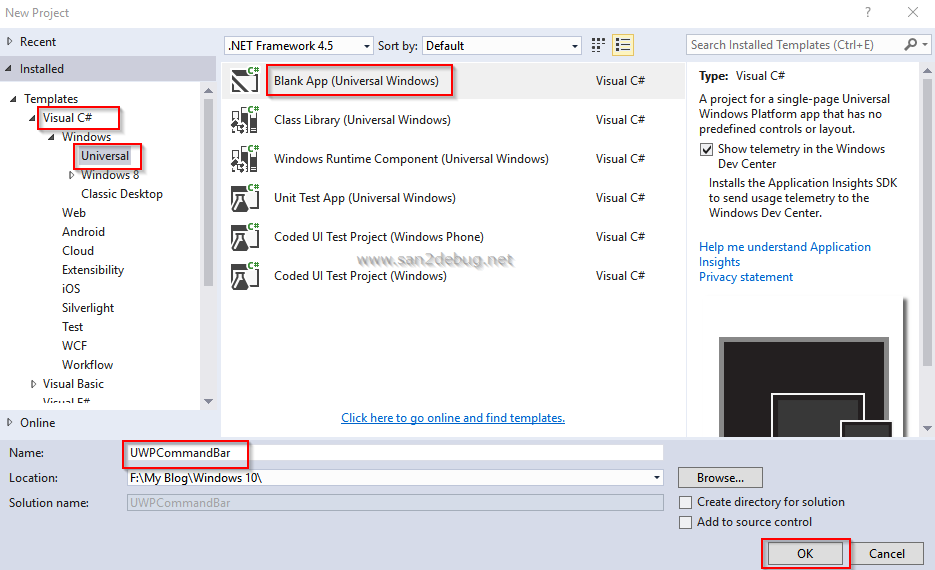
Step 1
Open Visual Studio 2015. Go to file menu, point to new and then click new project. New Project window will open, you can select an installed template like “ Universal” under the Windows on Visual C# Template, and then select a Blank App (Universal Windows) and type Project Name UWPCommandBar.
Choose the project location path and then click on the OK button.
Now, you can see the UWPCommandBar project structure as in the following screen shot.

Step 2
As you all know, we have discussed project folder structure and files in my previous article.
Step 3
As you all know, we have toolbox available on Visual Studio in that which is available on CommandBar control in the below screen shots:

Now, you can see the auto generated code as below:
<Page.BottomAppBar>
        <CommandBar>
            <CommandBar.Content>
                <Grid/>
            </CommandBar.Content>
            <AppBarButton Icon="Accept" Label="appbarbutton"/>
            <AppBarButton Icon="Cancel" Label="appbarbutton"/>
        </CommandBar>
 </Page.BottomAppBar>
Home.xaml
<Page
    x:Class="UWPCommandBar.MainPage"
    xmlns="http://schemas.microsoft.com/winfx/2006/xaml/presentation"
    xmlns:x="http://schemas.microsoft.com/winfx/2006/xaml"
    xmlns:local="using:UWPCommandBar"
    xmlns:d="http://schemas.microsoft.com/expression/blend/2008"
    xmlns:mc="http://schemas.openxmlformats.org/markup-compatibility/2006"
    mc:Ignorable="d">
    <Page.BottomAppBar>
        <CommandBar ClosedDisplayMode="Compact">
            <CommandBar.PrimaryCommands>
                <AppBarButton Name="home" Icon="Home"
                Label="Home" Click="AppHome_Click"/>
                <AppBarButton Name="admin" Icon="Admin"
                Label="Admin" Click="AppAdmin_Click"/>
                <AppBarButton Name="contact" Icon="Contact"
                Label="Contact" Click="AppContact_Click"/>
            </CommandBar.PrimaryCommands>
            <CommandBar.SecondaryCommands>
                <AppBarButton Name="setting"
                Icon="Setting" Label="Setting"/>
            </CommandBar.SecondaryCommands>
        </CommandBar>
    </Page.BottomAppBar>
    <Grid Background="{ThemeResource ApplicationPageBackgroundThemeBrush}">
        <StackPanel>
            <TextBlock Text="Home"
            Padding="25 25 25 25"></TextBlock>
        </StackPanel>
    </Grid>
</Page>
Home.xaml.cs
using System;
using Windows.UI.Xaml;
using Windows.UI.Xaml.Controls;
// The Blank Page item template is documented
// at http://go.microsoft.com/fwlink/?LinkId=402352&clcid=0x409
namespace UWPCommandBar
{
    /// <summary>
    /// An empty page that can be used on its own or navigated to within a Frame.
    /// </summary>
    public sealed partial class MainPage : Page
    {
        public MainPage()
        {
            this.InitializeComponent();
        }
        private void AppHome_Click(object sender, RoutedEventArgs e)
        {
            Frame.Navigate(typeof(MainPage));
        }
        private void AppAdmin_Click(object sender, RoutedEventArgs e)
        {
            Frame.Navigate(typeof(About));
        }
        private void AppContact_Click(object sender, RoutedEventArgs e)
        {
            Frame.Navigate(typeof(Contact));
        }
    }
}
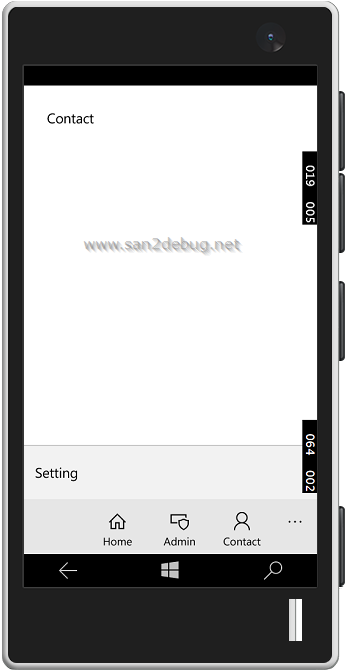
Step 4
Now, if you can run the UWPCommandBar Apps with the different devices, you can see how an app looks, as shown below.
Select a Debug and Mobile Emulator 10.0.10586.0 WVGA4 inch 512 MB option to run the apps.

How to Customize the CommandBar in UWP
We can easily customize the UI/UX based on your requirements in UWP. I have used AppBarSeparator for the UI to look pretty in the sample universal windows apps.
Step 1
<Page.TopAppBar>
        <CommandBar ClosedDisplayMode="Minimal"
        Background="#1FA2E1"></CommandBar>
    </Page.TopAppBar>
    <Page.BottomAppBar>
        <CommandBar ClosedDisplayMode="Compact"
        Background="#1FA2E1">
            <CommandBar.PrimaryCommands>
                <AppBarButton Name="home" Icon="Home"
                Label="Home" Click="AppHome_Click"/>
                <AppBarSeparator/>
                <AppBarButton Name="admin" Icon="Admin"
                Label="Admin" Click="AppAdmin_Click"/>
                <AppBarSeparator/>
                <AppBarButton Name="contact" Icon="Contact"
                Label="Contact" Click="AppContact_Click"/>
                <AppBarSeparator/>
            </CommandBar.PrimaryCommands>
            <CommandBar.SecondaryCommands>
                <AppBarButton Name="setting"
                Icon="Setting" Label="Setting"/>
            </CommandBar.SecondaryCommands>
        </CommandBar>
    </Page.BottomAppBar>
Step 2
Now, if you can run the UWPCommandBar Apps with different devices, you can see how an app looks, as shown below.
Select a Debug and Mobile Emulator 10.0.10586.0 WVGA4 inch 512 MB option to run the apps:

Select a Debug and Local Machine option to run the apps:

Conclusion
I hope you understood the CommandBar, AppBar, Customize UI and run it on multiple devices.
I have covered all the required things. If you find anything that I missed in this article, please let me know.
Please share your valuable feedback or suggestions.