Introduction
The CORBA Application Wizard is meant for programmers that are, like me,
CORBA beginners. The AppWizard is meant to aid in the study of CORBA by getting
rid of the tedious job of always having to enter the same boilerplate code over
and over again e.g. the initialization of the CORBA orb. Instead one can
concentrate on the finer details of CORBA. This article mainly deals with the
requirements needed to use this application wizard. At the end of the article
are some implementation methods that might be interesting for beginners that
want to write their own application wizards.
Background
This Application Wizard has grown out of a sudden interest in CORBA (Common
Object Request Broker Architecture) that started about a two years ago. After
posting a request for the possibility of having CORBA articles placed in
CodeProject and with a reply that I should write some articles to get started, I
decided to do just that.
I started reading the book Advanced
CORBA Programming with C++ by Michi Henning and Steve Vinoski, where most of
the code used to set up the ORB appeared to be boilerplate. So instead of always
typing in the same code over and over again this AppWizard was created to do the
dirty work for me.
WARNING
This is a work ( of art ;-) ) in progress !!!
Not all options available in this Application Wizard will function properly.
The options available will change as the Wizard is thoroughly tested and as
requests for new features are received. I also plan to add new features to the
Application Wizard as I become more familiar and experienced with using
CORBA.
Using CORBA in an MFC or Win32 Application has not yet been tested so results
are as yet unknown. I have not yet seen any examples of a MFC or Win32
Application making use of CORBA but in my opinion the
CDocument-derived class in a MFC Application can probably contain
the CORBA boilerplate code.
You might ask why I have posted this article if the AppWizard isn't yet
complete. Well I started on the Application Wizard a year ago and at least this
way I am forced to work on it and complete it.
Requirements and Setting Up
To be able to use this Application Wizard one needs to have both ACE
(ADAPTIVE Communication Environment) and TAO (The Ace Orb) installed and built
on your computer. The source code for ACE and TAO can be downloaded from www.cs.wustl.edu/~schmidt/ACE
and www.cs.wustl.edu/~schmidt/TAO
respectively.
Set the ACE_ROOT and TAO_ROOT environment variables
by adding the following lines to your Autoexec.bat file:
- SET PATH=%PATH%;E:\ACE_Wrappers\bin
- SET ACE_ROOT=E:\ACE_Wrappers
- SET TAO_ROOT=E:\ACE_Wrappers\Tao\Tao
Complete installation instructions can be found in the documentation provided
with the source code for ACE and TAO.
After selecting Options from the Tools menu, the Options dialog appears.
Click on the Directories tab and show the directories for the include
files. Add the directories, as the image below shows, encircled in red:

Then show the directories for the executable files and add the directory
highlighted below.
where E:\ is the drive where the source code for ACE and TAO has been saved
and ACE and TAO have been built.
Installation
To install the CORBA Application Wizard just download the zip file containing
the DLL and then copy the files after decompression into the directory where all
the other Wizards are located, i.e.
C:\Program Files\Microsoft Visual Studio\Common\MSDev98\Template
Getting Started
After selecting the Projects tab of the New dialog, click on CORBA AppWizard
and type in a suitable project name.
![Image 4]()
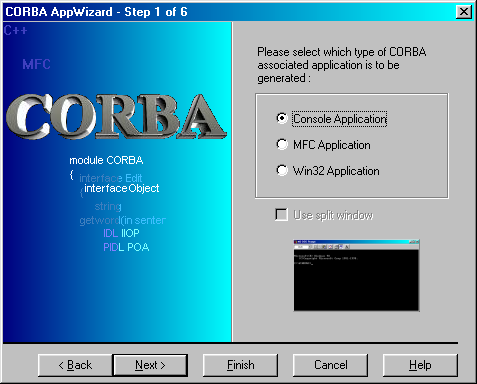
Then click on the OK button. The first step of the Application Wizard will
appear. For a more detailed explanation of how to use the CORBA Application
Wizard see the tutorial Using the CORBA
Application Wizard.
Points of Interest
Below are some items that might be of interest to
those that are new to creating Application Wizards.
Some of the steps have options that are only enabled when certain options are
selected in previous steps. For example if the user selects to create an
application acting as a server in step 2, then the Dynamic Skeleton Interface
option is enabled and the Dynamic Invocation Interface option is disabled in
step 6. If the user selects to create an application acting as a client in step
2, then the Dynamic Invocation Interface option is enabled and the Dynamic
Skeleton Interface option is disabled in step 6.
All the various options available in each step are initialised in the
OnInitDialog function of the corresponding dialog. This is fine if
the user doesn't suddenly change his mind and go back a few steps to select a
different option. If the user selected the server option in step 2 and has
reached step 6 then as stated above the Dynamic Skeleton Interface option is
enabled. However if he decides to go back to step 2 and selects the client
option then on reaching step 6, the Dynamic Skeleton Interface option will still
be enabled. This is because the OnInitDialog function is only
called once and that is when the dialog is created. The dialogs representing
each step aren't created when there is movement between the various steps,
because all the dialogs have already been created in the constructor of the
CDialogChooser class. In the constructor an array of pointers is
set up with each array element pointing to a specific dialog:
CDialogChooser::CDialogChooser()
{
  m_pDlgs[0] = NULL;

  m_pDlgs[1] = new CCustom1Dlg;

  m_pDlgs[2] = new CCustom2Dlg;

  m_pDlgs[3] = new CCustom3Dlg;

  m_pDlgs[4] = new CCustom4Dlg;

  m_pDlgs[5] = new CCustom5Dlg;

  m_pDlgs[6] = new CCustom6Dlg;

  m_nCurrDlg = 0;
}
To get the OnInitDialog function to be called again, thus
enabling the correct options, one needs to have the respective dialog created as
the step comes active. This is done by the following code in the
Next function:
CAppWizStepDlg* CDialogChooser::Next(CAppWizStepDlg* pDlg)
{
ASSERT(0 <= m_nCurrDlg && m_nCurrDlg < LAST_DLG);
ASSERT(pDlg == m_pDlgs[m_nCurrDlg]);
m_nCurrDlg++;
int pos = m_nCurrDlg;
switch (m_nCurrDlg)
{
case 1 : m_pDlgs[m_nCurrDlg] = new CCustom1Dlg;
break;
case 2 : delete m_pDlgs[--pos];
m_pDlgs[pos] = NULL;
m_pDlgs[m_nCurrDlg] = new CCustom2Dlg;
break;
....
}
return m_pDlgs[m_nCurrDlg];
}
The same goes for the Back function:
CAppWizStepDlg* CDialogChooser::Back(CAppWizStepDlg* pDlg)
{
ASSERT(1 <= m_nCurrDlg && m_nCurrDlg <= LAST_DLG);
ASSERT(pDlg == m_pDlgs[m_nCurrDlg]);
m_nCurrDlg--;
int pos = m_nCurrDlg;
switch (m_nCurrDlg)
{
case 1 : delete m_pDlgs[++pos];
m_pDlgs[pos] = NULL;
m_pDlgs[m_nCurrDlg] = new CCustom1Dlg;
break;
....
case 6 : m_pDlgs[m_nCurrDlg] = new CCustom6Dlg;
break;
}
return m_pDlgs[m_nCurrDlg];
}
In CCustom3Dlg one can enter the name of more than one
interface. These are saved in the dictionary under a macro NAME_x.
The count of the total number of interfaces are stored in another macro
INTERFACES, which can be used in $$BEGINLOOP. If the
names Quoter and QuoterFactory are stored in the
dictionary under the macros NAME_0 and NAME_1
respectively, with the number 2 stored in INTERFACES
then the following:
$$BEGINLOOP(INTERFACES)
  interface $$NAME$$
  {

  };

$$ENDLOOP
will become
interface Quoter
{

};

interface QuoterFactory
{

};
Still to do
Additional features to be added:
- Support for Dynamic CORBA
- Support for CORBAServices
- IDL compiler options
If it is possible:
- Add a new project to the workspace created, so that when the workspace is
eventually displayed it will contain two projects.
This is for when the user
selects the "Server and Client" option.
- Add folders and their relative files to the newly added project.
References and Further Information
History
- 3 November 2003 - First public release.
- 12 October 2002 - Started developing and writing the Application Wizard.
I am a qualified Veterinary Surgeon who prefers treating computers with viruses than animals with viruses. I have recently completed a MEng German Informatics degree at the University of Reading with a 2:1. I also have the ISEB Foundation Certificate in Software Testing.
Currently I am umemployed and desparately looking for a job in the IT industry.


 General
  News
News  Suggestion
  Question
  Bug
Bug  Answer
  Joke
Joke  Praise
  Rant
Rant  Admin
Admin 


