
BusyBar
4.84/5 (77 votes)
The only progress bar you will ever need
Introduction
There are a lot of articles about progress bars (about a dozen in CodeProject [^] ) and they all have different properties. My aim in writing BusyBar was to make all the different styles available in one control. I have coded about twenty-five styles, but the real beauty of BusyBar is that it is easily extendable. I hope that people will give me new styles as they write them, to include in this project.
Using the Code
First, you must add BusyBar to your project. I have packaged BusyBar as a single C# source file (BusyBar.cs) and its associated RESX file (BusyBar.resx). Visual Studio is a bit temperamental, so please follow these instructions in order:
- Copy the two files to your project directory.
- Add a reference to System.Design.dll to your project.
- Add BusyBar.cs to your project; BusyBar.resx will be added automatically.
- Open BusyBar.cs in the designer; I have no idea why this is necessary.
- Compile your project.
- Add your assembly to your toolbox.
Here are detailed instructions for the "Add your assembly to your toolbox" step (it's not that obvious):
- Display your toolbox.
- Select the "My User Controls" tab on your toolbox.
- Right-click and select "Add/Remove Items..."
- The "Customize Toolbox" dialog appears.
- Click "Browse..."
- Browse to the (project)/bin/Release folder and select your *.exe.
- Click "OK."
I have also now packaged it in a control library, as requested for VB.NET developers. You should now have the BusyBar control and some Painter components in your toolbox. Note that, they will only be enabled when you have a form open in design view. You are now ready to add a BusyBar control to your form. First, a quick diagram to help you to understand how BusyBar works:
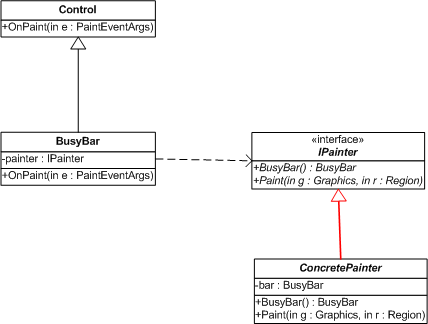
The BusyBar class is a custom control, and handles the control stuff, like the CornerRadius, and the data properties, like the minimum, maximum and current values. It is also responsible for drawing the border, but it delegates the rest of the painting to an instance of IPainter. I have written some implementations of IPainter, each of which has various Preset settings.
You are now ready to add an instance of BusyBar to your form. This will draw the border, but you need to select an IPainter to draw the client area. You can do this in one of three ways:
- Add an instance of one of the Painters to your form ( they all derive from
Component), and set thePainterObjectproperty of yourBusyBarto point to your Painter. This is probably the easiest way. You can then set the properties of your Painter from within the form designer. Note that all the Painters have aPresetproperty. This is not persisted, but setting it will set the properties of yourBusyBarand Painter to some predefined values. - Set the value of the
PainterPresetproperty of yourBusyBarto one of the enumeration values. At runtime, theBusyBarwill create an instance of the corresponding Painter. You can access this object through thePainterWorkerproperty of yourBusyBar, and set its properties in the code behind your form. - Do it all in code. You can set either the
PainterObjectorPainterPresetproperties of yourBusyBarin code, and then set the Painter's properties through thePainterWorkerproperty as above. This is the way to use a custom Painter if you write your own.
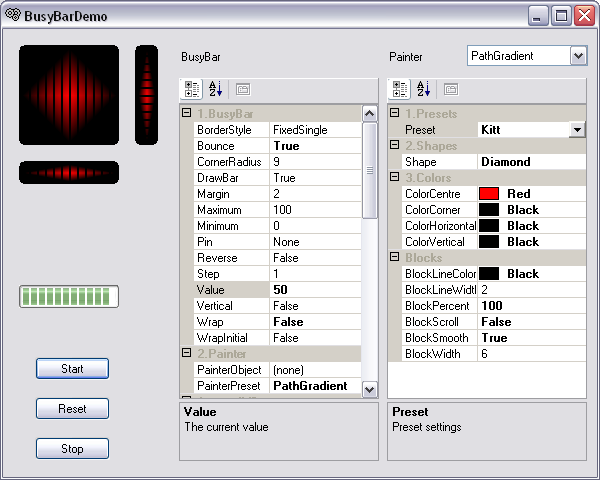
And that's it. :) You can use the demo to test various settings, and to see the different styles available so far.
Adding Design-time Bitmaps
You will notice that the BusyBar control and the Painter components have default bitmaps in your toolbox. If you want pretty bitmaps, you have to follow a few more steps:
- Add the bitmaps to your project. Create a new folder called "Bitmaps" in your project and copy the bitmap files into it.
- Set the Build action. Select the bitmap files in Solution Explorer and change the "Build Action" property to "Embedded Resource."
- Set your default namespace. There is a class called
ResFinderdefined at the top of the BusyBar.cs file. Change the value of theDefaultNamespaceconstant to your default namespace. See "Points Of Interest" for an explanation. - Build your project. You may have to Rebuild your Solution.
- Delete the old Toolbox items from your toolbox.
- Add your assembly to your toolbox again.
You should now have shiny new bitmaps showing in your Toolbox :)
The Painters
This section will help you to choose a Painter, and explain the properties specific to each. I haven't included images of the different presets as there are too many. You can run the demo to see examples of what is possible.
PainterLine
This was the first painter I wrote, just to test the BusyBar control. So it's quite simple, but may be of some use. It only has one preset, "Bar," which sets the width of the line to 50, so it appears as a block of colour.
PainterXP
This is an attempt to replicate the .NET ProgressBar control. This Painter introduces the concept of "Blocks." When the BlockLineWidth property is greater than 0, a series of lines are drawn over the bar. When the BlockLineColor property is set to the BackgroundColor of the control, this splits the bar up into blocks.
It has two presets: "System," which sets the Bar.Pin property to BusyBar.Pins.Start, which anchors the bar on the left or top sides; and "Startup," which is a copy of the bar XP shows at startup.
PainterPathGradient
This is one of the most useful and configurable Painters. It uses a PathGradientBrush to paint the bar, which means you can set the colour gradient in two dimensions. Set the Shape property to one of the enumeration values to specify the base shape, and then set the Color properties to define the brush.
It has five presets: "Kitt," "Circle," "Startup," "Startup2003" and "Noise." These show the large range of effects that this Painter can produce. You get points if you know where the "Kitt" preset comes from :)
PainterClock
This Painter works best for a larger, square or slightly rectangular BusyBar control. It draws 12 marks round the edges, and two "hands" that rotate. It has two presets: "Watch" and "Circle." Note that the "Watch" preset is in CP colours!
PainterSillyscope
This Painter is supposed to imitate an oscilloscope. The line is drawn as a GraphicsPath. This is defined by the Shape and Points properties. If the Shape property is set to Line, then path.AddLines( points ) is called to create the path. This just results in straight lines connecting the points.
If the Shape property is set to Curve, then path.AddCurve( points, 1, points.Length - 3, tension / 100f ) is called to create the path. This results in curves connecting the middle points. The two end points are not drawn, they are just there to define the curvature at the start and end of the path. So this Shape requires at least four points.
If the Shape property is set to Bezier, then path.AddBeziers( points ) is called to create the path. This results in curves connecting the points. This Shape requires one point for the start position, and then three more points to describe each segment. So it must have 4, 7, 10, ... (1 + 3n) ... points.
Note that the "size" of the path described by the points array does not matter. The path is scaled according to the HorizontalScale and VerticalScale properties, which are percentages of the BusyBar control client area. Also, if the control is in Vertical mode, the path is rotated 90 degrees clockwise, so the points array must always be set horizontally.
There are a few presets in this Painter. "Triangle", "Square" and "Saw" are based on the Line shape; "Sine" is based on the Curve shape; and "Bezier" is based on the Bezier shape. The other two presets, "Circle" and "Heartbeat" are just for fun :)
PainterInstall
This Painter is a copy of the progress bar shown during an OS installation. I wrote it from memory; I think it's about right. It has two presets: "Install," which is the classic install bar, and "LED," which imitates a row of (blue) LEDs.
PainterFrustratoBar
This is a joke (I hope). It displays a bar that looks like the one in IE. It displays the log of the value, so it seems to go fast at first, and then slows down. Then it resets itself when it reaches a specified percentage, so it never gets to 100%. This was requested (honest)!
Writing Your Own Painter
All Painters must implement the IPainter interface :
    public interface IPainter : ICloneable
    {
        IPainter CreateCopy();
        BusyBar BusyBar { get; set; }
        void Reset();
        void Paint( Graphics g, Region r );
    }
You probably want to inherit from one of the existing classes. The derivation structure looks like this :
    IPainter
        PainterBase
            PainterLine
            PainterBlockBase
                PainterXP
                    PainterFrustratoBar
                PainterPathGradient
            PainterClock
            PainterSillyscope
            PainterInstall
If you derive from PainterBase, you just have to override the CreateCopy and Paint methods. PainterBase holds a reference to the BusyBar control, which it makes available through the protected Bar property. It also handles the ICloneable interface.
The Paint method is the most interesting. It is called from the OnPaint method of the BusyBar control, after it has drawn the border. The Graphics parameter enables you to do your drawing, and the Region parameter defines the client area available to you. The clip region of the Graphics object is already set to this Region.
The best way to understand this design is to have a look at the existing concrete Painter implementations.
Note: To test your Painter in the demo, alter the Painter property of Form1 to return an instance of your Painter (it's at the end of Form1.cs ). You will then be able to play with the settings from the PropertyGrids.
Have fun :)
Points of Interest
Getting the design-time bitmaps to work was a real pain. When Visual Studio embeds a resource, it pretends the default namespace to the name, and this is not configurable ( someone thought this was a good idea! ). Because BusyBar.cs is designed to be included in any project, the default namespace cannot be known. So I added a class called ResFinder in the default namespace, but you have to set the DefaultNamespace constant manually. I could not find a way around this :(
Bob Powell's website was a great help, in particular his article "How to find the elusive ToolboxBitmap icon" [^].
Conclusion
BusyBar provides a lot of functionality out of the box, but I hope that people will write more extensions, and email them to me to be included in updates of this article. Appropriate credit will of course be given.
I have had fun writing this, especially the "Kitt" and "Heartbeat" presets were quite gratifying. I hope you like what I have done :)
History
- 19th May 2005 : Version 1
- 26th May 2005 : Version 2
- Fixed the threading bug in the demo.
- Removed SCC links as requested.
- Packaged in a strong-named library assembly as requested.
- Added preset "Startup" to
PainterXP. - Added preset "Startup2003" to
PainterPathGradient. - Added
PainterInstallwith two presets.
- 27th May 2005 : Version 3
- Fixed bug when
Minimumwas not zero. - Added
PainterFrustratoBaras requested.
- Fixed bug when