
WPF - Bind to Opposite Boolean Value Using a Converter
4.41/5 (22 votes)
Learn how to use a value converter for binding to the opposite of a boolean value
Introduction
A co-worker came to me the other day and asked how she could enable a TextBox when a particular radio button was not selected in WPF. The problem she noted was that she couldn't directly bind the Textbox.IsEnabled property to the RadioButton.IsChecked property. What she really wanted to do was bind IsEnabled to !IsChecked. This article provides an introduction to value converters in WPF using a simple and practical example of a BoolToOppositeBool converter.
Sample Project
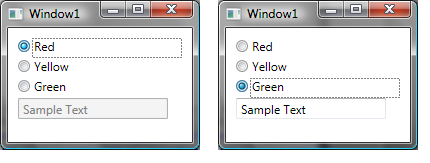
The sample scenario for this article is a WPF Windows application with three radio buttons and a TextBox. When the Red radio button is selected, we want the TextBox to be disabled. When any other radio button is selected, we want the TextBox to be enabled. The OppositeBoolConverter discussed in this article is used so that we can leverage data binding.
What are Value Converters?
As the name implies, a value converter converts one type to another. Converters are frequently used in data binding scenarios where the target type and the source type are not the same. Value converters are used heavily in WPF because XAML attributes are strings, but these strings often need to be converted into objects. For instance, the string value of red for a background in XAML needs to be converted to a Color object representing red.
Creating a Custom Converter
To create a custom converter, simply create a class implementing the System.Windows.Data.IValueConverter interface. This interface defines two methods:
Convert- Converts sourcevalueto targetvalueConvertBack- Converts targetvalueto sourcevalue, used for two-way databinding
If you are only using one-way databinding, you only need to implement the Convert method, which is what I have done. In the case of the BoolToOppositeBoolConverter, the Convert implementation returns the opposite boolean value of what was passed in.
public class BoolToOppositeBoolConverter : IValueConverter
{
    #region IValueConverter Members

    public object Convert(object value, Type targetType, object parameter,
        System.Globalization.CultureInfo culture)
    {
        if (targetType != typeof(bool))
            throw new InvalidOperationException("The target must be a boolean");

        return !(bool)value;
    }

    public object ConvertBack(object value, Type targetType, object parameter,
        System.Globalization.CultureInfo culture)
    {
        throw new NotSupportedException();
    }

    #endregion
}
Using the Converter
Once you have created a custom converter, the next step is to leverage that in data binding by adding the Converter property to a binding expression and specifying an instance of the Converter. In order to implement the scenario of binding a TextBox's IsEnabled property to a radio button's IsChecked property, I first imported the namespace of my Converter into the XAML file:
xmlns:wpfdude="clr-namespace:OppositeValueConverterDemo.Converters"
Next, I created an instance of the Converter as a resource of the Window, with a key of oppositeConverter:
<Window.Resources>
    <wpfdude:BoolToOppositeBoolConverter x:Key="oppositeConverter" />
</Window.Resources>
Finally, I specified the instance of the Converter to use in the binding expression for my TextBox:
<TextBox Height="21" Width="150" Name="textBlock1" Text="Sample Text"
     IsEnabled="{Binding ElementName=radRed, Path=IsChecked,
        Converter={StaticResource oppositeConverter}}" />
That's all that is needed to use a custom converter! The complete XAML for my demo is:
<Window x:Class="OppositeValueConverterDemo.Window1"
 xmlns="http://schemas.microsoft.com/winfx/2006/xaml/presentation"
 xmlns:x="http://schemas.microsoft.com/winfx/2006/xaml"
 xmlns:wpfdude="clr-namespace:OppositeValueConverterDemo.Converters"
 Title="Window1" Height="150" Width="200" >
    <Window.Resources>
        <wpfdude:BoolToOppositeBoolConverter x:Key="oppositeConverter" />
    </Window.Resources>
    <StackPanel Margin="10,10,10,10">
        <RadioButton IsChecked="True" Height="20" Name="radRed">Red</RadioButton>
        <RadioButton Height="20" Name="redYellow">Yellow</RadioButton>
        <RadioButton Height="20" Name="redGreen">Green</RadioButton>
        <TextBox Height="21" Width="150" Name="textBlock1" Text="Sample Text"
             IsEnabled="{Binding ElementName=radRed, Path=IsChecked,
                Converter={StaticResource oppositeConverter}}" />
    </StackPanel>
</Window>
Summary
The data binding features of WPF minimize the need to write code and value converters extend the scenarios where data binding can be applied. Implementing your own custom value converters can sound intimidating. I hope this article showed that creating one isn't something you need to shy away from.
History
- 13th March, 2008: Initial post