
MaChat - a chat with a browser for LANs
4.97/5 (26 votes)
Jul 29, 2002
11 min read
590084
12434
This article shows how to create a Chat for Local Area Networks which uses the WebBrowser control to display the messages.
- MaChat project - 663 Kb
- Setup - 356 Kb (see Installation process)
- Setup with mshtml.dll - 1,25 Mb (see Installation process)

Introduction
Recently I've been asked by my friends to write a chat for LAN. I thought it's a great idea. Meanwhile the MC++ competition was announced so it encouraged me to put more effort into making the app. And, of course, I decided I go in for the competition. In this article I'll describe what the program does and how it works. I demonstrate how to reuse some of the implemented features.
I split the text into several parts:
- MaChat - here you'll find a MaChat's description
- Installation process
- Network - this part shows how to take advantage of the ChatLibrary in your programs:
- WebBrowser - if you always wondered how, for example, VS.Net start page or Norton Antivirus UI works, this paragraph may interest you.
- Channel browser - modifying HTML during runtime
- Scripts - invoking scripts embedded on the page
- Handling context menu - replacing the standard context menu
- User Interface
MaChat
MaChat - the name was thought up by my friend - is a chat for Local Area Networks. It supports HTML because it's based on the IE control. The chat converts emoticons to the images which come from CP thanks to Chris Maunder. Moreover, the user can browse the net inside the IDE.
MaChat was tested in a LAN. 3 systems take part in the tests: 2 WinXP and Win98 SE. I'm still testing it so if I find any bug or get a bug report I'll correct it and update the article.
Below you can see 3 screens:


Installation process
I provided two setups. The smaller one - 356 Kb - is intended for systems were the .NET SDK is installed. The bigger one is - 1,25 Mb - for systems were only the .Net redistributable are installed. It's caused by the fact that when the .NET SDK is installed the mshtml.dll file ( an interop assembly of the mshtml.dll) is present in the system. Otherwise it must be added to the setup.
Network
The heart of every chat is network communication because the application's performance depends on it. First of all, I had to choose the best protocol and communication type. UDP\IP is connectionless and doesn't make unnecessary network traffic so it's suitable. Next, I had to select between broadcasting and multicasting. I think that multicasting is better because it only sends data to the computers which are in the group. This type of connection reduces the network traffic. In
.NET Framework there is a class which wraps the UDP protocol and multicasting - System::Net::UdpClient.
I've written a library in MC++ called ChatLibrary which is responsible for sending and receiving data. It's channel-divided and message-orientated which means that if you want to do something you need to send a suitable message to a suitable channel.
ChatLibrary::MessageHeader
Below you can see the MessageHeader class definition and the MessageType enumeration.
MessageHeader holds data which will be send. First field - Type - describes the aim of the message. For example, you want to refresh the remote users list and their information, all you need to do is to send a message of type
MessageType::Refresh and the remote hosts will answer with a message of type
UserInfo containing an UserInfo class in the Object field. In Object field you can store whatever you want but the object must be derived from
System::Object. Furthermore, it and each of it's members must be marked with a
[Serializable] attribute because the instance is serialized into a stream using Binary Formatter, send and deserialized on the other sides. Third field Sender contains the sender's
EndPoint (IP address and port ). It's always set by the Send function of either Chat or Channel classes. The same is with the last field - Channel, which specifies the destination channel.
You can manually create a MessageHeader instance and send it or you can you high-level functions which will do the job for you.
[Serializable]
public __gc class MessageHeader
{
public:
    // Constructors
    MessageHeader::MessageHeader();
    MessageHeader::MessageHeader( MessageType eType );

public:
    __property MessageType get_Type ( ) { return m_eType; }
    __property void set_Type ( MessageType eType ) { m_eType = eType ; }

    __property Object* get_Object ( ) { return m_obObject; }
    __property void set_Object ( Object* obObject ) { m_obObject = obObject; }

    __property IPEndPoint* get_Sender ( ) { return m_ipeSender; }
    __property void set_Sender ( IPEndPoint* ipeSender ) { m_ipeSender = ipeSender; }

    __property String* get_Channel ( ) { return m_strChannel; }
    __property void set_Channel ( String* strChannel ) { m_strChannel = strChannel; }

private:
    String* m_strChannel;        // Destination channel
    MessageType m_eType;        // Message type
    Object* m_obObject;            // Object
    IPEndPoint* m_ipeSender;    // Sender's IPEndPoint
};

// Message types
[Serializable]
public __value enum MessageType
{
    Unknown             = 0,    // Unknown message

    // User
    Join                = 1,    // Join the chat or a channel
    Leave               = 2,    // Leave the chat or a channel
    Refresh             = 3,    // Refresh users list
    UserInfo            = 4,    // Contain user info

    Invite              = 5,    // Invite user to join the channel

    // Topic
    Topic               = 6,    // Contain a new topic
    CheckTopic          = 7,    // Topic request
    CheckTopicResponse  = 8,    // CheckTopic response

    // Visual messages
    Text                = 9,    // Simple text
    Image               = 10,    // Image message
    Note                = 11,    // Contain a short message/note

    // Other
    Beep                = 12,    // Beep message
};
ChatLibrary::Chat
Chat is the main class which connects to a specified multicast group and opens a port for listening. After creating the Chat class you should initialize the LocalUser field which represents a local user. You can specify user's nickname, image, state, focus state and tag. Next, set EventHandlers to receive the notification of the common events. Chat class has the following ones:
// Events
__event MessageEventHandler* UserJoinMsg;
__event MessageEventHandler* UserLeaveMsg;
__event MessageEventHandler* UserUpdateMsg;
__event MessageEventHandler* InviteMsg;
__event MessageEventHandler* NoteMsg;

__event MessageEventHandler* UnknownMsg;
__event MessageEventHandler* NotHandledMsg;
After that you need to call Chat->Join function with local port number, multicast group IP and multicast group port. Currently, the local port number and multicast group port must be the same. The multicast group IPs are addresses between 224.0.0.0 and 239.255.255.255 but several of them are reserved: 224.0.0.0, 224.0.0.1, 224.0.0.2, 224.0.1.1, 224.0.0.9, 224.0.1.24.
m_chChat = new Chat();

// Set LocalUser info
m_chChat->LocalUser->NickName = "Michael";
m_chChat->LocalUser->State = UserState::Normal;
m_chChat->LocalUser->Image = image;                // bitmap

// Set EventHandlers
m_chChat->UserJoinMsg += new MessageEventHandler( this, OnUserJoin );
m_chChat->UserLeaveMsg += new MessageEventHandler( this, OnUserLeave );
m_chChat->UserUpdateMsg += new MessageEventHandler( this, OnUserUpdate );

// Join the net
m_chChat->Join( 7001, new IPEndPoint( IPAddress::Parse( "239.255.255.255" ), 7001 );
After a while the remote users will send messages of type MessageType::UserInfo and a delegate
Chat->UserJoinMsg will be invoked giving you a chance to update the users list. Property
UsersInfo of type UserInfoCollection holds the actual remote users list during the whole session of the chat.
ChatLibrary::Channel
As I said earlier ChatLibrary is channel-divided. This feature allows you to create public, private
channels (currently, it isn't supported by the library but you can achieve this, see
MaChat\ChatProxy.cpp: CreateChannel and CreateChannelP functions) and channels with a specific target. The list of all channels is available through Channels property
Creating a channel is a very easy task. Look at the following example:
Channel* channel = new Channel( m_chChat );
channel->Name = strName;
channel->ConnectionType = ChannelConnectionType::MulticastGroup;

// Set EventHandlers
channel->UserJoinMsg += new MessageEventHandler( this, OnUserJoin );
channel->UserLeaveMsg += new MessageEventHandler( this, OnUserLeave );
channel->TextMsg += new MessageEventHandler( this, OnText );
channel->ImageMsg += new MessageEventHandler( this, OnImage );
channel->TopicChanged += new ChangeEventHandler( this, OnTopicChange );

channel->Join();
channel->CheckTopic();
First of all, you need to create a Channel class. The constructor takes one parameter: pointer to the
ChatLibrary::Chat class. Then set the name of the newly created channel and it's connection type. And here we stop for a while because the connection type requires some explanation. For the channels with a small number (2-3) of users you can use direct connection so set
ConnectionType to Direct, for large ones use MulticastGroup and the data will be send to all users through the multicast group. Use Auto for dynamically channels
public __value enum ChannelConnectionType
{
    Auto            = 0,    // Switch between MulticastGroup and Direct
                            // depends on the number of the users
    MulticastGroup  = 1,    // Use multicast group to communicate
    Direct          = 2,    // Send data directly to the remote hosts
};
Next, you can set EventHandlers. Some of them are similar to the Chat delegates like
UserJoinMsg but some don't occur in the Chat class, for example, TextMsg,
TopicChanged. Finally, call Join function ( if the channel with the same name already exist the exception will be thrown ). Furthermore, if you joining an existing channel it's good to get its topic so call
CheckTopic.
Now you're ready to send messages. You can do it by calling Send function which is overloaded both in Chat and Channel classes.
WebBrowser
I decided to use AxWebBrowser control ( IE control ) as a channel browser because it gives a great flexibility and simplicity to format text and images. If the user knows HTML then he/she can change text size, color, decoration, or event send a table. Detailed information about inserting the control you can get from Nikhil Dabas's article - Using the WebBrowser control in .NET. Here I'll describe how to parse and edit HTML documents during runtime, how to invoke scripts and how to handle context menu
But before we start, we need to create an interop assembly from mshtml.dll. The file contains about 4000 interfaces which supports parsing the HTML document. It's not required if the .NET Framework SDK is installed but you must redistribute the file with your app or create it during the install process. All you need to do is to run a tlbimp utility:
tlbimp c:\windows\system32\mshtml.dll
and wait a few minutes because the library is big - the output file is about 8 MB. Next, copy the file to the app directory.
Channel browser
Now it's time to start the show. I'll try to explain you how the channel browser works. Below you can see it.
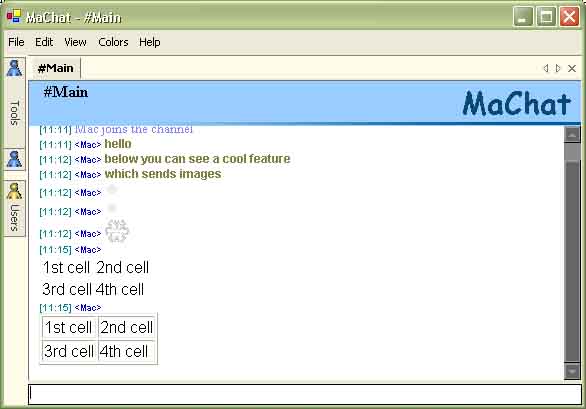
The page consists of 2 frames, the upper has id header and the lower one has id main. After the page is loaded the app parses the document and try to gets interfaces required to operate the page. These are:
mshtml::IHTMLWindow2* m_windowMain;
mshtml::IHTMLWindow2* m_windowHeader;
mshtml::IHTMLElement* m_elementMainBody;
mshtml::IHTMLElementCollection* m_arLinks;
The first 2 are the frame representation and allow to invoke scripts. The interface
mshtml::IHTMLElement is a base for every HTML tag. We need to get the body element of the lower frame. And finally the interface
mshtml::IHTMLElementCollection which is a collection of all links in the document.
First of all, we need to get the document interface - mshtml::IHTMLDocument2. It is stored in the
AxWebBrowser->Document. Next, obtain the whole document window doc->frames and it's frames collection.
IHTMLDocument2* doc = static_cast<IHTMLDocument2*>( this->Document );

if ( doc )
{
    // Obtain window interface
    IHTMLWindow2* windowFrame = dynamic_cast<IHTMLWindow2*>( doc->frames );

    if ( windowFrame )
    {
        // Check if the window is framed
        IHTMLFramesCollection2* framescol;
        framescol = windowFrame->frames;
If the collection is a valid pointer try to get the frames from the ids. Having obtaining the main frame pointer get the body element doc->body and links collection doc->links.
        if ( framescol )
        {
            // Try to get frame with ID main
            String* strFrame = "main";
            Object* objName = static_cast<Object*>( strFrame );
            Object* obj;
            obj = framescol->item( &objName );
            if ( obj )
            {
                // Covert to IHTMLWindow2 interface and get document
                m_windowMain = static_cast<IHTMLWindow2*>( obj );

                IHTMLDocument2* doc = m_windowMain->document;
                if ( doc )
                    m_elementMainBody = doc->body;

                // Furthermore obtain link collection interface
                m_arLinks = static_cast<IHTMLElementCollection*>( doc->links );
            }

            // And then with ID header
            strFrame = "header";
            objName = static_cast<Object*>( strFrame );

            obj = framescol->item( &objName );
            if ( obj )
            {
                // Covert to IHTMLWindow2 interface
                m_windowHeader = static_cast<IHTMLWindow2*>( obj );
            }
        }
    }
}
Next, we're ready to update the document with the discussion text. It's done by the code shown below.
if ( m_windowMain && m_elementMainBody )
{
    // Add
    String* strBody = m_elementMainBody->innerHTML;
    strBody = String::Format ( "{0}{1}", strBody, strHTML );
    m_elementMainBody->innerHTML = strBody;
}
One thing is not working correctly so far - links. We need to hack them that they open in a new window. ( currently, an external browser opens ). So go through the links collection and set every target property to
_BLANK
// Parse links
for ( int i=0; i<m_arLinks->length; i++  )
{
    Object* obj = static_cast<Object*>( __box(i) );
    IHTMLAnchorElement* anchor = static_cast<IHTMLAnchorElement*>
                                                ( m_arLinks->item( obj, obj ) );
    if ( anchor )
        anchor->target = "_BLANK";
}
Scripts
If we got an interface pointer to the window - mshtml::IHTMLWindow2 - we can invoke scripts which the page contains. The code below sets the topic and the channel's name in the header. It's done by calling a javascript which is located in the header frame and it's called UpdateHeader. Before we do that we need to double \ and ' characters. Otherwise the control will throw an exception.
// We must double \ and ' characters. Otherwise an exception will be thrown.
strChannel = strChannel->Replace( "\\", "\\\\" );
strChannel = strChannel->Replace( "\'", "\\\'" );
strTopic = strTopic->Replace( "\\", "\\\\" );
strTopic = strTopic->Replace( "\'", "\\\'" );

// Create JavaScript function call
String* strHTML = String::Format( "UpdateHeader( \'{0}\', \'{1}\' );",
    strChannel, strTopic );

try
{
    // Invoke
    m_windowHeader->execScript( strHTML, new String("javascript") );
}
catch ( Exception* e )
{
    // Script error handling, try to reload
    LoadNewPage();
}
Handling the context menu
All we need to do this is to define the IDocHostUIHandler interface. It's done in the
WebBrowserEx.h file. Next, we need to implement the interface and set it. The
IDocHostUIHandler can be implemented as a simple class which derives the interface. In the chat the class
MaChat::WebBrowser::WebBrowserEx does the whole job.
// Set the UI handler for the browser to this application
IHTMLDocument2* doc = dynamic_cast<IHTMLDocument2*>( this->Document );
ICustomDoc* custom = dynamic_cast<ICustomDoc*>( doc );
custom->SetUIHandler( static_cast<IDocHostUIHandler*>( this ) );
Now the function ShowContextMenu will be called every time the context menu will be required.
void WebBrowserEx::ShowContextMenu( unsigned int dwID, tagPOINT* ppt,
    [MarshalAs(UnmanagedType::IUnknown)] Object* pcmdtReserved,
    [MarshalAs(UnmanagedType::IDispatch)]Object* pdispReserved)
You can cast the first parameter to type WebBrowser::ContextMenuConstants and you will know what type of menu the control wants. The second is a click location. The third parameter specifies document's interface and the last one is the interface to the element at the screen coordinates specified in ppt.
User Interface
MagicLibrary
The user interface makes use of MagicLibrary. It's a freeware third-party product written in C#. It supports several cool features which makes program looks nicer. It provide a simple way to change color so the interface appearance can be altered. MaChat provides only 5 build-in schemas so far. Another worth mentioning feature, is docking windows. I placed the users list and tollbars in this windows. The user can dock or hide them whatever he/she wants.
Globalization
MaChat uses the new .NET feature - globalization. The user can change the language of the user interface. (Currently, English and Polish). VS.NET almost doesn't support this feature so I had to do it by myself. Here I'll briefly describe you how you can do it for a single class.
A good idea is to create a new empty project called, for example, Resources. It helps in management. After that, go into the project's options and set Configuration Type to Utility.
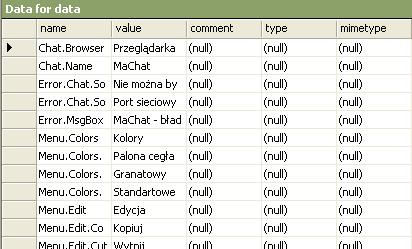
After that, you need to create resX files. One for each language. The picture above shows a resX file opened in the VS.NET. The first column - name - contains the string's IDs, the second one contains text which will be returned. You create as many files as many languages you want to have.
Now the compilation. Go to the project properties window - Building events node. There's a property called Command line. If you click on it a new window appears. Here you need to enter the following line:
resgen MaChat.MainForm.resX $(OutDir)\MaChat.MainForm.resources
for each file you want to include in your project. Note that the resource file must have appropriate name. If you want to use it in a class, for instance, MyProgram::MyForm you need write
resgen Whatever.resX $(OutDir)\MyProgram.MyProgram.resources
If the file contains neutral language (the one compiled in the exe) you don't need to specify any culture identifier ( for available identifiers see
.NET SDK - CultureInfo class ). Otherwise you must add it at the and of the name but before the resource extension. For a Polish resource you need to write
resgen Whatever.resX $(OutDir)\MyProgram.MyProgram.pl.resources
As I said the neutral resources are build in the exe. The rest are compiled into the satellite assemblies, one per language. To the command line you must add the following text:
al /out:$(OutDir)\pl\MyAppName.resources.dll /c:pl
/embed:$(IntDir)\MaChat.MainForm.pl.resources,MaChat.MainForm.pl.resources,Private
replacing the MyAppName with yours, pl ( /c:pl ) with the language identifier for this assembly and the name of the resources files in the embed switch. The embed switch syntax is as follow:
/embed:[path of the resource file],[the namespace through which you will access +
       language identifier + resource extension],[Access specifier]
Each assembly must be located in [app dir]\[culture identifier] directory.
Next we need to add the neutral resources to the exe. Go to the properties window of the app project - Linker\Input node and add all neutral resource files' path to the Embed Managed Resource File property.
Now you're ready to use the ResourceManager in your code. It's very simple:
m_resourcesText = new System::Resources::ResourceManager(
                                           __typeof( MyProject::MyForm ) );
String* strText = m_resourcesText->GetString( strID );
The return string will be of language specified in the System::Threading::Thread::CurrentThread->CurrentUICulture->Name
property. If it's not available the neutral will be returned. You can change the current language using the code shown below:
cultureNeutral = new System::Globalization::CultureInfo( "" );
culturePolish = new System::Globalization::CultureInfo( "pl-PL" );

System::Threading::Thread::CurrentThread->CurrentUICulture = cultureNeutral;
Acknowledgements
Morover I want to thanks the guys listed below:
- The authors of the MagicLibrary
- Maciej Piróg - for help and his icons
- Chris Maunder - for CP emoticons
Contact
If you have any questions, bugs reports or opinions you can send them to GreenSequoia@wp.pl
History
31 July 2002 - updated downloads