
A C# Track Editor
This application is designed to put way points on a track map picture and to set the height of the track points in order to produce a TXT or XML file which resumes the track information.
Introduction
This application is designed to put way points on a track map picture and to set the height of the track points in order to produce a *.txt or *.xml file which resumes the track information. The application uses the ZedGraph library for the plots features and the SharpGL library for the 3D view.
Description
TrackEd is a tool to build track files for an upper level software called SimVE. SimVE is Matlab/Simulink based application which is used for vehicle simulations in energy races like the Shell ecoMarathon. SimVE was developed in 2006 by four students of the ESTACA for the PV3e team. SimVE needs a track file as an input of the simulator and until now, the track files were hand made. So the purpose of the SimVE TrackEd is to build track files in an easy way.
This article deals with the presentation of key points and the main features of the application.
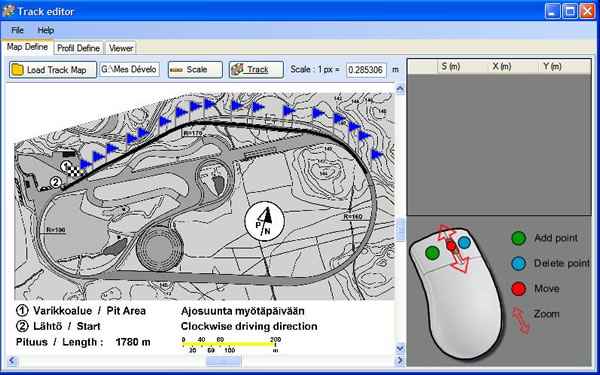
Define Track Map
The definition of the track is divided in two parts. First the track map, I mean the X,Y coordinates of the track points. In order to get the X,Y points, we use a picture of the track seen from upside, then we define the scale and compute the ratio between the length on the picture and the length in reality. After that, the user marks points on the track picture to figure the track path; each point is then converted in the real coordinate system.
To performs those operations, we use two levels of C# components. First level is a control which just displays the track picture and includes view functions such as zoom in and out; move the picture and key functions such as draw a path, add a point to the path, etc. The second layer is a UserControl which includes the previous user control, some control buttons like open the track picture, mode selection (scale or track path) and some callback.
Define Track Profile
The second part consists of defining the height of the track points. To set up the height of the points, we use a table (linear distance since the start, height of the point). Once the table is defined, the height of the track points defined on the map are computed by an interpolation of the height table also called the track profile.
To allow the user to define the track profile, we use a C# UserControl with a datagridview to edit the table and a ZedGraph to plot the table.

View Track File
Once the track is built, the third part of the application consists in viewing that track. There is a tabControl with one tab for the 2-D plots and a tab for the 3D view. The 3D view uses the ShapGL library and a special class inherited from SceneObject has been created for 3D track objects. 

History
- 2nd November, 2008: Initial post