
Rubberband Behavior for WPF ListBox
5.00/5 (15 votes)
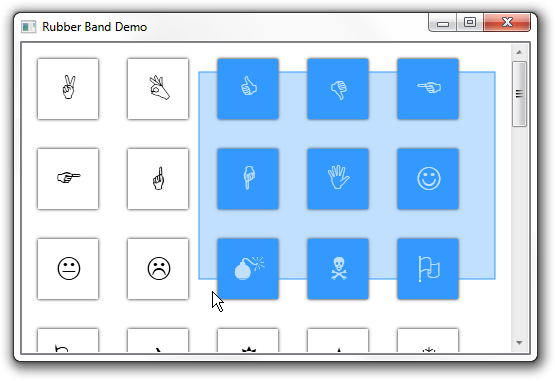
The article describes how to implement Rubberband behavior for WPF Listbox. Also it describes how to add the behavior using Expression Blend.
Introduction
The article describes how to implement Rubberband behavior for WPF Listbox. Also it describes how to add this behavior using Expression Blend.
Background
1. Multiple Selection for WPF Listbox.
http://msdn.microsoft.com/en-us/library/system.windows.controls.listbox.selectionmode
2. Add custom behaviors through Expression Blend
http://msdn.microsoft.com/en-us/library/ee341397(v=expression.40).aspx
Project Structure
The sample project structure goes like this,

Rubberband project contains the corresponding behavior. RubberBand class holds the UI logic to render the rubberband. RubberBandSelection is the demo project which contains the ListBox with Multiple Selection.
Using the code
Let me split the article in 3 sections. First creating a custom behavior in WPF 4.0. And rendering a rubberband adorner in Window. Finally how to add the behavior in Expression blend assets for reuse.
Creating Custom Behavior
Behaviors are used to encapsulate simple pieces of functionality into a single component for easy reuse. The Behaviors can be associated to any WPF object to give an additional behavior to the control. Example of a behaviors are drag&drop, input validation, pan and zoom, re-position of elements, etc... The list of possible behaviors is very long.
Custom behaviors can be created by inheriting from System.Windows.Interactivity.Behavior class.
[DescriptionAttribute("Enable Rubberband selection for a WPF listbox object.")]
public class RubberBandBehavior : Behavior<ListBox>
{
        protected override void OnAttached()
        {
            AssociatedObject.Loaded += new System.Windows.RoutedEventHandler(AssociatedObject_Loaded);
            base.OnAttached();
        }
        void AssociatedObject_Loaded(object sender, System.Windows.RoutedEventArgs e)
        {
            RubberBandAdorner band = new RubberBandAdorner(AssociatedObject);
            AdornerLayer adornerLayer = AdornerLayer.GetAdornerLayer(AssociatedObject);
            adornerLayer.Add(band);
        }
        protected override void OnDetaching()
        {
            AssociatedObject.Loaded -= new System.Windows.RoutedEventHandler(AssociatedObject_Loaded);
            base.OnDetaching();
        }
}
Creating Rubberband Adorner
Create a Rubberband adorner by inheriting from Adorner class. Adorners are a special type of FrameworkElement, used to provide visual cues to a user. Among other uses, Adorners can be used to add functional handles to elements or provide state information about a control.
Adorners are rendered in an AdornerLayer, which is a rendering surface that is always on top of the adorned element or a collection of adorned elements. Rendering of an adorner is independent from rendering of the UIElement that the adorner is bound to. An adorner is typically positioned relative to the element to which it is bound, using the standard 2-D coordinate origin located at the upper-left of the adorned element.
public RubberBandAdorner(UIElement adornedElement)
:base(adornedElement)
{
}
To bind an adorner to a particular UIElement, follow these steps:
1. Call the static method GetAdornerLayer to get an AdornerLayer object for the UIElement to be adorned. GetAdornerLayer walks up the visual tree, starting at the specified UIElement, and returns the first adorner layer it finds. (If no adorner layers are found, the method returns null.)
2. Call the Add method to bind the adorner to the target UIElement.
RubberBandAdorner band = new RubberBandAdorner(AssociatedObject);
AdornerLayer adornerLayer = AdornerLayer.GetAdornerLayer(AssociatedObject);
adornerLayer.Add(band);
Subscribe the Mouse Down and Mouse Move events and get the start point and current point. Use the OnRender override to render the visual.
protected override void OnRender(DrawingContext drawingContext)
{
     Rect rect = new Rect(startpoint, currentpoint);
     drawingContext.DrawGeometry(brush, new Pen(SystemColors.HighlightBrush, 1), new RectangleGeometry(rect));
     base.OnRender(drawingContext);
}
The base idea is while moving the mouse, calculate the current position of mouse and draw the Rubberband adorner over the ListBox. OnRender override method can be invoked manually by using InvalidateVisual(). On every mouse move determine the listbox items within the rubberband rect and make it selected.
foreach (var obj in _selector.Items)
{
   ListBoxItem item = _selector.ItemContainerGenerator.ContainerFromItem(obj) as ListBoxItem;
   if (item != null)
   {
       Point point = item.TransformToAncestor(AdornedElement).Transform(new Point(0, 0));
       Rect bandrect = new Rect(startpoint, currentpoint);
       Rect elementrect = new Rect(point.X, point.Y, item.ActualWidth, item.ActualHeight);
       if (bandrect.IntersectsWith(elementrect))
       {
             item.IsSelected = true;
       }
       else
       {
             item.IsSelected = false;
       }
   }
}
Add custom behavior in Expression Blend
Copy the RubberBand.dll in the following location,
C:\Program Files (x86)\Microsoft SDKs\Expression\Blend\.NETFramework\v4.0\Libraries

1. Open the Expression Blend.
2. Create a new WPF project.
3. Open the Assets -> Behaviors panel. You will find the RubberBandBehavior in the list.

4. Drag and drop the behavior into the Listbox object in the designer. Make sure you set the Selection mode of Listbox to Multiple or Extended.