
AdMob & iAd advertisment system
5.00/5 (3 votes)
This article shows how the use advertisment system on iOS and Android platform using cross platfrom development tool
Introduction
This article provides basic information about advertisement systems. To make our work most effective, we use a Moscrif SDK. Moscrif SDK allows creating application for about 90% of currently used devices with only one code. More information about Moscrif SDK is available on its homepage: www.moscrif.com
Advertisement systems
Many developers decide to make their applications available for free and earn money from the advertisements. However, paying attention for users of every single platform may be too difficult and time consuming. Therefore, advertisement systems were developed to simplify this task. Currently, Moscrif supports two systems: AdMob and iAd.
AdMob
AdMob is a mobile advertisement system provided by Google. It is used by many well known brands like Ford, Coca-Cola, EA, P&G, Land Rover, MTV Europe, Adidas, AccuWeather and many others. For mobile developers the AdMob is an easy way how to make revenue from free to download applications. Moscrif supports AdMob for both Android and iOS platform.
Registration
To start using the AdMob system developer has to register on the official website: http://www.google.com/ads/admob/ . An existing Google account can be used to sign in. Once signed in, some additional information like name, surname, address and account type have to be filled. The account type can be either Advertiser, Publisher or both Advertiser & Publisher. The advertiser is a person who creates the advertisement and let Publisher show it in their applications.
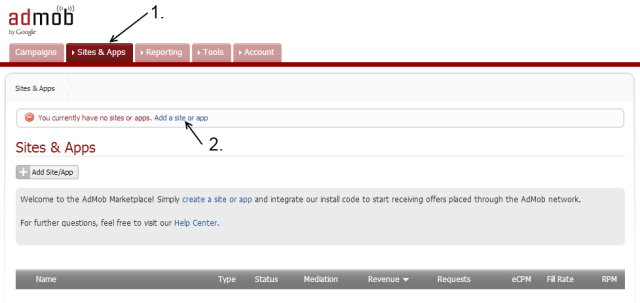
Afterwards, select Sites & Apps tap and click onto Add site or app.
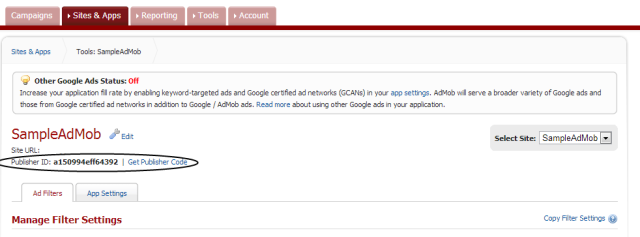
Select the platform on which the application runs and fill its name and category. Then open the list of all application again, move cursor over the required application and click to the Manage Settings button.

It opens window, where is a Publisher ID, which is needed to create a banner.
iAd
iAd is an advertisement system available only for iOS. It allows to embed an advertisement into iPhone or iPad application. Same as AdMob, also iAd is used by many well known brands like BMW, Evian, Nissan, Geico or Renault. With the aid of iAd hundreds of developers are making more than $15,000 per quarter. Before the iAd system can be used it is needed to allow it on iTunes connect.
Implementation
Both iAd and AdMob are managed by AdBanner class. In order to use the AdBanner class it is needed to add it to the project in Project properties window. Open a Project properties window, select application tap, clicks onto Manage Libs and tick ads library.
The banner can be customized by many properties. The type of banner can be changed by provider property. This property supports 4 symbols:
- #auto - automatically detects the best provider (iAd for iOS, AdMob for Android, otherwise simlulates banner ads)
- #AdMob - use AdMob (on both, iOS and Android)
- #iAd - use iAd (iOS only)
- #simulate - just simulate banner (use for testing in emulator)
The size of banner can be customized with the size property. If you use iAd system the size is set automatically. For AdMob you can select one size from:
| #default | 320x50 |
| #full | 300x250 |
| #leaderboard | 728x90 |
| #skyscraper | 120x600 |
| #smartPortrait | 90x50 |
| #smartLandscape | 90x32 |
When you are testing your application you should also set testing property to true so the testing clicks are not tracked.
When a banner is created it can be showed by calling the show method. The position of the banner is also set in this method.
Example: create a banner
var banner = new AdBanner({
    provider:#auto,
    adId:"XXXXXXXXXXXXXXX",
    size:#smartPortrait,
    testing:true
});
banner.show(0, 10);
Before you the project is published it is needed to add web permissions for Android version. Open a Project properties window, then select tap with settings for android and open a dialog window with permissions. Then add following three permissions:
Example: needed permissions
<uses-permission android:name="android.permission.INTERNET" />
<uses-permission android:name="android.permission.READ_PHONE_STATE" />
<uses-permission android:name="android.permission.ACCESS_NETWORK_STATE" />
Now application is ready to be published and run on the device.
Note: Keep on mind that it takes some time to download the banner from the internet and show it.