
Behavior Pattern - Visual Behaviors in WPF and Avalonia with Practical Samples
4.97/5 (9 votes)
Here I describe the behaviors - functionality that allows modifying and augmenting an object's behavior non-invasively - without modifying the object's code.
Introduction to Behaviors
Note that both the article and the samples code have been updated to work with latest version of Avalonia - 11.0.6
What is Behavior Pattern?
There is a very interesting pattern called Behavior widely used primarily for visual programming (WPF and Avalonia), though it can very well be used for completely non-visual code also.
Historically, AFAIK, the term 'Behavior' was introduced by MS Blend SDK where they used behaviors for implementing custom objects that trigger a change in a visual class'es behavior once attached to it.
In general Behavior is something attaches to an object to modify or augment the object's behavior non-invasively - without modifying the object's class itself:

The C# behaviors are usually implemented by reacting to the object's events (in WPF and Avalonia they can also be reacting to Dependency or Attached property changes). Some simpler behaviors would change the state of the object only at the moment when they are attached to or detached from the object - such behaviors do not even need the object to have any events.
In WPF and Avalonia, visual behaviors are most commonly used to produce some visual change when an event happens somewhere within the XAML Visual or Logical tree.
Behaviors and MVVM
The Behaviors are especially useful when MVVM (Model-View-View Model) pattern is employed, since the proper usage of the pattern implies defining the Views via DataTemplates bound to some non-visual view models (without any code-behind). On the one hand, it is important NOT to have the code-behind since it is often used for nefarious mixing of visual and non-visual concerns and tightly couples XAML representation with C# code. On the other hand you still might need to use C# for some complex modifications of the visual objects involving two or more properties. The best way to achieve it without the code-behind is via the Behaviors.
Note that some of the communications between the visual objects might be done via the View Models themselves, e.g. a ToggleButton's IsChecked property can be two-way bound to a property defined on a View Model whose change will trigger some other changes which will be reflected by other visual properties. This is fine and is perfectly legitimate, yet there are some cases, when such communication via the view model is not desirable or impossible. For example
- If the change is purely visual and local (does not influence anything outside of a small logical area around where the change took place and especially if it does not involve any business logic) it is better not to polute your View Model with unnecessary extra code.
- If we need to change some visuals based on some Routed Event (not Button.Click or MenuItem.Click event - for which we can use the Commands) then we are forced to use a behavior or code behind.
Prerequisites and Other Approaches
In order to get the most out of this article you need to understand some basic WPF/Avalonia concepts including XAML, Visual and Logical trees, Routed Event propagation, Attached Properties and Bindings.
For those who are new to Avalonia - it is an open source UI development framework very similar but more powerful than WPF and what is very important - it is also Multiplatform - UI desktop applications built using Avalonia will run on Windows, Linux and Mac computers. Avalonia also close to releasing a version that works in browsers via WASM technology.
If you are a beginner in Avalonia or WPF, you can start with the following articles:
- Multiplatform UI Coding with AvaloniaUI in Easy Samples. Part 1 - AvaloniaUI Building Blocks
- Basics of XAML in Easy Samples for Multiplatform Avalonia .NET Framework
- Multiplatform Avalonia .NET Framework Programming Basic Concepts in Easy Samples
- Avalonia .NET Framework Programming Advanced Concepts in Easy Samples
When it comes to behaviors, the interesting question of how to keep the behavior object attached to the object that it modifies or augments. As will be seen from the samples below, some behaviors can be implemented as static classes and 'attached' to a visual object when a certain attached property within that behavior gets a certain value on the object. This is my preferred way of creating behaviors.
Other behaviors e.g. those of Avalonia Behaviors are non-static objects which use some special Attached Properties to attach a behavior. Those behaviors are Avalonia re-implementations of UWP behaviors which in turn were inspired by the original MS Blend behaviors.
In order to understand how to install Avalonia Visual Studio extensions and how to create Avalonia projects, please, take a look at Creating and Running a Simple Avalonia Project using Visual Studio 2019
About this Article's Content
Behaviors, unfortunately are not very simple software objects, and from my point of view, in order to understand the behaviors you need to see how they work. Because of that, this article describes creating several simple custom Behaviors.
As a follow up, I plan another article that will explain some very useful behavior from NP.Avalonia.Visuals package.
It is essential that you read the article and run the samples. It will be even better if you try to create similar sample projects with custom behaviors.
I'll start with one small sample of a WPF behavior and then will concentrate on Avalonia which is a better, bigger and multiplatform version of WPF.
Samples
Code Location
All the code, including a single WPF example is located under NP.Avalonia.Demos/CustomBehaviors
I was using .NET 5.0 and VS2019 for writing this code, even though one should be able to easily port is up or down.
WPF Behavior for Calling a Method when a Routed Event Occurs on a Visual Element.
The code for the sample can be found under NP.Demos.WPFCallActionBehaviorSample.
Open, compile and run the solution in your Visual Studio. Here is the MainWindow of the sample:

If you move the mouse over the yellow square on the left, the Window's background will turn red. If you move the mouse over the pink square on the right, a small dialog window pops up containing text "I am a happy dialog!".

Now, let us look at the implementation of this functionality.
The methods that switch the window's background to red and open the popup are defined within MainWindow.xaml.cs file they are void MakeWindowBackgroundRed() and void OpenDialog() methods:
public partial class MainWindow : Window
{
    public MainWindow()
    {
        InitializeComponent();
    }

    // Turns window background red
    public void MakeWindowBackgroundRed()
    {
        Background = new SolidColorBrush(Colors.Red);
    }

    // opens a dialog
    public void OpenDialog()
    {
        Window dialogWindow =
            new Window()
            {
                Left = this.Left + 50,
                Top = this.Top + 50,
                Owner = this,
                Width = 200,
                Height = 200
            };

        dialogWindow.Content = new TextBlock
        {
            HorizontalAlignment = HorizontalAlignment.Center,
            VerticalAlignment = VerticalAlignment.Center,
            Text = "I am a happy dialog!"
        };

        dialogWindow.ShowDialog();
    }
}
MakeWindowBackgroundRed() method is called when the MouseEnter routed event occurs on the yellow square and OpenDialog() is called when the same event occurs on the pink square.
Now take a look at the XAML file - MainWindow.xaml.
<Window ...
        xmlns:local="clr-namespace:NP.Demos.WPFCallActionBehaviorSample"
        ...
        Width="400"
        Height="300">
    <Grid>
        <Grid.ColumnDefinitions>
            <ColumnDefinition />
            <ColumnDefinition />
        </Grid.ColumnDefinitions>
        <Border Background="Yellow"
                HorizontalAlignment="Center"
                VerticalAlignment="Center"
                local:CallActionOnEventBehavior.TheEvent="{x:Static UIElement.MouseEnterEvent}"
                local:CallActionOnEventBehavior.TargetObject="{Binding RelativeSource={RelativeSource AncestorType=Window}}"
                local:CallActionOnEventBehavior.MethodToCall="MakeWindowBackgroundRed"
                Width="50"
                Height="50"/>

        <Border Background="Pink"
                Grid.Column="1"
                HorizontalAlignment="Center"
                VerticalAlignment="Center"
                local:CallActionOnEventBehavior.TheEvent="{x:Static UIElement.MouseEnterEvent}"
                local:CallActionOnEventBehavior.TargetObject="{Binding RelativeSource={RelativeSource AncestorType=Window}}"
                local:CallActionOnEventBehavior.MethodToCall="OpenDialog"
                Width="50"
                Height="50" />
    </Grid>
</Window>
Note that we define the xmlns:local XML namespace to point to the namespace of our project - NP.Demos.WPFCallActionBehaviorSample.
The two squares - yellow and pink are defined as two borders 50x50. Here is how we make the routed event's MouseEnter occurance on the yellow square to call method MakeWindowBackgroundRed() on the MainWindow object:
local:CallActionOnEventBehavior.TheEvent="{x:Static UIElement.MouseEnterEvent}"
local:CallActionOnEventBehavior.TargetObject="{Binding RelativeSource={RelativeSource AncestorType=local:MainWindow}}"
local:CallActionOnEventBehavior.MethodToCall="MakeWindowBackgroundRed"
All 3 properties set in the 3 lines above are static attached properties defined in the static class CallActionOnEventBehavior local to the project. This class will be explained below shortly.
For now let us take a look at the properties set in those 3 lines above:
local:CallActionOnEventBehavior.TheEvent="{x:Static UIElement.MouseEnterEvent}"sets the behavior's attached property on our border object to the staticUIElement.MouseEnterEventrouted eventMouseEnterEventdefined withinUIElementclass. (The routed events, just like attached properties, have a static field that defines them).local:CallActionOnEventBehavior.TargetObject="{Binding RelativeSource={RelativeSource AncestorType=local:MainWindow}}"- we bind the attachedCallActionOnEventBehavior.TargetObjectproperty on our border object to theMainWindowup the visual tree. Note that since we are using the attached properties, we can have them as the targets of a binding.local:CallActionOnEventBehavior.MethodToCall="MakeWindowBackgroundRed"finally we set the method name to "MakeWindowBackgroundRed" method.
The pink square defines its its behavior in a similar fashion, only the method name there is "OpenDialog".
Let us switch our attention to the static class CallActionOnEventBehavior that implements the behavior. It defines 3 attached properties (same properties that we set in our XAML file):
TheEventof typeRoutedEvent- specifies the routed event for which the visual should call a method.TargetObjectof typeobject- specifies the object on which to call the method.MethodToCallof typestring- specifies the name of the method to call.
TheEvent attached property defines a callback OnEventChanged to be fired when the property changes:
 public static readonly DependencyProperty TheEventProperty =
    DependencyProperty.RegisterAttached
    (
        "TheEvent",
        typeof(RoutedEvent),
        typeof(CallActionOnEventBehavior),
        new PropertyMetadata(default(RoutedEvent), OnEventChanged /* callback */)
    );
Within that callback, we connect the new event on the visual to the handler HandleRoutedEvent(...) (also disconnect the old routed event if it is non-null from the same handler):
private static void OnEventChanged(DependencyObject d, DependencyPropertyChangedEventArgs e)
{
    // we can only set the behavior on FrameworkElement - almost any visual element
    FrameworkElement el = (FrameworkElement)d;

    RoutedEvent oldRoutedEvent = e.OldValue as RoutedEvent;

    if (oldRoutedEvent != null)
    {
        // remove old event handler from the object (if exists)
        el.RemoveHandler(oldRoutedEvent, (RoutedEventHandler)HandleRoutedEvent);
    }

    RoutedEvent newRoutedEvent = e.NewValue as RoutedEvent;

    if (newRoutedEvent != null)
    {
        // add new event handler to the object
        el.AddHandler(newRoutedEvent, (RoutedEventHandler) HandleRoutedEvent);
    }
}
#endregion TheEvent attached Property
The implementation of void HandleRoutedEvent(...) method gets the TargetObject and MethodToCall values and uses reflection to call MethodToCall method on the TargetObject:
// handle the routed event when happens on the object
// by calling the method of name 'methodName' onf the
// TargetObject
private static void HandleRoutedEvent(object sender, RoutedEventArgs e)
{
    FrameworkElement el = (FrameworkElement)sender;

    // if TargetObject is not set, use DataContext as the target object
    object targetObject = GetTargetObject(el) ?? el.DataContext;

    string methodName = GetMethodToCall(el);

    // do not do anything
    if (targetObject == null || methodName == null)
    {
        return;
    }

    MethodInfo methodInfo =
        targetObject.GetType().GetMethod(methodName);

    if (methodInfo == null)
    {
        return;
    }

    // call the method using reflection
    methodInfo.Invoke(targetObject, null);
}
Of course, there are many things that are not implemented in this simple behavior, for example it is assumed that there is only one method of "MethodToCall" name exists on the TargetObject and that this method has no arguments. The actual CallAction behavior from NP.Avalonia.Visuals open source project is much better rounded up and much more powerful. However, our CallActionOnEventBehavior is quite sufficient for understanding how the static behaviors work.
Avalonia Behavior for Calling a Method when a Routed Event Occurs on a Visual Element
NP.Demos.CallActionBehaviorSample contains a project very similar to the one discussed above, that uses Avalonia instead of WPF.
Run the project, the sample application should be exactly the same.
The differences from the WPF project (aside from some Avalonia types being named differently from the corresponding WPF types) are very small.
The main difference is in how we set the callback on TheEvent attached property change. In WPF, we pass the callback as one of the parameters to the metadata passed to the attached property definition: new PropertyMetadata(default(RoutedEvent), OnEventChanged /* callback */).
In Avalonia, we are using the using the Reactive Extensions (Rx) to subscribe to the changes on the property within the static constructor of the CallActionOnEventBehavior class:
public class CallActionOnEventBehavior
{
   ...
   static CallActionOnEventBehavior()
   {
      TheEventProperty.Changed.Subscribe(OnEventChanged);
   }
   ...
}
Using Two Instances of Behavior on a Visual Element
One problem with static behaviors is that you cannot use several instances of them on the same visual element. For example using CallActionOnEventBehavior we could call MakeWindowBackgroundRed() method on PointerEnter event but we cannot call a different method on a different event e.g. method RestoreBackground() on PointerLeave event.
In general, in my experience, such requirements of having behaviors of the same type attached to the same element, is very rare and when it is needed, there is a trick that allows to achieve just that.
Example of imitating calling CallActionOnEventBehavior twice on the same element is given by NP.Demos.DoubleCallActionBehaviorSample behavior.
The changes in comparison to the previous sample are only in MainWindow.axaml.cs and MainWindow.axaml file.
MainWindow class now has an extra method RestoreBackground() which restores the Window's background to what it was before it changed to red:
private IBrush? _oldBackground = null;
// Turns window background red
public void MakeWindowBackgroundRed()
{
    _oldBackground = Background;
    Background = new SolidColorBrush(Colors.Red);
}

public void RestoreBackground()
{
    Background = _oldBackground;
}
In MainWindow.axaml file, the yellow Border mouse over which turns the window red, is now made to be a child of a transparent Grid panel. The Grid panel is there only to call the behavior for second PointerLeave event (which bubbles up from the Border to the Grid):
<Grid local:CallActionOnEventBehavior.TheEvent="{x:Static InputElement.PointerLeaveEvent}"
      local:CallActionOnEventBehavior.TargetObject="{Binding RelativeSource={RelativeSource AncestorType=local:MainWindow}}"
      local:CallActionOnEventBehavior.MethodToCall="RestoreBackground"
      HorizontalAlignment="Center"
      VerticalAlignment="Center"
      Width="50"
      Height="50">
    <Border Background="Yellow"
            local:CallActionOnEventBehavior.TheEvent="{x:Static InputElement.PointerEnterEvent}"
            local:CallActionOnEventBehavior.TargetObject="{Binding RelativeSource={RelativeSource AncestorType=local:MainWindow}}"
            local:CallActionOnEventBehavior.MethodToCall="MakeWindowBackgroundRed"
            HorizontalAlignment="Stretch"
            VerticalAlignment="Stretch"/>
</Grid>
The resulting sample behavior is exactly what we want it to be - the Window turns red when the mouse enters the yellow square and then back to white when it leaves.
Drag Behavior Sample
Previous three samples were all built around the same behavior that handles some routed events and calls a method. In this sample we are going to demonstrate a more involved behavior that allows dragging controls within a window.
The Drag sample code is located under NP.Demos.DragBehaviorSample project.
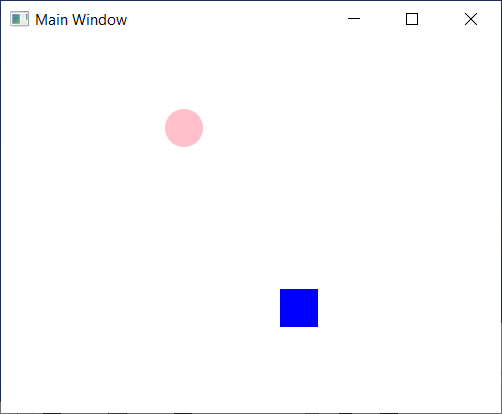
Open, compile and run the project - you will see a pink circle and a blue square in the middle of the left and right vertical halfs of the window. You can move them by pressing the left mouse button on them and dragging them to wherever you want within the window:
The non-trivial code is located within DragBehavior.cs and MainWindow.axaml files.
MainWindow.axaml is very simple - the window contains a grid with two columns. There is a pink ellipse in the left column and a blue rectangle in the right column:
<Window ...
        xmlns:local="clr-namespace:NP.Demos.DragBehaviorSample"
        ...>
    <Grid ColumnDefinitions="*, *">
        <Ellipse Width="30"
                 Height="30"
                 Fill="Pink"
                 HorizontalAlignment="Center"
                 VerticalAlignment="Center"
                 local:DragBehavior.IsSet="True"/>

        <Rectangle Width="30"
                   Height="30"
                   Fill="Blue"
                   Grid.Column="1"
                   HorizontalAlignment="Center"
                   VerticalAlignment="Center"
                   local:DragBehavior.IsSet="True"/>
    </Grid>
</Window>
The most interesting lines within the file are the lines which set the behavior on the ellipse and the rectangle by setting the attached property local:DragBehavior.IsSet to true on them.
Take a look at DragBehavior.cs file. It contains three attached properties:
bool IsSet- once set to true on a control - the control becomes draggable.Point InitialPointerLocation- set to the pointer location within the Window in the beginning of the drag operation.Point InitialDragShift- set to the shift of the control (with respect to the original position) when the Drag operation begins.
The callback to IsSet attached property sets the handler to PointerPressed event and assigns the RenderTransform on the control to be TranslateTransform (which shifts the control) when the property is set to true. If the property is set to false, the opposite happens - the PointerPressed handler is removed and the RenderTransform becomes null:
static DragBehavior()
{
    IsSetProperty.Changed.Subscribe(OnIsSetChanged);
}

// set the PointerPressed handler when
private static void OnIsSetChanged(AvaloniaPropertyChangedEventArgs<bool> args)
{
    IControl control = (IControl) args.Sender;

    if (args.NewValue.Value == true)
    {
        // connect the pointer pressed event handler
        control.RenderTransform = new TranslateTransform();
        control.PointerPressed += Control_PointerPressed;
    }
    else
    {
        // disconnect the pointer pressed event handler
        control.RenderTransform = null;
        control.PointerPressed -= Control_PointerPressed;
    }
}
Take a look at Control_PointerPressed(...) handler - it fires when the Drag operation starts:
// start drag by pressing the point on draggable control
private static void Control_PointerPressed(object? sender, PointerPressedEventArgs e)
{
    IControl control = (IControl)sender!;

    // capture the pointer on the control
    // meaning - the mouse pointer will be producing the
    // pointer events on the control
    // even if it is not directly above the control
    e.Pointer.Capture(control);

    // calculate the drag-initial pointer position within the window
    Point currentPointerPositionInWindow = GetCurrentPointerPositionInWindow(control, e);

    // record the drag-initial pointer position within the window
    SetInitialPointerLocation(control, currentPointerPositionInWindow);

    Point startControlPosition = GetShift(control);

    // record the drag-initial shift of the control
    SetInitialDragShift(control, startControlPosition);

    // add handler to do the shift and
    // other processing on PointerMoved
    // and PointerReleased events.
    control.PointerMoved += Control_PointerMoved;
    control.PointerReleased += Control_PointerReleased;
}
We capture the mouse within the control, get the initial values for the pointer location and the initial shift of the control and record those values within InitialPointerLocation and InitialDragShift attached properties - correspondingly. We also set the handlers for PointerMoved and PointerReleased events on the control - these handlers will be released when the drag operation ends:
Here is what we do on PointerMoved event:
// update the shift when pointer is moved
private static void Control_PointerMoved(object? sender, PointerEventArgs e)
{
    IControl control = (IControl)sender!;
    // Shift control to the current position
    ShiftControl(control, e);
}
Essentially we only call method ShiftControl:
// modifies the shift on the control during the drag
// this essentially moves the control
private static void ShiftControl(IControl control, PointerEventArgs e)
{
    // get the current pointer location
    Point currentPointerPosition = GetCurrentPointerPositionInWindow(control, e);

    // get the pointer location when Drag operation was started
    Point startPointerPosition = GetInitialPointerLocation(control);

    // diff is how far the pointer shifted
    Point diff = currentPointerPosition - startPointerPosition;

    // get the original shift when the drag operation started
    Point startControlPosition = GetInitialDragShift(control);

    // get the resulting shift as the sum of
    // pointer shift during the drag and the original shift
    Point shift = diff + startControlPosition;

    // set the shift on the control
    SetShift(control, shift);
}
This method gets the current position of the pointer, gets the difference between it and the position of the pointer in the beginning of the drag operation and adds this difference with the controls shift at the start of the drag operation to get the required current shift of the control.
Control_PointerReleased handler releases the capture, and removes the PointerMoved and PointerReleased handlers on top of shifting the control to the final position of the drag operation:
// Drag operation ends when the pointer is released.
private static void Control_PointerReleased(object? sender, PointerReleasedEventArgs e)
{
    IControl control = (IControl)sender!;

    // release the capture
    e.Pointer.Capture(null);

    ShiftControl(control, e);

    // disconnect the handlers
    control.PointerMoved -= Control_PointerMoved;
    control.PointerReleased -= Control_PointerReleased;
}
Conclusion
This article describes very useful pattern of Behaviors - functionality that allows to modify the behavior of an object non-invasively - without modifying the code of the object's class. Behaviors can use observables (including the events) to detect the changes and modify the properties of an object based on those changes.